
Operating instructions


Page 3
P/N XG0675
Gas Conversion Kit
Gas Conversion Instructions
Conversion
CAUTION - Before you begin:
1. Shut off gas at the shut-off valve and disconnect the electrical
supply (if used).
2. Remove the glass door as shown in the installation instructions
and remove the logs. Flip down or remove the lower trims.
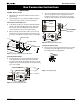
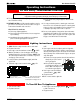
Install or Remove the Air Inlet Screw:
3. Locate the two air inlet holes on the burner tube underneath the
right side of the burner tray. On Propane models, both air inlet
holes must be open, and on Natural Gas models the air inlet
screw, provided in the conversion kit, must be installed.
4. When converting to the desired fuel, install or remove the sup-
plied air inlet screw using a 3/16 allen key. The air inlet screw is
accessable on the right side of the burner tray as shown in figure
1.
Figure 1. Installing or Removing the Air Inlet Screw.
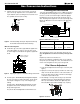
Converting the Burner Orifice:
6. Disconnect the valve from its valve bracket by removing the 4
screws that hold the valve in place, and disconnect the valve
asssembly from the pan base by spinning off the union as shown
in figure 2a. The valve assembly will drop out of the way, allowing
access to the coupling.
Figure 3. The Pilot Assembly.
Converting the Pilot Assembly:
8. Remove pilot hood/ orifice cap by pulling it off the pilot assembly.
The cap will snap off with slight pressure; the orifice must be
removed with an allen key. (See Figure 4)
Figure 2a. Converting the Burner Orifice.
Air Inlet Holes
Burner Tube
Air Inlet Screw
Spin off union here
Valve Bracket
Burner
Orifice
Coupling
Valve Assembly
drops down
Figure 2b. Converting the Burner Orifice.
7. Unscrew the coupling assembly from the pan base. The burner
orifice is located at the top end of coupling. Unscrew it and
install the new orifice from the conversion kit to convert to the
new gas, as shown in figure 2b. Re-install all of the gas fittings.