www.montigo.com Installation Operation & Maintenance Manual Check local codes and read all instructions prior to installation. H38DF-PRC Gas Fireplace H38DF-PRC HL38DF-PRC HS38DF-PRC HLS38DF-PRC Warning: If the information in these instructions is not followed exactly, a fire or explosion may result causing property damage, personal injury or death.
H(L)38DF-PRC Indoor Panorama Gas Fireplace Warning: Read this manual before installing, operating or troubleshooting this appliance. Please retain this owner's manual for future reference. Table of Contents Safety Alert Key Introduction................................................................................ 3 ▪ Section 3-3-3: Heat Shields....................................... 14 Models............................................................................
H(L)38DF-PRC Indoor Panorama Gas Fireplace Introduction Safety Alert Key: • WARNING! Indicates a hazardous situation which, if not avoided could result in death or serious injury. • CAUTION! Indicates a hazardous situation which, if not avoided, could result in minor or moderate injury. • NOTICE: Used to address practices not related to personal injury. • Important: Used to address practices not related to personal injury. INTRODUCTION Congratulations on your purchase of a Montigo Fireplace.
H(L)38DF-PRC Indoor Panorama Gas Fireplace Installation IMPORTANT MESSAGE: SAVE THESE INSTRUCTIONS The H*38PR* Direct Vent fireplace must be installed in accordance with these Instructions. Carefully read all the Instructions in this manual first. Consult the Local Gas Branch to determine the need for a permit prior to starting the installation. It is the responsibility of the installer to ensure this fireplace is installed in compliance with the manufacturers instructions and all applicable codes.
H(L)38DF-PRC Indoor Panorama Gas Fireplace Installation Section 1: Installation Overview and Product Dimensions Please review the Pre-Installation Checklist on Page 4 for general information on preparing for a successful installation of your fireplace. The H*38PR* fireplace may be installed in any location that maintains proper clearances to air conditioning ducts, electrical wiring and plumbing. Safety, as well as efficiency of operation, should be considered when selecting the fireplace location.
H(L)38DF-PRC Indoor Panorama Gas Fireplace Installation Section 2: Framing 1). Frame in the enclosure for the unit with framing materials. The framed opening for the assembled fireplace is 40 7/8" wide, x 44" high x 24 5/8" deep, see Figure 2. NOTE: When constructing the framed opening, please ensure there is access to install the gas line when the unit is installed. See Figure 22.
H(L)38DF-PRC Indoor Panorama Gas Fireplace Installation Section 3: Venting Montigo supplies a variety of direct venting and termination options. The direct vent termination location MUST be selected such that it is the highest point in the venting assembly. It should also be selected such that it provides the shortest vent run possible.
H(L)38DF-PRC Indoor Panorama Gas Fireplace Installation Section 3-2: INSTALLING A ROOF MOUNTED DIRECT VENT TERMINATION (PVTK-1) This section applies to installations where the direct vent termination will be roof mounted. PVTK1 Termination 2’ min. Section 3-2-1: VENTING LAYOUT SuQQort ring Selection of components and details of venting lay out should adhere to the following guidelines: 32’ max.
H(L)38DF-PRC Indoor Panorama Gas Fireplace Installation Section 3-2-2: VENTING COMPONENTS Select from the following components and associated Montigo part numbers for installation of a Roof Mounted Termination. Use only Montigo Vent Components. Use of non-Montigo parts will void the warranty and may impede operation of the fireplace.
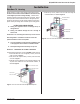
H(L)38DF-PRC Indoor Panorama Gas Fireplace Installation Section 3-3: INSTALLING A WALL MOUNTED DIRECT VENT TERMINATION This section applies to installations where the direct vent termination will be wall mounted. 4). Installation of termination from inside structure A Termination with a MOSR Frame is installed from the inside of the structure. These are commonly used in high-rise construction. Framing, concrete or other materials 12” MOSR Frame 1).
H(L)38DF-PRC Indoor Panorama Gas Fireplace Installation Section 3-3-1: VENTING LAYOUT Selection of components and details of venting layout should adhere to the following guidelines: A C Vent terminations must not be recessed in walls or siding. All through-the–wall terminations within 3’ of the fireplace must have a Montigo Heat Shield (RHS101) installed. See Section 3-3-3. B 46” All through-the-wall terminations beyond 3' of the fireplace must have a Montigo Heat Shield (RHS8) installed.
H(L)38DF-PRC Indoor Panorama Gas Fireplace Installation NOTE: 12” MAX. horizontal run with no vertical lift. Notes Wall Mounted Terminations: Rear Vent All dimension lengths for vertical or horizontal runs are measured from center of the vent pipe. Venting runs must fall within the limits set by the venting graphs, see Figure 16. PXT Extension RHS101 Heat Shield Fireplace must be converted to Rear Vent configuration prior to running vent, see Figure 7 and 8.
H(L)38DF-PRC Indoor Panorama Gas Fireplace Installation Section 3-3-2: VENTING COMPONENTS The following components and associated Montigo part numbers are available for installation of a Wall Mounted Termination. Use only Montigo Vent Components. Use of non-Montigo parts will void the warranty and may impede operation of the fireplace.
H(L)38DF-PRC Indoor Panorama Gas Fireplace Installation Section 3-3-3: Heat Shields Installing a Wall Mounted RHS101 Heat shield. Installing a Wall Mounted RHS8 Heat shield The RHS8 Heat shield CANNOT be used when the Termination is WITHIN (36" Min. horizontal and 46" Min. vertical) from the fireplace, or directly off the rear of the fireplace, as shown figure 19a. The RHS101 Heat Shield (Figure 19c and 19d) MUST be used within the noted dimensions.
H(L)38DF-PRC Indoor Panorama Gas Fireplace Section 4: Wiring Installation Honeywell (Q3450) Pilot Assembly Pilot Electrical Harness Connector Honeywell Gas Control (SV9501M) Gas Control Connector Fan Plug ReceQtacle Models Included H38PRNE H38PRLE Junction Box Black White Green 115VAC 24VAC Gnd Screw 40 VA Transformer Wall Switch Figure 20. Wiring with Honeywell gas control and pilot. Models Included H38PRNI H38PRLI HL38PRNI HL38PRLI Figure 21. Wiring for the SIT IPI Wiring Schematic Part No.
H(L)38DF-PRC Indoor Panorama Gas Fireplace Installation Section 5: Installing the Gas line Section 5-1: FUEL CONVERSION Note: Verify that your fireplace is compatible with your available gas type. (Natural Gas or Propane shown by "N" or "L" in your model number If gas type is not compatible, contact your local Montigo representative to purchase a conversion kit. Conversion kits must be installed by a qualified service technician.
H(L)38DF-PRC Indoor Panorama Gas Fireplace Installation Section 6: Finishing Finishing Around the Fireplace Combustible mantels and mouldings may be safely installed over the top and on the front of the fireplace provided that they do not project beyond shaded area shown in Figure 24.
H(L)38DF-PRC Indoor Panorama Gas Fireplace Installation Section 7: Installing & Removing the Door Removing the door: The H*38PR* doors are removed in a few simple steps. Follow these below to remove the Horizontal access panel, unlatch the door buckles and, remove the door. Replace in reverse order. Remove the Horizontal Access Panel: Step 1: Remove the Horizontal Access Panel: Remove the Horizontal cover by placing fingers in both finger holes, then pushng away from you and lifting out.
H(L)38DF-PRC Indoor Panorama Gas Fireplace Installation Section 8: Installing the Log Set Bottom Logs The H*38PR* is supplied with eight (8) fibre logs. The two small bottom logs ("A" ) are mounted on the burner grate by placing them diagonally onto the supplied Log stands. The long Front / Back logs ("B") are placed against the grate as shown in Figure 27c. Note: When placing logs, arrange Logs "B" as not to cover Burner holes.
H(L)38DF-PRC Indoor Panorama Gas Fireplace Installation Installing Firestones in N.G. (Natural Gas) Fireplaces The H*38PR* is supplied with firestones. Remove the Door and trim as shown in the previous Instruction. Follow these instructions to ensure all parts are removed or replaced as required. Once the Trim and glass doors are removed place the firestones randomly across the pan and the burners as described in Figure 28 to 28b. Installing Firestones in L.P.
H(L)38DF-PRC Indoor Panorama Gas Fireplace Operation Installation Section 9: Start-up Sequence with Continuous Pilot For Your Safety - READ BEFORE LIGHTING: with American Flame Electronic Ignition WARNING! If you do not follow these instructions exactly, a fire or explosion may result causing property damage, personal injury or loss of life. A. This appliance has a pilot which must be lighted by hand. When lighting the pilot, follow these instructions exactly. B.
H(L)38DF-PRC Indoor Panorama Gas Fireplace Operation Installation with Honeywell Electronic Ignition For Your Safety - READ BEFORE LIGHTING: with American Flame Electronic Ignition WARNING! If you do not follow these instructions exactly, a fire or explosion may result causing property damage, personal injury or loss of life. A. This appliance is equipped with an ignition system that lights the pilot burner automatically. Do not attempt to light the pilot by hand. B.
H(L)38DF-PRC Indoor Panorama Gas Fireplace Operation Installation Proflame SIT Electronic Ignition For Your Safety - READ BEFORE LIGHTING: with American Flame Electronic Ignition WARNING! If you do not follow these instructions exactly, a fire or explosion may result causing property damage, personal injury or loss of life. A. This appliance is equipped with an ignition system that lights the pilot burner automatically. Do not attempt to light the pilot by hand. B.
H(L)38DF-PRC Indoor Panorama Gas Fireplace Maintenance Lighting Instructions General See pages 21 to 23 Have the fireplace and installation inspected yearly. The inspection must include, but is not limited to, the following: Burner Adjustment The H*38PR* is equipped with an adjustable burner, allowing you to raise or lower the flames. To adjust the flames, locate the black knob marked 'Hi-Lo', in the centre of the gas control valve (See Figure 32). The front burners are not adjustable.
H(L)38DF-PRC Indoor Panorama Gas Fireplace Maintenance Gas Control Valve Power Generator Troubleshooting Pilot Adjustment Screw Wall Switch Inlet Pressure Manifold Pressure Test Connection Figure 33. Sit Nova 820 gas valve. Pilot Burner Adjustment 1. Locate Pilot Adjustment Screw. (See figure 33.) 2. Adjust pilot screw to provide properly sized flame as shown in figure 34). 3. After installing or servicing, leak test with a soap solution with main burner on. Coat pipe and tubing joints, gasket etc.
H(L)38DF-PRC Indoor Panorama Gas Fireplace Appendix A - Termination Locations A = clearance to the termination frame above grade, veranda, porch, deck, or balcony [16 inches (41 cm) minimum] N= B = clearance to door, or sides and top of window, that may be opened [16 inches (41 cm) minimum for appliances ≤100 000 BTU/H (30kW)] P = clearance under veranda, porch, deck, or balcony [16 inches (41 cm) minimum‡ to non-combustibles] [22 inches (56 cm) minimum‡ to combustibles] clearance above paved sidewalk
H(L)38DF-PRC Indoor Panorama Gas Fireplace Appendix B - Warranty The Warranty The Companies warrants the Montigo Gas Appliance to be free from defects in materials and workmanship at the time of manufacture. On the Montigo fireplace, there is a ten-year warranty on the firebox and its components, a five-year warranty on the main burner and pilot burner, and a one-year warranty on the gas control valve, fibre logs and Power Vent Module.
H(L)38DF-PRC Indoor Panorama Gas Fireplace Appendix C - State of Massachusetts Amendment (Gas Fireplace / Equipment sold in the State of Massachusetts) 5.08: Modifications to NFPA-54, Chapter 10 (1) Revise NFPA-54 section 10.5.4.
H(L)38DF-PRC Indoor Panorama Gas Fireplace Notes Part No.
XG0211 - 080510 Canadian Heating Products Inc. Langley, BC V4W 4A1 Montigo Del Ray Corp.