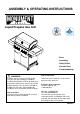
ASSEMBLY & OPERATING INSTRUCTIONS Liquid Propane Gas Grill • Parts • Assembly • Safety Rules • Use and Care • Troubleshooting ! WARNING: Read this Owner’s manual carefully and be sure your gas grill is properly assembled, installed and maintained. Failure to follow these instructions could result in serious injury and/or property damage. This gas grill is intended for outdoor use only and is not intended to be installed in or on recreational vehicles or boats.
Table of Contents Safety Precautions ! WARNING Warranty------------------------------------------------2 Safety Precautions--------------------------------2~4 Hardware List------------------------------------------5 Parts Diagram -----------------------------------------6 Parts List------------------------------------------------7 Assembly Instructions---------------------------8~17 Lighting Instructions----------------------------17~19 Cleaning and Maintenance-------------------20~21 Troubleshooting----
Safety Precautions A tank of approximately 12 inches in diameter by 181/2 inches high is the maximum size LP gas tank to use. You must use an OPD gas tank which offers an Overfill Prevention Device. This safety feature prevents the tank from being overfilled which can cause malfunction of the LP gas tank, regulator and/or grill. • Have your LP gas tank filled by a reputable propane gas dealer and visually inspected and requalified at each filling.
! WARNING A strong gas smell, or the hissing sound of gas indicates a serious problem with your gas grill or the LP gas tank. Failure to immediately follow the steps listed below could result in a fire or explosion that could cause serious bodily injury, death, or property damage. • Shut off gas supply to the gas grill. • Turn the control knobs to OFF position. • Put out any flame with a proper fire extinguisher. • Open Grill Lid. • Get away from the LP gas tank. • Do not try to fix the problem yourself.
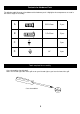
Contents for Hardware Pack The following table illustrates a breakdown of the hardware pack. It highlights what components are used in the various stages of assembly. A 5/32"x12mm 11 pcs B 1/4"x15mm 12 pcs C 2 pcs D 1/4'' 4 pcs Tools required for assembly Cross Screwdriver (not included). Note: The left and right sides of the grill are on your left and right as you face the front of the grill.
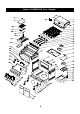
Model K104BSBFD2S Parts Diagram 6
Model K104BSBFD2S Parts List seq. NO. 1 appellation qty Material code appellation qty Material code D010012896 seq. NO.
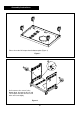
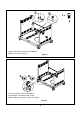
Assembly Instructions Please insert the NO.39 part into the bottom plate (Figure 1) Figure 1 Half screw out the screws in the bottom plate, then put the NO.27 and NO.
4x B Install the NO.30 part onto the relevant place With four B screws (Figure 3) Figure 3 Half screw out the screws in the bottom and side plates, then put the NO.
4x A Install No.
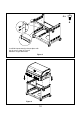
4x B Screw the grill body and the cart tightly with four B screws (Figure 7.1) Figure 7.2 Figure 7.1 2x B 2x D 1.Half screw out the three big screws outside the grill body, then put the NO.25 part onto the relevant screw holes and screw tightly 2.Screw the No.25 part tightly with B screw and D spacer inside the grill body Figure 8.1 Figure 8.
1.Half screw out the screw in the No.23 part, then put it into the hole of No.21 part and screw tightly (Figure 9) 2.Connect the side burner wire to the No.22 part Figure 9 2x B 2x D 1.Half screw out the three big screws on the grill body, then put the NO.65 part onto the relevant screw holes and screw tightly 2.Screw the No.65 part tightly with B screw and D spacer inside the grill body Figure 10.1 Figure 10.2 12 Figure 10.
1.Half screw out the screw in the No.23 part, then put it into the hole of NO.67 part and screw tightly (Figure 11) 2.Connect the sear side burner wire to the sear side burner lighting rod Figure 11 Put the NO.
1x A Fixed the NO.54 part onto the right plate with one A screw Figure 13.1 Figure 13.2 4x A C C 1.Install the NO. 42 parts onto the NO.43 part with A screws (Figure 14.1) 2.Put the C part into the relevant hole in the bottom plate (Figure 14.2) 3.Put No.43 part into the C part (Figure 14.2) 4.Then put the door into by pressing the flexible axis upward Figure 14.1 Figure 14.2 14 Figure 14.
2x A 1.Install the NO.13 part onto the No.15 part with two A screws (Figure15.1) 2.Put the NO. 14 part into the NO.13 part (Figure15.1) 3.Put the grease tray into the grill body (Figure15.2) Figure 15.1 Figure 15.2 Put the No. 6, No. 7 , No. 41 and NO.
Connect the NO. 45 part to the NO. 33 part (Figure17) Figure 17 1.Install the NO. 40 part onto the bottom plate (Figure18.1) 2.Install the NO. 26 part onto the side plate(Figure18.2) Figure 18.1 Figure 18.
Connecting LP Gas Tank to LP Grill 1. Place foot ring of 20 lb tank into the hole in bottom panel. Make sure the tank valve is in OFF position.(Fig.20). 2. Check the tank valve to ensure it has proper external mating threads to fit the hose and regulator assembly provided. 3. Make sure all burner valves are in OFF position. 4. Inspect the valve connection port and regulator assembly. Look for damage or debris. Remove any debris. Inspect hose for damage. Never use damaged or plugged equipment. 5.
Checking for LP gas leaks Never test for leaks with a flame. Prior to first use, at the beginning of each season, or every time your LP gas tank is changed, you must check for gas leaks. 1. Make a 50/50 (soap/water) mild soap solution. 2. Turn the control knobs to full OFF position; then turn gas ON at supply tank. 7. To light additional burners, push and turn burner knob (s) 3. Apply the soap solution with a clean brush to all to IGNITE/HI. At the same time, press and hold gas connections. See below.
! WARNING Never lean over the grill cooking area while lighting your gas grill. Keep your face and body a safe distance (at least 18 inches) from the cooking grid surface when lighting your grill by match. Manually Lighting Your Grill by Match 1. Take the manual lighting stick 2. Insert a match into the lighting stick. 3. Follow steps 1 through 5 of the Basic Lighting Procedure. 4. Light the match and extend the lighting stick to cooking grid surface. 5.
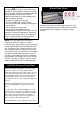
Cleaning and Maintenance Cleaning Exterior Stainless Steel Surfaces To ensure a proper working unit the following proper care and maintenance is suggested. Cleaning Cooking Grids We suggest you wash your cooking grids in a mild soap and warm water solution. You can use a wash cloth or soft brush to clean your cooking grids. Cleaning Heat diffusers Periodically you should wash the heat diffusers in a soap and warm water solution. Use a soft brush to remove stubborn burnt-on cooking residue.
Regardless of which burner cleaning procedure you use, we recommend you also complete the following steps to help prolong burner life. 1. Use a fiber pad or nylon brush to clean the entire outer surface of each burner until free of food residue and dirt. 3. Inspect each burner for damage (cracks or holes) and if such damage is found, order and install a new burner. After installation check to ensure that gas valve orifices are correctly placed inside the ends of the burner tubes.
Cooking Instructions ! WARNING Do not leave the grill unattended. Your grill will get very hot. Never lean over the cooking area while using your grill. Do not touch cooking surfaces, grill housing. Grill Lid or any other grill parts while the grill is in operation, or until the grill has cooled down after use. Failure to comply with these instructions may result in serious bodily injury.
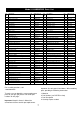
Grill Cooking Chart FOOD Weight or thickness Temperature Time Special instructions and tips Vegetables NA Medium 8 to 20 minutes Slice or chop vegetables and dot with butter or margarine. Wrap tightly in heavy duty foil. Grill turning occassionally. Potatoes Whole Medium 40 to 60 minutes Wrap individually in heavy duty foil. Cook rotating occassionally. 4 to 15 minutes Pre heat grill for 15-20 minutes then sear steaks on each side for two minutes.
INSTRUCCIONES PARA MONTAJE Y FUNCIONAMIENTO Parrilla a gas de propano líquido • Partes • Montaje • Reglas para seguridad • Uso y mantenimiento •Resolución de problemas básicos ! Para el Consumidor: Deje este manual en un lugar conveniente para usar como referencia en el futuro. ADVERTENCIA Lea este Manual del Usuario atentamente y asegúrese de que su parrilla a gas esté correctamente montada, instalada, y mantenida.
Indice Precauciones de seguridad Garantía-------------------------------------------------2 Precauciones de seguridad--------------------2~-4 Lista de herramientas--------------------------------5 Esquema de partes-----------------------------------6 Lista de partes-----------------------------------------7 Instrucciones para montaje--------------------8~17 Instrucciones para prender-------------------17~19 Limpieza y mantenimiento -------------------19~21 Resolución de problemas-------------------------
Precauciones de seguridad • Haga llenar su tanque de gas de PL por un vendedor de gas propano acreditado y haga que éste sea inspeccionado y nuevamente cualificado a cada llenado. • No guarde un tanque de gas LP de repuesto debajo o • cerca de este aparato. • NUNCA llene el cilindro a más del 80% de su capacidad. Si ni se sigue exactamente la información, podría causarse un incendio que lleve a la muerte o a heridas serias. • Mantenga siempre los tanques de gas de PL en posición vertical.
! ADVERTENCIA Inspección de llama de quemadores Un olor fuerte a gas o un sonido siseante de gas indica un grave problema con su parrilla a gas o con su tanque de gas de PL. La no observación de los pasos indicados a continuación puede resultar en un incendio o explosión que podrían causar serios daños personales, la muerte o daños a la propiedad. • Cierre completamente el suministro de gas a la parrilla a gas. • Gire las perillas de control a la posición OFF.
Contenido del Paquete de Herramientas La tabla siguiente presenta una lista detallada del paquete de materiales. Subraya qué componentes son usados en las diversas etapas del ensamblaje. Artículo Descripción Especificación Cantidad A 5/32"x12mm 11 un B 1/4"x15mm 12 un C 2 un D 1/4'' 4 un Herramientas necesarias para el ensamblaje Destornillador tipo Truss (no se incluye).
Modelo K104BSBFD2S Esquema de Partes 6
Lista de partes del modelo Nº K104BSBFD2S seq. NO. 1 appellation qty Tapa principal 1 2 Medidor de temperatura 1 3 4 Tornillo de la tapa principal Poignée du couvercle principal 5 Material code appellation D010012896 seq. NO.
Instrucciones para montar PASO 1 favor de insertar la parte no.39 en el panel del fondo. (figura 1) Ilustr. 1 PASO 2 desatornille a la mitad los tornillos del panel del fondo, y luego ponga las partes no.27 y no.32 en los agujeros que les corresponden, y luego atorníllelos bien (figura 2) Ilustr.
PASO 3 4x B Monte la parte no. 30 en el lugar que le corresponde con cuatro tornillos B (figura 3) Ilustr. 3 PASO 4 desatornille a la mitad los tornillos en el panel del fondo y el panel literal. Luego ponga la parte no.37 en los agujeros que le corresponden y atorníllelos bien. (figura 4) Ilustr.
PASO 5 4x A monte la parte no.29 en el lugar que le corresponde con cuatro tornillos A (figura 5) Aviso: Imán hacia abajo Ilustr. 5 PASO 6 Ilustr.
PASO 7 4x B Atornille bien al armazón y al carrillo con cuatro tornillos B (figura 7.1) Ilustr. 7.1 Ilustr. 7.2 PASO 8 2x B 2x D 1) Desatornille a la mitad los tres tornillos grandes en el armazón, luego ponga la parte no.25 en los agujeros que le corresponden, y atorníllelos bien. Ilustr. 8.1 11 2) Atornille bien la parte no.25 con tornillo B y separador D dentro del armazón Ilustr. 8.
PASO 9 1) Desatornille a la mitad el tornillo en la parte no.23, luego póngalo en el agujero de la parte no.21 y atorníllelo bien (figura 9) 2) Conecte el alambre de la hornilla literal con la barra para prender de la hornilla literal Ilustr. 9 2x B PASO 10 2x D 1) Desatornille a la mitad los tres tornillos grandes en el armazón, luego ponga la parte no.65 en los agujeros que le corresponden y atorníllelo bien. Ilustr. 10.1 Ilustr. 10.2 12 2) Atornille bien la parte no.
PASO 11 1) Desatornille a la mitad el tornillo en la parte no.23, luego póngalo el agujero de la parte no. 67 y atorníllelo bien. 2) Conecte el alambre de la hornilla para abrazar lateral a la barra para prender. Ilustr. 11 PASO 12 Ponga la parte no.64 debajo de la hornilla para abrazar Ilustr.
PASO 13 1x A Fije la parte no.54 con un tornillo A Ilustr. 13.1 Ilustr. 13.2 PASO 14 4x A C C 1) 2) 3) 4) Monte la partes no.42 en la parte no.43 con tornillos A (figura 14.1) Ponga la parte C en el agujero que le corresponde en el panel del fondo (figura 14.2) Ponga la parte no.43 en la parte C (figura 14.2) Luego, monte la puerta por presionar el eje flexible para arriba Ilustr. 14.1 Ilustr. 14.2 14 Ilustr. 14.
PASO 15 2x A 1) Monte la parte no.13 en la parte no.15 con dos tornillos A (figura 15.1) 2) Ponga la parte no.14 adentro de la parte no.13 (figura 15.1) 3) Ponga la bandeja para grasa en el armazón (figura 15.2) Ilustr. 15.1 Ilustr. 15.2 PASO 16 Ponga las partes no.6, no.7 , no.41, y no.8 en los lugares que les corresponden. (figura 16) Ilustr.
PASO 17 Conecte la parte no.45 a la parte no.33 (figura 17) Ilustr. 17 PASO 18 1) Monte la parte no.40 en el panel del fondo (figura 18.1) 2) Monte la parte no.26 con la parte no.25. (figura 18.2) Ilustr. 18.1 Ilustr. 18.
Connección del Tanque de gas de PL a la parrilla de PL 1.coloque el anillo del pie del tanque de 20 lb en el agujero del panel inferior. Asegúrese de que la válvula del tanque esté en posición “OFF”. (Ilustr.20). 2. Inspeccione la válvula del tanque para asegurar que tenga las roscas externas adecuadas para encajar el conjunto suministrado de manguera y regulador. 3. Asegúrese de todas las válvulas de los quemadores estén en posición OFF. 4.
Inspección para fugas de gas de PL No haga nunca esta prueba con una llama. Antes del primer uso, al comienzo de cada temporada, o cada vez que cambie su tanque de gas de PL verifique si existen fugas. 1. Haga una solución suave de jabón/agua al 50/50. 2. Gire las perillas de control a la posición APAGADO, luego gire hasta ENCENDIDO en el tanque de suministro. 3. Aplique la solución jabonosa con un pincel limpio a todas las conexiones de gas. Ver abajo.
! ADVERTENCIA No se incline nunca sobre el área de cocción de la parrilla mientras que la enciende. Mantenga su rostro y su cuerpo a una distancia segura (al menos 18 pulgadas) desde la superficie de la rejilla de cocción cuando encienda con fósforo. Encendido manual de la parrilla con un fósforo 1. Tome la varita de encendido manual 2. Inserte un fósforo en la vara de encendido. 3. Siga los pasos 1 a 5 del Procedimiento Básico de Encendido. 4.
Limpieza y Mantenimiento Para asegurar que la unidad funcione bien, sugerimos la limpieza y mantenimiento. Limpieza de las parrillas de cocinar Sugerimos que lave las rejillas de cocción con un jabón suave en una solución de agua caliente. Use un paño de limpieza o un cepillo suave para limpiar las rejillas de cocción. Limpieza de los difusores de calor Lave periódicamente los moderadores de llama con una solución de jabón y agua caliente.
No importa qué procedimiento de limpieza use para el quemador, le recomendamos que siga todos los pasos siguientes para ayudar a prolongar la vida del quemador. 1. Use un paño de fibra o un cepillo de nylon para limpiar toda la superficie externa de cada quemador hasta que quede sin restos de comida o suciedad. 3. Verifique si hay daños (rajaduras o agujeros) en los quemadores. Si estos existieran, pida e instale uno nuevo.
Instrucciones para Cocinar ! ADVERTENCIA No deje la parrilla sin vigilancia. Su parrilla calienta mucho. No se incline sobre el área de cocción durante el uso de la parrilla. No toque la superficie caliente ni la caja de la parrilla. La cubierta ni ninguna otra parte de la parrilla mientras que la parrilla esté en uso, o hasta que la parrilla se haya enfriado después del uso. El incumplimiento de estas instrucciones puede causar serias lesiones físicas.
Carta para hacer asados ADVERTENCIA: Para garantizar que son seguros para comer, los alimentos deben cocinarse a las temperaturas mínimas interiores que se enumeran en el cuadro siguiente Temperaturas Internas Mínimas para la Seguridad, del USDA* Pescado 145° Cerdo 160° Recetas que contengan huevos 160° F Bistés o asados de res, ternera o cordero 145° F Carne molida de res, ternera o cordero 160° F Aves enteras (pavo, pollo, pato, etc.) 165° F Aves, molida o en pedazos (pechugas, etc.