
Instructions)


Etherwave® Plus Field Upgrade Instructions
The Etherwave Plus Field Upgrade is an advanced project for upgrading a standard Moog Music Etherwave theremin
to the Etherwave Plus. The new features of the Etherwave Plus include:
• Pitch CV Output – The Pitch Antenna can act as a CV (Control Voltage) controller for any external CV compatible
device, such as Moogerfooger® analog effects, the Minimoog Voyager® analog synthesizer, the Little Phatty® analog
synthesizer or the Moog Guitar. The Pitch CV is generated from the pitch of the theremin waveform. Nominal output
is -2.5V to + 4.5V. Zero Volts is output when the theremin produces a pitch one octave below middle C (approx.
131Hz). The Pitch CV output is factory-calibrated to produce a change of 1 Volt per octave change in the theremin’s
pitch.
• Volume CV Output – The Volume Antenna can act as a CV controller for any external CV-compatible device. The
Volume CV output is generated from the same CV signal used internally for the Etherwave’s VCA circuitry. Nominal
output is 0 to +10V.
• Gate Output – The Gate signal can be used as a signal to start envelopes, trigger sample and hold circuits or other
timing related activities.The Gate signal is generated when the Volume CV rises above 0 Volts AND when the ther-
emin audio is greater than 0 Hz. OFF is 0 Volts and +10V is ON.
• Headphone Output with headphone volume control – can be congured with an internal jumper for normal or
“pitch preview” function.
• Power Indicator LED - indicates when the unit is on and ready to play.
This User’s Guide only describes the installation of the upgrade and the use of the added functions of the Etherwave
Plus. For information regarding the operation of the Etherwave Plus’ basic theremin functions, please refer to the Sec-
tions “Setting Up and Playing the Moog Music Etherwave Theremin” in the Etherwave Theremin User’s Manual. The
manual also assumes knowledge of basic theremin functions and terms.
The Upgrade
The upgrade procedure requires the following skills:
• Use of basic hand tools
• Precision drilling of three 1/2” holes with 7/8” counterbores into the wooden cabinet.
• Soldering wire harnesses and panel components to a PCB (Printed Circuit Board).
• Calibration of the Etherwave.
Caution: If you do not have these skills, then we recommend the Etherwave Plus factory upgrade
for your Etherwave.
Tools and materials required for the Upgrade:
• Drill press or hand drill
• 7/8” Forstner drill bit
• 1/2” drill bit
• Center punch for marking location of holes to be
drilled.
• Scotch or masking tape
• Soldering iron appropriate for electronics assembly
• Solder appropriate for electronics assembly
• #2 Phillips screwdriver
• Small athead screwdriver (1/8”)
• 15mm socket
• 11mm nutdriver, socket or wrench for installing pots
• 1/2” nutdriver, socket or wrench for installing jacks
• Wire cutters
• Wire stripper (for 22AWG wire)
• Voltmeter
• Calibration tool (included with kit)
• ESD-safe work bench
Getting started
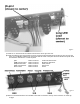
Before you begin, verify the following parts are included in the kit:
(1) 11-213 PCB assembly
(3) 15mm nylon hex nuts
(1) Etherwave Plus Front Panel
(1) 5-wire harness
(2) 50K linear taper potentiometers (labeled 50KB) w/ hardware: lockwasher, washer, and nut.
(2) 5K linear taper potentiometers (labeled 5KB) w/ hardware: lockwasher, washer, and nut.
(1) 50K audio taper potentiometer (labeled 50KA) w/ hardware: lockwasher, washer, and nut.
(1) #6 Locking terminal
(1) LED