
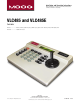
Operating instructions


3.4 AUTO TOUR DWELL (Available only for Moog and Kalatel)
Auto tour Dwell denes how long the pan/tilt will stay at each preset in the auto tour.
This parameter is preset in the pan/tilt, but the VLC485 allows you to override that
setting via the menu if this feature is supported by the pan/tilt. A range from 3 to 99
seconds can be set.
SET AUTOTOUR DWELL:
Use the POUND (#) key to scroll to Set
Auto tour Dwell mode.
Use the keypad to enter the desired
dwell time. Press the POUND (#) key
to select. Press MENU to exit the menu
mode.
Press the MENU button. Enter password
if necessary.
30
SET AUTOTOUR DWELL:
3.5 BEEP ENABLE
Also, if enabled, a brief beep will sound when each button is pressed. To prevent
damage to the joy stick, a beep sound is activated whenever the joystick is at its
maximum position. This function can be disabled in the Menu Mode.
BEEP ENABLE
YES
Use the POUND (#) key to scroll to
Beep Enable. The current setting will be
displayed.
Press the STAR (*) key to change the
setting. Press the POUND (#) key to
select. Press MENU to exit the menu
mode.
Press the MENU button. Enter password
if necessary.
BEEP ENABLE
NO
3.6 SEQUENCING
Sequencing allows you to view up to 16 cameras in a specic order. The sequence can
be set and reviewed and cameras can be added or subtracted using the Menu Mode.
SEQUENCE - ADD CAM:
05
Use the POUND (#) key to scroll to
Sequence. If a sequence is already set
the rst camera in the sequence will be
displayed.
Press the MENU button. Enter password
if necessary.
SEQUENCE - ADD CAM:
You can review the existing sequence by
pressing the SEQUENCE button. Each
time you press it the next camera will
be displayed. When a blank appears,
that will be the end of the sequence.
1, 2, 3...
3.6.1 TO REVIEW A SEQUENCE
A blank space will appear after the last
camera of the current sequence.
3.6.2 TO ADD A CAMERA TO A SEQUENCE
A sequence may contain up to 16 camera entries. If you have not lled a sequence
and would like to add cameras to it, do the following.
To add a camera to the existing
sequence enter the camera number on
the key pad.
Press the STAR (*) key, then press
the SEQUENCE button. At that point
another blank space will appear.
You may add another camera to the
sequence at this time (up to a total of
16), or press the SEQUENCE button
again to review your entries.
SEQUENCE - ADD CAM:
21
1, 2, 3...
Using the SEQUENCE button, scroll
through the sequence until you reach
the camera you want to change.
3.6.3 TO CHANGE A CAMERA IN A SEQUENCE
You may change any entry in a sequence at any time. Remember that these
changes overwrite your existing sequence.
SEQUENCE - ADD CAM:
17
Using the keypad, enter the number of
the camera you want to use.
Press the STAR (*) key, then press the
SEQUENCE button. The number of
the next camera in the sequence will
appear. Press the SEQUENCE button
again to continue to review your entries.
SEQUENCE - ADD CAM:
08
1, 2, 3...
Press the MENU button. Enter password
if necessary. Use the POUND (#) key to
scroll to Sequence.
Press the MENU button. Enter pass-
word if necessary. Use the POUND (#)
key to scroll to Sequence.
Press the MENU button. Enter pass-
word if necessary. Use the POUND (#)
key to scroll to Sequence.
1, 2, 3...
Using the key pad, enter 00. Press
the STAR (*) key, then press the
SEQUENCE button. The sequence will
be blank.
3.6.4 TO CLEAR THE SEQUENCE
Press the MENU button. Enter password
if necessary. Use the POUND (#) key to
scroll to Sequence.
SEQUENCE - ADD CAM: