
User Guide

I. Getting Started
For those of you who can’t wait to read the manual (perfectly understandable
when you have a brand new synthesizer…), the following are the important steps to
get you going with your new Voyager. Once the adrenaline subsides a bit, you will
find this manual to be an excellent guide to exploring the outer reaches of your
minimoog Voyager.
- Check the contents in the shipping carton
The Voyager comes in a carton with a removable lid, and contains the following:
The minimoog Voyager itself, a power cord, and the bag that contains the manual
and warranty registration card.
- What you will need
In addition to the Voyager and its provided accessories, you will need:
- A keyboard stand or table that will hold the Voyager,
- (1) ¼” instrument cable for connecting in mono, or (2) ¼” instrument cables for
connecting in stereo,
- an amplifier, or headphones,
- a properly wired AC outlet.
- Warranty registration
Before you get started with your Voyager, please fill out your warranty registration
card and send it to Moog Music Inc. This will activate your warranty and is a vital
piece of information for us to provide you with the best service.
- Remove the Voyager from the carton
Before you remove the Voyager from the carton, make sure you have a space in
mind to set it up. Keep in mind that you will need a keyboard stand or table that
will support a 40 lb. analog synthesizer and will not topple if you play hard. The
Voyager weighs about 40 lbs., so use caution when lifting it out of the carton. Make
sure to save the packaging in case you need to ship the Voyager for any reason.
- Set tilt of panel
The Voyager’s front panel can be tilted for comfortable adjustment of the panel
controls while you play the keyboard. Once the Voyager is on a stand, the
Voyager’s panel can be lifted by the handle on the back of the instrument and set
to one of 5 angles. Pull the front panel forward and lift the hinged support for the
panel and insert the tab into the appropriate slot on the back panel for your desired
front panel angle. CAUTION: Do not over-tilt the front panel when pulling it forward.
Make sure the support bracket is properly seated into the slots on the back panel
before playing.
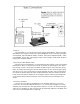
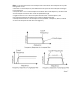
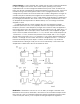
-Connect to source of AC
Connect the Voyager’s power receptacle to a wall outlet with the supplied AC
cordset (see figure 1). The Voyager will operate with a power source from 100 to 240
Volts.