
User Guide


-Power up
Turn the power on. You will see the screen light up and display: “Moog Voyager”.
After about 5 seconds the Power-On screen disappears and you will see the current
active preset. The LED labeled “PANEL” will be lit. The buttons labeled “PANEL”, “EDIT”,
and “MASTER” access the 3 operating modes of the Voyager. PANEL is the Mode for
playing the Voyager’s Presets.
-Check out the Blue Backlit Panel
The knob next to the highest C on the keyboard is the intensity control for the Blue
Backlit Panel. When it is all the way counter-clockwise, the panel light is OFF. When
the intensity control is all the way clockwise the panel light is all the way ON. Moog
Music recommends running this at 33% intensity when in use, and turning the lamp
OFF when not in use. A small amount of high-pitched acoustic noise is transmitted
from both the power supply and the lamps themselves when the lamps are driven
hard. This sound doesn’t appear at the Voyager’s outputs. Reducing the brightness
of the lamps reduces the transmission of the sound from the power supply and
lamps.
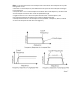
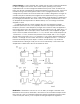
-Connect to Amplifier
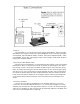
Connect your Voyager to headphones or an amplifier (figure1). For a mono
connection, use the jack labeled “left/mono”. To connect the Voyager to a stereo
amplifier, use the left/mono and right audio outputs to connect to the left and right
inputs of your amplifier. To get a sound, play the keyboard. Adjust the amplifier level
until it is at a comfortable level for listening.