
Owner`s manual


320 S Power Supply
____________________________________________________________________________________
9
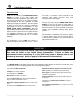
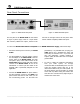
Rear Panel Connections
Figure 2: MOON 310LP Rear panel Figure 3: MOON 320S Rear panel
The rear panel of the MOON 320S will look similar
to Figure 3 (above right). There is a 4-pin female
XLR connector, labeled “DC output”, located on the
left side. On the right side are the the power “main
switch” and IEC receptacle, labeled “AC Input”.
To connect the MOON 310LP Phono Preamplifier to the MOON 320S Power Supply, follow these steps:
1. Disconnect the AC power cord from your MOON
310LP.
2. Use the supplied DC 4-pin XLR cable to connect
the “DC Output” on the MOON 320S to the “DC
Power” input on the MOON 310LP. The male
end (with 4 pins) of the cable connects to the
MOON 320S and the female end (with 4 holes)
connects to the MOON 310LP. Do not use an
aftermarket or custom 4-pin XLR cable as the
supplied cable is specifically designed for this
application.
3. Connect the MOON 310LP’s AC power cable to
the IEC receptacle, located on the 320S’s rear
panel. Ensure that the AC wall outlet you use
has a functioning ground. For the best sonic
performance, it is preferable that you plug your
320S directly into a dedicated AC outlet and
avoid using an extension cord. If you have the
time and willingness, consider installing a
superior quality AC wall outlet such as a hospital
grade Hubbell.
4. In order to obtain the maximum performance
from your audio system, we strongly
recommend that the detachable power cord not
come into physical contact with any of the
interconnect cables from your audio system. In
the event that this can’t be avoided, you should
ensure that any cables coming into contact with
each other are crossed at ninety degree angle to
minimize the contact area.