Network Media Player APP Operating Instructions CONTENT One、Software Introduction .........................................................................4 Two、Application Installation and Uninstallation .................................................4 APP Installation .................................................................................4 APP Uninstallation ..............................................................................4 Three、User Login .......................................
(4)Quick Connection ..................................................................7 3,Video Source Switching(MB1/MB2 does not have this function,it only with MB4/MB6 ) .......................................................................................7 (1)Video Source ........................................................................7 (2)Coordinate Position ................................................................7 4、Detection ............................................................
Ten、FAQ&Solutions .................................................................................19 1、How to check the Ledmagic program version ? ...................................... 19 2、How does a mobile phone connect to the hotspot of a connected media player? 19 3、Why Can’t the Mobile App be connected to the Media Player? ....................19 4、How to upgrade the software of the network media player? ......................
One、Software Introduction Mooncell Ledmagic Network Media Player APP Management Software is suitable for MB Series Network Media Player. It could be stably run both on Android and IOS system and the app has the following features: (1)User Friendly Interface,the user habits have been fully considered while designing the Interface. (2)Convenient Operation,it supports to have the wireless connection to its terminal devices, and it’s with a very simple access method.
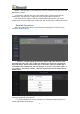
STEP 4、After the device was found,click “connect” and enter the user name and password to connect. Connected: it indicates the app on the mobile phone communicates with the media player normally and it could perform the program editing operations. Not Connected: it indicates that the communication between the app on the mobile phone and the media player is abnormal and no operations could be performed.
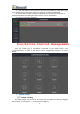
(2)clear the password, that means to clear the login password of the device,and if you wanna connect the device again you’d have to re-enter the password. (3)Delete,which means the device is deleted from the device list and will no longer be displayed (refreshing the device then it can be reproduced).
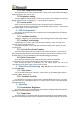
(2)Color Temperature Setting The System has three color temperatures to choose from: Cold, Neutral and Warm. what you need to do is just to click. (3)Brightness Setting Screen brightness setting,which can be set to 0-100%,you can adjust the value by dragging the scroll bar or clicking the +/- on the phone to adjust it. (4)Screen Switch Power on and off of the Led Screen that is controlled by the media player.
(3)Screenshot From the picture that is displayed here,you can accurately view the picture that the current device is playing. (4)Time Parameter It shows the current operating time information of the media player system. 5、Playing Management Managing the programs,by default, 20 programs could be operated, select the program and click the “delete” button in the upper right corner to delete the program content.
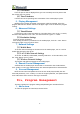
Click “+ add programs” to enter the new program interface, as shown below: 2、Select Template Enter “ program name(single screen)and resolution settings(1920x1080),select a template(such as selecting a single window temperature) and click “OK” to jump to the program editing interface, as shown below: 9
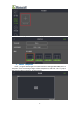
3、Add Media User your finger to click “00” in the screen display area to enter into the media file adding interface,as shown in the figure below: Click “+add media”, select the media type and slide the scroll bar up or down to select the type of media to be added(picture,video,text,digital clock,analog clock,weather,web page),as shown below: Select the “ Image” File and click “OK” to enter the following interface: Click “Media Library” to jump to the album of your mobile, select a picture to 10
publish from the album,as shown below: Here we can set some requirements for the picture that will be displayed in the program. The picture is with “ Full Screen and Original Ratio” Types. Switching Time(dwell time), the default is 1 hour, and the dwell time could be set (hour,minute,second) according to the needs.
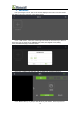
5、Send the Programs Click “Save” in the upper right corner to pop up the device that needs to be published to MB2, check the media player device that needs to be published, as shown below: Click “OK” to send the edited program to the selected media player, as shown below: 12
Sending Programs to the Media Player.Wait………….. The above is an example of the basic operations of single screen program editing and publishing. The operation to have multi screen or other media files added or sent to MB2 are similar. The properties of the media files(duration,special effects)could be set, you can set it according to your needs. For the specific settings of the media type, refer to the next section.
(1)Weather Settings: Address setting(province,city),txt color. (2)Set the Displaying Duration, the default is 1 hour. 7、Web Page To add URL in the program window, the following items could be set: (1)Set the web page address and click “edit” to type in. (2)Set the displaying duration, the default is 1 hour. Seven、Custom Templates New Program Sequence, Click add program —Set program Name—Select Templates —Add media file.
1、Custom Design the Single Window Template Here are the steps to add a single window template: (1)Click “+” on the left to add a window, and a green frame 00 appears, as shown below: (2)In the 00 box,press your finger slightly on the edge of the frame and slide it in the direction you want to drag. Slide your finger to drag the frame so that the green frame is drawn to the widest and highest state, i.e.
Then when you want to use this templates for next time,you can directly select the 600x100 template, click “OK” then you can add the media files. 2、Custom Multiple Window Templates (1)In the program list , click “+ Add Program” and slide down to the bottom, find “custom template”, and click “+” to enter the width ,height.
(4)Slightly press the “00”which inside the 00 window frame with your finger,s when the bottom edge of the box appears: edit,delete,move up,move down, click “edit” to set the position and size of the 00 window, enter the X,Y, Width,Height of the 00 window, as shown below: (5)Click the “+” on the left to add the window again, and the green 01 window frame appears, and with the same operation once again to click “+” to add the window 02.
(6)When the parameters of the position and size of this 3 windows are set, click “save”in the upper right corner to complete the custom template operation, and it will automatically return to adding template interface, and then you will be able to see the the newly added 1600x960 multi window template,as shown below: When you need to use the template for next time,just directly select and click the “OK” in the upper right corner, to add media files respectively in this 3 windows.
Nine、Advanced Settings 1、Time The System has NTP and Local time Synchronization,Turn on NTP to set the Network Time. 2、Terminal Information Capacity Usage, with this software you can check the operation status of the connected media players, including: CPU Usage, CPU Temperature, Available Memory ,External Storage Space, click “refresh” to update the device status information in real time. 3、Clear Media Files Erase all media files that stored in the currently connected media players.
(4)The System Starts to upgrade automatically and restarts automatically. (5)After the upgrading is completed,remove the U Disk and keep it properly. FCC Warning Statement Changes or modifications not expressly approved by the party responsible for compliance could void the user’s authority to operate the equipment. This equipment has been tested and found to comply with the limits for a Class B digital device, pursuant to Part 15 of the FCC Rules.