IMPORTANT SAFETY INSTRUCTIONS IMPORTANT: SUITABLE FOR DRY LOCATIONS ONLY. READ ALL INSTRUCTIONS BEFORE USE. D0 NOT USE OUTDOORS OR ON WET SURFACES. RETAIN INSTRUCTIONS FOR FUTURE REFERENCE. A WARNING: Basic safety precautions should always be followed when using an electrical appliance, including the following: Gol oo 1.
2. The charger has been designed for a specific voltage. Always check that the mains voltage is the same as that stated on the rating plate. 3. Charger that is suitable for one type of battery pack may crests a risk of fire when used with another battery pack. 4, Do not use with a damaged cable or plug. If the supply cable is damaged it must be replaced by MOOSE, its service agent or similarly qualified person in larder to avoid a hazard. §. Do not unplug by pulling on the cable.
Skin contact — Wash with sap and water. — Inhalation — Expose to fresh air and seek medical advice. — Eye contact — Immediately flush eyes thoroughly with water for at least 15 minutes. Seek medical attention. 5. Shorting the battery terminals may cause burns or fire. 8. When the battery pack is not in use, keep it away from paper clips, loins, keys, nails, screws or other small metal objects that could make a connection from one terminal to another. 7.
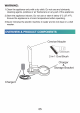
WARNING: 1.Clean the appliance only with a dry cloth. Do not use any lubricants, cleaning agents, polishes or air fresheners on any part of the appliance. 2 Store the appliance indoors. Do not use or store it below 3°C Ensure the appliance is at room temperature before operating. 3.Never immerse the electric machine in water and do not clean in a dish washer. OVERVIEW & PRODUCT Crevice Nozzle J Sa vw Oval brush 2-in-1 Oval Brush Charger & Storage Bracket Charger.
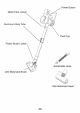
Power Button Metal Tube Locker Lp Ls / Aluminum Alloy Tube Dust Cup Power Brush Locker / / & Stretchable Hose LED Motorized Brush Mini Motorized Head 06
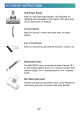
ACCESSORY INSTRUCTION LED Power Brush Ideal for hard floorfrugs/carpets, very effective for agitating dirt embedded in the carpet. LED lights help you to clean even in shadow. Crevice Nozzle Ideal for corners, niches and other hard -to-reach places. 2-in-1 Oval Brush Ideal for vacuuming upholstered furniture, curtain, etc. Stretchable Hose The MOOSE hose conventional state of about 18.1 in, the longest stretch to 47.2 in, could be contact with crevice nozzle, 2-in-1 dusting brush or 2-in-1 square brush.
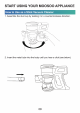
START USING YOUR MOOSE APPLIANCE 1. Assemble the dust cup by twisting it in a counterclockwise direction.
Switch/Speed control A Low power Press the switch button once. B High power Press the switch button twice. Press the button a third time to power off. See the diagram below: Lower power / Power on Power off High power 3.
How {0 Use as a Handheld Insert your chosen accessory into the body as shown below, 4 Do not use without the dust cup and filter in place. 4 Fine dirt such as flour should only be vacuumed in very small amounts. 4 Do not use the appliance to pick up sharp hard objects, small toys, pins, paper clips, etc. They may damage the appliance. 4 When vacuuming, certain carpets may generate small static charges in the clear bin or wand. These are harmless and are not associated with the mains Electricity supply.
EOI] 1. The battery power indicator will blink red when the battery is low and automatically power off the machine when the battery dies. To charge, plug the machine into the charger bracket, as shown. Battery Indicator 2. Once attached to the power dock, the indicator light will blink red. The battery is fully charged when the light tums green.
1.Press the metal tube locker then 3.Empty the dust cup take it out 4 Empty as soon as the dirt reaches the level of the MAX mark — do not overfill. 4 Ensure the appliance is disconnected from the charger before emptying the dust cup. Be careful not to pull the ‘ON’ trigger. # To make emptying the dust cup easier, it is advisable to remove the wand and other floor tools. ¥ To minimize dust/allergen contact when emptying, encase the dust cup tightly in a plastic bag and empty.
Lent EE EEE 1. Press the dust cup lock, and turn it in a clockwise direction. 3. Thoroughly wash the filter case and HEAP filter. 4. Be sure to dry the filters completely.
5. After drying, reassemble the filters as shown below: @ 7. Attach the dust cup by twisting in a counterclockwise direction. ¥ Ensure the appliance is disconnected from the charger before removing the filter. Be careful not to pull the ‘ON’ trigger. 4 Check and wash the filter regularly according to instructions to maintain performance. + The filter may require more frequent washing if vacuuming fine dust or if used mainly in * High Powerful suction” mode. ® Wash the filter with cold water only.
4 Lay the filter on its side to dry. Leave to dry completely for a minimum of 24 hours. 4 Do not put the filter in a dishwasher, washing machine, tumble dryer, oven, microwave or near a naked flame. © To refit, place the dry filter back into the top of the appliance. Make sure it is fitted properly TROUBLESHOOTING: Vacuum is not 1.Empty the dust bin cleaning well 2.Check that the dust bin is correctly attached 3.Check that the filter is correctly attached 4.Clean the filter Vacuum suddenly | 1.
MOOSE | YEAR WAR The 1-Year Limited Warranty is valid for products purchased from our MOOSE only, starting from the date of original retail purchase against defects in quality and materials under normal, non-commercial use. According to the requirements outlined in this instruction manual, subject to the following conditions and exclusions.
MOOSE | YEAR WARRANT WARRANTY SERVICE If you have a query about your MOO SQQ appliance, please contact the MONSOON customer service email © Please inform us your model name/number, purchase date order number, machine problem and your requirement. Your model number can be found on rating plate. For information on your rating plate see the inside front cover. Please keep your purchase receipt in a safe place to ensure you have this information.