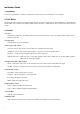
Installation Guide Installationsanleitung Guide d'installation Guía de Instalación Guida all'installazione Installatiehandleiding Installationsguide Руководство по установке Performance 9
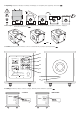
1. Unpacking / Auspacken / Déballage / Desembalaje / Disimballaggio / Uit de verpakking halen / Uppackning / Распаковка / kg 2. Floor Spikes / Spike-Füße / Pointes de découplage / Fijaciones de suelo / Supporti per l'appoggio a pavimento / Vloer-spikes / Golvpiggar / Ножки для установки на полу / OR 3. Controls / Bedienelemente / Commandes / Controles / Comandi / Bediening / Styrningar / Органы управления / 3.1 3.
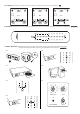
5. Positioning / Positionierung / Installation / Colocación / Disposizione in ambiente / Plaatsing / Placering / Размещение / 5.1 6.1 7.1 6. SPL Meter / SPL-Anzeige / Sonomètre / Medidor SPL / Misuratore SPL / SPL-meter / SPL-mätare / Измеритель уровня звукового давления SPL / 7.
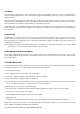
English 2 Deutsch 4 Français 6 Español 8 Italiano 10 Nederlands 12 Svenska 14 Русский 16 18 Read all instructions Avoid damp Avoid direct sunlight Bitte lesen Sie alle Punkte genau durch Kontakt mit Feuchtigkeit vermeiden Nie direktem Sonnenlicht aussetzen Lisez toutes les instructions N'installez pas le système dans un Évitez une exposition directe aux rayons du soleil Lea todas las instrucciones environnement humide Evite la luz directa del sol Leggere tutte le istruzioni Evit
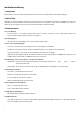
Installation Guide 1. Unpacking Please follow the diagrams to unpack your Performance subwoofer. Gloves are included for your convenience. 2. Floor Spikes Attach the feet to the Performance 9 using the supplied screws as shown in the diagram. Use the metal spikes for carpeted flooring and the rubber feet for hard flooring. Adjust the feet until the subwoofer is stable and lock them securely into position using the locknut. 3. Controls 3.1) Power Switch power on and off.
4. Cabling If you are using a 2-channel system, connect the pre-amp outputs on your amplifier to the Line In sockets on your Performance 9 subwoofer using a high quality stereo phono cable. When this input is used the frequency and slope controls for the subwoofer preamp are activated. If you are using a home cinema receiver, connect the "LFE" or "Sub" output on the receiver to the LFE In socket on your Performance 9 subwoofer using a high quality mono phono cable.
Installationsanleitung 1. Auspacken Bitte beachten Sie die Zeichnungen beim Auspacken Ihres Subwoofers. Als Hilfe haben wir Handschuhe beigelegt. 2. Spike-Füße Befestigen Sie die Füße gemäß der Zeichnung am Performance 9 mit den mitgelieferten Schrauben. Die Metallspitzen sind für den Teppichboden und die Gummifüße für massiven Boden (Stein, Beton usw.) gedacht. Stellen Sie die Standfüße so ein, dass der Subwoofer sicher und gerade steht, und sichern Sie diese Einstellung mit der Kontermutter. 3.
4. Verkabelung Bei einem 2-Kanal-System die Ausgänge des Vorverstärkers mit den Line In Eingängen des Performance 9 Subwoofers mithilfe eines Stereo-Cinch-Kabels der Güteklasse High Quality verbinden. Wenn dieser Eingang verwendet wird, werden die Einstellungen für die Frequenz (Frequency) und die Flanke (Slope) für den Vorverstärker des Subwoofers aktiviert.
Guide d'installation 1. Déballage Veuillez suivre les instructions des schémas pour déballer votre caisson de grave Performance. Pour votre facilité, des gants sont fournis. 2. Pointes de découplage Fixez les pieds au caisson Performance 9 à l'aide des vis fournies, comme illustré dans le schéma. Utilisez les pointes en métal si le sol est revêtu d'un tapis ou d'une moquette, et les pieds en caoutchouc si le sol présente une surface dure.
4. Câblage Si vous utilisez un système à deux canaux (stéréo), raccordez les sorties préampli de votre amplificateur aux prises Line In (entrée haut-niveau) du caisson de grave Performance 9 à l'aide d'un câble Cinch stéréo de haute qualité. Lorsque cette entrée est utilisée, les commandes de fréquence et de filtre du préamplificateur du caisson de grave sont activées.
Guía de Instalación 1. Desembalaje Por favor siga las indicaciones de los diagramas para desembalar el subwoofer Performance 9. Se incluyen guantes para mayor comodidad. 2. Fijaciones de suelo Fije las patas al equipo Performance 9 utilizando los tornillos suministrados como muestra el diagrama. Utilice las fijaciones de metal para suelos con moqueta y patas de goma para suelos duros.
4. Cableado Si utiliza un sistema de 2 canales, conecte las salidas del preamplificador a las clavijas de Entrada de línea del subwoofer Performance 9 utilizando un cable de audio de alta calidad estereofónico. Si utiliza esta entrada se activan los controles de Frecuencia y pendiente del preamplificador del subwoofer.
Guida all'installazione 1. Disimballaggio Attenersi alle istruzioni indicate sugli schemi per disimballare il subwoofer Performance. È incluso a corredo un paio di guanti per rendere più comoda quest'operazione. 2. Supporti per l'appoggio a pavimento Fissare i piedini di supporto al Performance 9 impiegando le viti fornite a corredo, come da illustrazione.
4. Cablaggio Se si sta utilizzando un sistema a due canali, collegare le uscite preamplificate dell'amplificatore agli ingressi di linea ("Line In") del subwoofer Performance 9 mediante un cavo di interconnesione audio stereo di alta qualità. Quando si utilizza quest'entrata, vengono attivati i comandi di Frequency e Upper Roll-Off Slope del subwoofer.
Installatiehandleiding 1. Uit de verpakking halen Volg de onderstaande schema's om uw Performance 9 -subwoofer uit de verpakking te halen. Om beschadigingen aan de lak te voorkomen zijn er handschoenen meegeleverd. 2. Vloer-spikes Bevestig de voet aan de Performance 9 -subwoofer met de meegeleverde schroeven, zoals in het schema wordt weergegeven. Gebruik de metalen spikes voor vloerbedekking en de rubberen voeten voor harde vloeren.
4. Bekabeling Als u gebruik maakt van een 2-kanaals setup, sluit u de uitgangen van de voorversterking op de versterker met een hoogwaardige stereo cinch-kabel aan op de Line In-ingangen van de Performance 9-subwoofer. Als deze ingang wordt gebruikt, wordt de frequentie- en curveregeling voor de voorversterker van de subwoofer geactiveerd.
Installationsguide 1. Uppackning Följ diagrammen när du packar upp Performance-subwoofern. Handskar medföljer. 2. Golvpiggar Montera fötterna på Performance 9 med hjälp av de medföljande skruvarna enligt diagrammet. Använd metallpiggarna på golv med mattor och gummifötterna på hårda golv. Justera fötterna tills subwoofern är stabil och lås dem ordentligt på plats med låsmuttern. 3. Styrningar 3.1) Ström Slår på och av strömmen. I mittläget (auto) slås strömmen på och av enligt behov.
4. Kablar Om du använder ett tvåkanalssystem ansluter du förförstärkarutgångarna på förstärkaren till Linje in-uttagen på din Performance 9 subwoofer med hjälp av en högkvalitativ stereophonokabel. När denna ingång används aktiveras frekvens- och lutningsstyrningarna för subwooferns förförstärkare. Om du använder en hembiomottagare ansluter du utgången "LFE" eller "Sub" på mottagaren till LFE in-uttaget på din Performance 9 subwoofer med hjälp av en högkvalitativ monophonokabel.
Руководство по установке 1. Распаковка Выполняйте действия согласно рисункам при распаковке вашего сабвуфера серии Performance. Для вашего удобства прилагаются перчатки. 2. Шипы для установки на полу Прикрепите опоры сабвуфера Performance 9 согласно рисунку, используя прилагаемые винты. Для коврового покрытия применяйте металлические шипы и для твердой поверхности пола используйте резиновые опоры.
4. Кабельные соединения Если Вы используете 2-x канальную систему, соедините выходы предусилителей вашего усилителя к входным линейным разъемам ‘Line In’ на Вашем сабвуфере серии Performance 9, используя высококачественный стерео звуковой кабель. Когда используется этот вход, то активизируются органы управления частотой и наклоном АЧХ предусилителя сабвуфера.
18
19
20
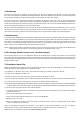
Input sensitivity Frequency range Mains voltage Ouput power Power consumption Notch filter response Adjustable cut 200mV 19Hz-200Hz max UK/EU 220-240 Volts, 50Hz CU 110-120 Volts, 50-60Hz 1000 watts 1200 watts max 25-110Hz -2dB to -16dB Drive units 2 x 250mm (10" ) long-throw aluminium CPC™ woofer Crossover Magnetically shielded Dimensions - H x W x D Active, variable from 35-200Hz Yes 500 x 500 x 500mm (20 x 20 x 20") Weight 40Kg (88Lbs) Colour(s) Brilliant Silver Granite Grey Performance 9
Performance is a trademark of Mordaunt-Short Ltd. All rights reserved. Continuous Profile Cone (CPC) is a trademark of Mordaunt-Short Ltd. All rights reserved. www.mordaunt-short.