
Installation Manual


14
5.0 Trouble shooting
There is no display.
9 Verify that the Morningstar controller or inverter connected to the RM-1 is powered and
working properly. The meter is supplied power from the connected controller or inverter.
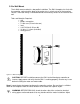
9 Disconnect and reconnect the meter cable RJ-11 connection. Press firmly until there is a
“click”.
9 There may be a break in the meter cable. Inspect the cable for frays or pinches.
The LCD display is dim.
9 Check the system battery voltage. Low battery voltage will cause the display to dim. The
minimum operating voltage of the RM-1 is 8 Volts.
9 In extremely cold temperatures the LCD may appear dim or it may react very slowly.
The meter is powered, however it does not display any data.
9 The meter cable is damaged. Repair or replace the cable with a 4- or 6-conductor
telephone cable with RJ-11 connectors.
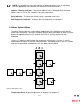
The meter menus do not match the product menu map.
9 Software revisions may alter the menus or menu layout slightly. Check our website for
the latest documentation.
Dust or debris has collected in the LCD window.
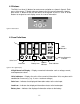
1. Disconnect the meter cable and remove the 3 philips screws that secure the meter back
cover.
2. Remove the back cover and circuit board from the faceplate.
3. Clean the label window with a damp cloth and reassemble. Do not use harsh solvents.
The buttons do not work, or work intermittently.
1. Disconnect the meter cable and remove the 3 philips screws that secure the back cover.
2. Remove the back cover and circuit board from the faceplate.
3. Inspect the button contacts, clean dirt and debris with a damp cloth.
4. Clean the gold button contacts on the PCB with alcohol and a cotton swap. Allow alcohol
to try and reassemble.