
SunLight SL-10L-12V Installation


2
will help you to make full use of the many advantages the
SunLight can provide to your solar lighting system.
2.0 IMPORTANT SAFETY INSTRUCTIONS
• SAVE THESE INSTRUCTIONS—This manual contains important
instructions that should be followed during installation and main-
tenance of the SunLight controller.
• WARNING—Be very careful when working with batteries. Lead
acid batteries can generate explosive gases, and short circuits
can draw thousands of amps from the battery. Read all instruc-
tions provided with the battery.
• Do not exceed the voltage or current ratings of the controller.
Use only with a 12 volt or 24 volt battery.
•
DO NOT
short circuit the PV array or load while connected to
the controller. This will
DAMAGE
the controller.
• The controller should be protected from direct sunlight. Ensure
adequate space for air flow around the controller.
• Pressure terminal connectors are not required. Use only copper
wire with minimum 75˚C insulation rating and between 10 AWG
(5.2 mm
2
) and 14 AWG (2.1 mm
2
) gage.
• The negative system conductor should be properly grounded.
Grounding should comply with local codes.
3.0 QUICK START INSTRUCTIONS
This section provides a brief overview of how to get started using
the SunLight controller. However, please review the entire manual
to ensure best performance and years of trouble-free service.
1. Mount the SunLight to a vertical surface. Allow space above and
below the controller for air flow.
2. Make sure the PV and load currents will not exceed the ratings
of the SunLight model being installed.
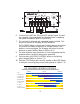
3. The 6 system connections to the SunLight terminals
are numbered on the label. It is recommended that the
connections be made in order from 1 to 6.
4. Connect the
BATTERY
first. Use care that bare wires do not
touch the metal case of the controller.
5. Connect the
SOLAR
(PV array) next. The green LED indicator will
light if sunlight is present.