
SunLight SL-10L-12V Installation


3
6. Connect the
LIGHT
last. If the red LED indicator lights, the bat-
tery capacity is low and should be charged before completing
the system installation (Refer to Section 6.4).
7. The controller is shipped with a terminal jumper installed. This
sets the controller for charging
SEALED
batteries.
If a
FLOODED
battery is being used, simply remove the jumper
to optimize the battery charging for a flooded battery. If the
jumper is connected again, the charging will return to the set-
points for a sealed battery (Refer to Section 6.4.)
8. For most effective surge protection, it is recommended that the
negative system conductor be properly grounded.
9. Turn the rotary
LIGHTING CONTROL
switch to the lighting
option desired (Refer to Section 7.1).
10. Press the
TEST
button and count the number of Red LED flashes
to verify the correct lighting control setting (Refer to Section 7.2).
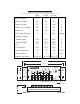
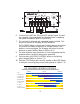
4.0 LIGHTING CONTROL OPTIONS
SOLAR LIGHTING CONTROLLER
+
–
BATTERYSOLAR
4
+
–
+
–
3 2 1 6 5
12 Volts
10A Solar
10A Light
LOW VOLTAGE
DISCONNECT
TEMP. SENSE
MORNINGSTAR
MADE IN USA
SEALED
OR
FLOODED
SELECT
LIGHT
TEST
LIGHTING CONTROL
CHARGING
2
OFF
4
6
8
10
3/1
4/2
6/2
D/D
12 V
4
6
7
8
5
3
Õ
1
UP
2
9
10
• OFF
• 2 HOURS ON
• 4 HOURS ON
• 6 HOURS ON
• 8 HOURS ON
• 10 HOURS ON
• 3 / OFF / 1
• 4 / OFF / 2
• 6 / OFF / 2
• DUSK-to-DAWN
SUNSET NIGHT SUNRISE