
TriStar Manual


54TriStar MPPT Operator’s Manual
Battery Charging and Performance Issues
Problem:
No LED indications, controller does not appear to be powered
Solution:
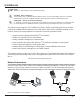
With a multi-meter, check the voltage at the battery terminals on the TriStar MPPT 150V. Battery
voltage must be 8 Vdc or greater. If the voltage on the battery terminals of the controller is be-
tween 8 and 72 Vdc and no LEDs are lit, contact your authorized Morningstar dealer for service.
If no voltage is measured, check wiring connections, fuses, and breakers.
Problem:
The TriStar MPPT 150V is not charging the battery.
Solution:
Checkthethree(3)batterySOCLEDs.Iftheyareashingasequence,seeSection 4.4 Faults &
Alarms of this manual to determine the issue. If a TriStar Meter 2 is connected, the diagnostics
menu will display reported faults and alarms.
If the LED indications are normal, check the fuses, breakers, and wiring connections in the solar
array wiring. With a multi-meter, check the array voltage directly at the TriStar MPPT 150V solar
input terminals. Input voltage must be greater than battery voltage before charging will begin.
NOTE:
For more in-depth testing and diagnosis, download the TriStar MPPT 150V Testing Document
from the Support section on our website: www.morningstarcorp.com/
Network and Communication Issues
Problem:
Cannot connect to the controller via RS-232
Solution:
Check the following:
• The RS-232 cable is straight-through, not a Null Modem (cross-over)
• If using a serial-USB adapter, verify that the adapter software is installed and a serial COM
port has been mapped. Check the activity light on the USB adapter if it has one. If there is
noactivity,thewrongCOMporthasbeenchosenorthereisacongurationissuewiththe
adapter.
• The default MODBUS ID of the TriStar MPPT 150V is 1. Verify that the PC software is
conguredtocommunicateusingthecorrectMODBUSID.
Troubleshooting6.0