
manual


4
For stubborn creases, use the water spray
button (2).
If using for the first time, you may need to press
this a few times to prime the pump.
3
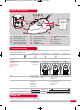
Vary the steam output using
the variable steam switch (1).
Only use the steam function
on heavy fabrics and when
the temperature dial is set
within the shaded area (as
shown, right).
Plug in the iron and switch on at the mains.
Set the temperature dial
(9) to the temperature
required (see ‘Temperature Guide’ on page 3).
The temperature indicator light (10) will
illuminate until the required temperature is
reached, then it will turn off.
Tip: We recommend the temperature indicator
light is allowed to illuminate and extinguish twice
before you begin ironing.
The temperature indicator light will switch on
and off whilst you are ironing.
Tip: Begin with cool fabrics and work up to
higher settings. An iron heats up quicker than it
cools down so this will save you time and
energy.
2
10
Make sure the iron is not plugged in. Set the
variable steam switch (1) to ‘O’. Fill the water
tank (11) via the filling hole (6). The MAX graphic
on the side of the water tank has two positions,
allowing the tank to be filled in either a
horizontal or tilted position. To fill the tank with
the maximum amount of water, we recommend
the iron is tilted whilst being filled.
IN HARD WATER AREAS, WE RECOMMEND
A MIX OF 50% TAP WATER AND 50%
DISTILLED OR DEMINERALISED WATER.
Never use battery topping up fluid or water
containing any substances like starch, sugar,
fragrant additives or defrosted water from a
refrigerator.
NOTE: Please see point 2 of ‘Exclusions’ on
page 8.
1
4
2
Using the iron for steam ironing
RN300250MUK Rev1.qxp_Instruction Booklet 10/07/2014 10:35 Page 4