
manual


6
To clean a coated soleplate
D
o not use scouring powder or solution as this
could cause damage to the coating.
I
f any man-made fibres fuse to the soleplate
(
8)
,
set the iron at the MAX position and pass it over a
c
lean piece of cotton to draw the deposit off the
s
urface.
To clean the exterior
Allow the unit to cool and wipe over with a damp
cloth and mild detergent, then wipe dry.
When you have finished ironing, unplug and
empty all water from your iron and set the steam
switch at the ‘O’ position. When cool, store the
iron on its heel with the cord wrapped loosely
around the heel.
NOTE: Please see point 3 of ‘Exclusions’ on page 8.
Y
our iron has a built in cleaning system designed
to keep the water valve, steam chamber and
steam vents clear of lint and loose mineral
deposits.
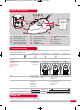
1 Half fill the iron with water.
2 Place the iron on its heel
(12)
.
3 Move the variable steam switch
(1)
to the MAX
position.
4 Connect to a mains supply outlet.
5 Set the temperature dial
(9)
to ‘MAX’. See step 2
o
f ‘Using your iron for steam ironing’ on page 4.
6
Leave the iron switched on, rested on its heel (12)
u
ntil the temperature indicator light
(
10)
g
oes out.
W
ARNING: Keep hands and body away from
the hot soleplate.
7 Disconnect the iron from the mains supply outlet.
8 Whilst the iron is still very hot, hold the iron
horizontally over a sink.
CAUTION: The soleplate will still be hot, so
ensure the power cord and plug are kept away
from it and the sink.
9
Push the variable steam switch
(1)
fully to the right
and hold in the self clean position
(5)
.
WARNING: Steam and boiling hot water will
drain from the holes in the soleplate. Keep
hands and body away from the hot water. This
washes away the scale and minerals that have
built up inside the steam chamber.
10
Whilst still holding the variable steam switch
(1)
in
the self clean position, gently move the iron back
and forth until the water tank is empty.
11
When cleaning is complete, move the variable
steam switch back to the ‘O’ position.
12
Rest your steam iron back on its heel and allow to
fully cool down.
13
Wipe the soleplate
(8)
with a cold, damp cloth.
After this cleaning operation, empty out any
remaining water.
IMPORTANT: Do not attempt to descale the
soleplate with descaling products.
Maintenance
Emptying and storing
Self clean
RN300250MUK Rev1.qxp_Instruction Booklet 10/07/2014 10:35 Page 6