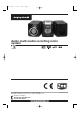
29112 rev1 1/9/06 09:40 Page 1 Audio multi media recording micro system Please read and keep these instructions For replacement parts, help with using your Morphy Richards, problems and lots more, contact us by phone or through our website. UK Helpline: 0870 060 2614 Ireland 1800 409119 www.morphyrichardsaudio.
9112 rev1 1/9/06 09:40 Page 2 INDEX INSTALLATION HOW TO CONNECT THE SPEAKERS TO MAIN UNIT 3 TIPS FOR CONNECTING THE SPEAKER WIRES 3 SPEAKER TERMINALS 3 TERMINALS OF UNIT 3 TO AVOID SHORT-CIRCUITING THE SPEAKERS 4 CONNECT THE FM ANTENNA TO THE FM ANT JACK 4 NAME OF CONTROLS (MAIN UNIT) 5 NAME OF CONTROLS (REMOTE UNIT) 6 CONNECT TO THE WALL OUTLET 6 SETTING HOW BACLKLIGHT ILLUMINATES IN STANDBY MODE 6 DIGITAL CLOCK&TIMER SETTING FUNCTION 7 HOW TO SET TIME CORRECTLY (In standby mode)
29112 rev1 1/9/06 09:40 Page 3 TO STORE THE CURRENT RADIO STATION 10 RDS OPERATION OF DIGITAL TUNER 10 OPERATION VOL +/-BUTTONS 10 MUTE BUTTON 10 USE THIS PLAYER AS AN EXTERNAL POWER AMPLIFIER 10 EQUALISER AND BASS BOOST 11 USB & CARD OPERATION EXTERNAL MEMORY MEDIA OPERATION (USB/MMC) 11 PREPARE THE PLAYER FOR EXTERNAL MEMORY MEDIA 3 OPERATION 11 SKIPPING TRACKS AND SEARCHING BETWEEN TRACKS 11 REPEAT MODES 11 RANDOM PLAY 11 INTROSCAN PLAY 12 PREPARE THE MICRO SYSTEM CONNECTED
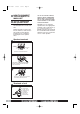
29112 rev1 1/9/06 09:40 Page 4 HOW TO CONNECT THE SPEAKERS TO MAIN UNIT Tips for connecting the speaker wires Push and hold the speaker terminal tab down to insert each wire. Release the tab to lock the wire into the terminal, make sure the wire is fully inserted, but the insulation is not covering the inserted part of the speaker wires. GO ON TO THE NEXT WIRE & REPEAT ABOVE. REMEMBER WIRES MUST GO FROM THE SET TO THE SPEAKERS.MAKE SURE POWERS IS OFF WHEN DOING THE ABOVE.
29112 rev1 • 1/9/06 09:40 Page 5 To avoid short circuiting the speakers A Make sure the stripped end of each speaker wire does not touch another speaker terminal or the stripped end of another speaker wire. B Connect the FM antenna to the FM ANT Jack Take out the FM antenna and extend it to its full length A. Connect it to the FM ANT Jack by simply plugging it to the Jack B. 5 www.morphyrichardsaudio.
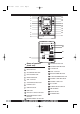
29112 rev1 1/9/06 09:40 Page 6 11 12 13 14 1 2 3 4 15 16 17 5 6 7 18 19 8 9 10 20 21 24 25 26 22 23 Name of controls (main unit) 14 VOLUME UP BUTTON 15 VOLUME DOWN BUTTON 1 PROGRAM/DELETE BUTTON 2 MENU BUTTON 3 ON/STAND BY BUTTON 4 FUNCTION BUTTON 5 REMOTE SENSOR 6 SKIP - BUTTON 7 STOP/MONO/ST BUTTON 8 PHONES JACK 9 USB INDICATOR 16 LCD DISPLAY 17 SKIP + BUTTON 18 RECORD/TIMER BUTTON 19 PLAY/PAUSE/BAND BUTTON 20 SD/MMC CARD INDICATOR 21 SD/MMC CARD SLOT 22 AC SOCKET 23 POW
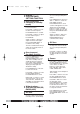
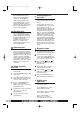
29112 rev1 1/9/06 09:40 Page 7 1 2 3 4 5 6 7 8 9 10 12 13 14 15 16 17 18 19 20 21 11 Name of controls (remote unit) 11 REC BUTTON 12 BASS BUTTON 1 EQ BUTTON 2 STANDBY BUTTON 3 FUNCTION BUTTON 4 TIMER BUTTON 5 SLEEP BUTTON 6 DELETE/STORE/PROGRAM BUTTON 18 FF. BUTTON 7 PTY SELECT BUTTON 19 PLAY/PAUSE/BAND BUTTON 8 INTRO/RDS MODE BUTTON 20 STOP BUTTON 9 REW.
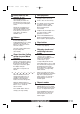
29112 rev1 1/9/06 09:40 Page 8 DIGITAL CLOCK&TIMER SETTING FUNCTION How to set time correctly (In standby mode) Press menu button. Press SKIP +/- button to locate the item CLOCK and press PLAT/PAUSE button to confirm. Press SKIP +/- buttons to adjust the hour, and then press PLAY/PAUSE Again, use SKIP +/- buttons to adjust the minute. And again press PLAY/PAUSE button to confirm the time setting. as soon as the presetting time arrives.
29112 rev1 1/9/06 09:40 Page 9 Press timer on the remote to set Disk playback The unit will power on automatically and enter the presetting Source DISC mode as soon as the presetting time arrives. NOTE: The unit will power on and enter the TUNER mode automatically if there is no disc in the disc tray or there is no music files in the USB or SD/MMC card. Volume Press SKIP +/- button to locate the item VOLUME, press PLAY/PAUSE button to confirm, and again use the SKIP +/buttons to adjust the volume.
29112 rev1 1/9/06 09:40 Page 10 Setup program in data disc Press REPEAT button three times to cancel repeat, the repeat icon will disappear. To program MP3 or WMA format tracks, follow the steps below: In MP3/WWA playing mode, press REPEAT button once to repeat current track, twice to repeat tracks as a whole, three times to repeat directory, four times to cancel repeat.
29112 rev1 1/9/06 09:40 Page 11 NEWS - AFFAIRS - INFO SPORT - EDUCATE - DRAMA CULTURE - SCIENCE - VARIED M - POP M - ROCK M - MOR M - LIGHT M - CLASSIC OTHER M - WEATHER FINANCE - CHILD - SOCIAL RELIGION - PHONE - TRAVEL HOBBY - JAZZ - COUNTRY NATION - OLDIES - FOLK M DOCUMENT - TESTS - ALARM - (BACK TO NEWS) frequency. When the tuning goes to one station available, broadcasting starts immediately.
29112 rev1 1/9/06 09:40 Page 12 Equaliser and bass boost Press MENU button to enter the main menu display then use SKIP buttons to locate Equalizer, press PLAY/PAUSE button to confirm and again use the SKIP buttons to scroll among Flat, Custom, Jazz, Rock, Classic, POP. NOTE: Pressing PLAY/PAUSE button when you have located the item Custom will initiate a two-option menu (User Bass & User Treble) for you to choose from.
29112 rev1 1/9/06 09:40 Page 13 Press INTRO button once in play or stop mode to activate introscan playback immediately. The player will pick up tracks for playback of the first 10 seconds of each track in a sequential order. You may press this button once again to exit introscan play mode and return to normal playback from the track it’s arrived at. NOTE: In playback mode, press DELETE button, the LCD will display ‘DELETE FILE?’ press DELETE button again, the file will be deleted..
29112 rev1 1/9/06 09:40 Page 14 Menu operation FM mode from ST to MONO. Timer record 1 Insert the device that is to be recorded to : into its correct slot (SD card or USB device). 2 Press the MENU button and use the SKIP +/- button to advance to TIMER and press PLAY/PAUSE. 3 4 5 6 ‘ON TIME’ is displayed. Press the PLAY/PAUSE button, use the SKIP +/- button to set the hour. Press PLAY/PAUSE and use the SKIP +/- buttons again to set the minutes. Press PLAY/PAUSE.
29112 rev1 1/9/06 Menu 09:40 Page 15 Record Menu structure table Rec to USB Rec to SD Clock Setting Clock Timer Setting On Time Setting Off Time Source Pre Rec Radio Volume Disc AUX Present 1 Present 20 USB Card Tuner EQ Custom Bass Jazz Rock +10 -10 Treble Classic +10 -10 Pop Flat Bass ON OFF ID3 ON OFF YES Format UK Helpline 0870 060 2614 NO Ireland Helpline 1800 409119 14
29112 rev1 1/9/06 09:40 Page 16 Compact disc Warning labels Always use compact discs bearing the mark shown WARNING: To reproduce the risk of an electric shock, do not expose this application to rain or moisture. Handling discs • Removing the disc from its storage case and load it. • Do not touch the reflective record surface. • Do not stick paper or write anything on the surface. • Do not bend the disc. Storage • Store the disc in its case.
29112 rev1 1/9/06 09:40 Page 17 Recorded file structure and bit rate table FM mode AUX IN mode CD mode File directory FM00001 AUX00001 CD00001 File name FM00001.mp3 FM00002.mp3 AUX00001.mp3 AUX00002.mp3 CD00001.mp3 CD00002.mp3 Bit rate 96kbps 128kbps 128kbps NOTE: • When the timer function is set, all buttons are locked except TIMER, MUTE, VOL +/- MUTE buttons.
29112 rev1 1/9/06 09:40 Page 18 ID3 The system default setting is ID3 ON, support up to ID3 V2.0 If the system set to ID3 ON, and the unit is playing MP3, the music info is displayed. If the system set to ID3 OFF, LCD will show track no. and play time. Tips for supporting famous MP3 players Due to the legal issue, we can not edit the structure of the following MP3 players. Please follow below after ripping.
29112 rev1 1/9/06 09:40 Page 19 Technical Specification AC power supply: Max. AC power consumption: Remote control battery: Speakers: Max. output power: Radio: MP3 Bitrate (Playback): WMA Bitrate (Playback): MP3 Bitrate (Encoding): Compatible disc: 230 V-50HZ 70W 1 x CR2025 4” woofer, 2" ” tweeter 2 x 15W (Max THD 10%) FM 87.5MHz - 108MHz MW 522kHz - 1620kHz 8 - 320kbps and VBR 32 - 320kbps CD/AUX - 128 kbps, Radio - 96kbps CD / CD-R / CD-RW The system is for indoor use only.
29112 rev1 1/9/06 09:40 Page 20 Guarantee Morphy Richards products are manufactured to internationally accepted quality standards. In addition to your statutory rights. Morphy Richards guarantee your product to be free from manufacturing and component defects for a period of TWO YEARS from date of purchase. If your product proves to be defective within 28 days of purchase, your Morphy Richards dealer from who the product was purchased will be pleased to replace it free of charge.