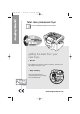
DF45075M Rev 1 20/12/04 11:15 AM Page 1 Total clean professional fryer Please read and keep these instructions getting the best from your new fryer... • Hot oil Don’t attempt to move the fryer while it is still hot - wait two hours after frying for your fryer to cool. • Easy cleaning Your fryer breaks down into component parts for easy cleaning with a removable bowl. www.morphyrichards.
DF45075M Rev 1 20/12/04 11:15 AM Page 2 Important safety instructions • Never operate with the oil level below minimum mark (2.0 litres) or above maximum mark (2.7 litres). The use of any electrical appliance requires the following common sense safety rules. Primarily there is danger of injury or death and secondly the danger of damage to the appliance.
DF45075M Rev 1 20/12/04 11:15 AM Page 3 Mains lead Electrical requirements • The mains lead should reach from the socket to the base unit without straining the connections. • Do not let the cord hang over the edge of the table or the counter and keep it away from any hot surface. • Do not let the lead run across an open space eg. between a lower socket and table. Check that the voltage on the rating plate of your appliance corresponds with your house electricity supply which must be A.C.
DF45075M Rev 1 20/12/04 11:15 AM Page 4 Before first use To replace, locate in the guides and slide back into position. Close the lid by pressing down in the centre and ensure locking catch „ is fully engaged. Refer to the assembly sequence page 5. When unpacking the fryer, make sure all packaging material is removed. WARNING: make sure that your fryer is disconnected from the electricity supply. Please note : Remove the filter from the lid before washing lid.
DF45075M Rev 1 20/12/04 11:15 AM Page 5 Assembly/Disassembly sequence Basket operation The handles are removable so they can be attached to the 2 small or 1 large basket. The fryer has to be disassembled and assembled following this procedure. • Open the lid and remove. • Remove the basket. • Lift out the tank. • Pull out the pod control. Assembly is the reverse of the above process. Removal of the pod Location of basket to drain 1 Lift up the fryer body at the front as shown and pull out the pod.
DF45075M Rev 1 20/12/04 11:15 AM Page 6 Filter • When using small baskets both must be in place when frying to ensure that there is no escape of steam and fumes from the handle opening in the lid. 6 Lift the lid. • Do not over fill the basket when frying, the food must be covered with the bubbling hot oil, depending on the size and shape of the food to be cooked. There are two methods of cooking in your fryer, one general method for most food types and another for home battered products.
DF45075M Rev 1 20/12/04 11:15 AM Page 7 Cooking home-battered foods Cooking This method allows for the fact that if wet batter is placed in the basket prior to cooking the food may stick. 1 Leave the basket in the down position. 2 Coat the raw food in the batter and allow it to drain slightly to get rid of the excess coating. 3 Very carefully, slowly lower the coated food into the hot oil, using a suitable implement or tongs.
DF45075M Rev 1 20/12/04 11:15 AM Page 8 Emptying and cleaning Helpline WARNING: Cleaning should only be carried out with the plug removed from the socket. The fryer should have completely cooled. Allow 3 hours for cooling. 1 Remove the lid. 2 Remove the basket. 3 Lift out the bowl. If you have any difficulty with your appliance, do not hesitate to call us. We are more likely able to help than the store from where you bought it.
DF45075M Rev 1 20/12/04 11:15 AM Page 9 Frying times and temperature chart These frying times are intended as a guide only and should be adjusted to suit quantity or thickness of food and your own taste. Times listed are normally the maximum time required. Quantities listed are for use in the large basket. When using the 2 small baskets fill as required, but make sure the food is covered with the hot bubbling oil. Fresh cut chips 190˚C Frozen chips 190˚C 1.
DF45075M Rev 1 20/12/04 11:15 AM Page 10 Your two year guarantee It is important to retain the retailers receipt as proof of purchase. Staple your receipt to this back cover for future reference. Please quote the following information if the product develops a fault. These numbers can be found on the base of the product. Model no. Serial no. All Morphy Richards products are individually tested before leaving the factory.