Installation and Operating Instructions 1410 Squirrel For use in North America Read this entire manual before you install and use your new room heater. If this room heater is not properly installed, a house fire may result. To reduce the risk of fire, follow the installation instructions. Failure to follow instructions may result in property damage, bodily injury, or even death. Contact local building officials about restrictions and installation/inspection-requirements in your area.
We congratulate you on your choice of a Morsø stove. Morsø has been producing some of the world’s best stoves since 1853. If you follow this installation- and operating instruction carefully, we can assure you many years of warmth and pleasure. Optional Accessories A wide range of accessories (such as handling gloves, fireside tools, glass cleaner and heatproof paint) are available for use with your Morsø stove. They help with day-to-day running and maintenance.
CONTENTS: 1.0 Installation of your Morsø stove 1.1 Unpacking the stove 1.2 Checking loose parts in the stove 1.3 The chimney / flue system 1.4 Flue Connection 1.5 Connection to existing chimney 1.6 Positioning the stove 3 4 4 5 6 6 8 2.0 Operation 2.1 Before you start firing 2.2 Lighting and loading intervals 11 11 12 3.0 Maintenance 3.1 Exterior maintenance 3.2 Internal maintenance 3.3 Cleaning the Stove and the Flue 3.4 Leaving the stove for extended periods 3.5 Parts diagram 3.
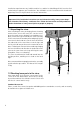
Installation requirements vary in different districts, and the local building officials have the final authorization to approve your installation. You should discuss the installation with them before beginning. Please ask your dealer for further information. Do not connect to any air distribution duct or system. Important: If the installation instructions are not followed carefully, it may cause dangerous situations like chimney - and house fires.
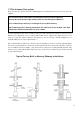
1.3 The chimney / flue system Note that the flue system must be independently secured and must not rely on the stove for support. The stove must not be connected to a chimney flue serving any other appliance. (Several flues may run up a single chimney stack; use one flueway per appliance). Use a residential type masonry or listed type HT factory-built chimney. High Temperature (H.T.) Chimney Standard UL-103-1985 (2100º F.) for the USA, and High Temperature (650ºC) Standard ULC S-629 for Canada.
1.4 Flue Connection The stove is supplied from the factory with a flue collar fitted to the top plate and a round blanking plate blocking off the rear flue exit (behind the rear shield plate). The flue collar is from the factory prepared for fitting the enlosed 6 inche adapter. Use a 24 MSG black or blue chimney connector or listed double wall chimney connector.
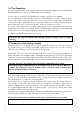
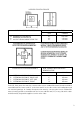
1.6 Positioning the stove Distance to walls and lintel When the stove is positioned near combustible materials, observe all current local and national building regulations with regards to clearances. Whatever regulations apply to your area, do not in any case install the stove within 8 inches of combustible materials around the sides or 16 inches above the top of the stove. These distances may need to be increased if the materials are sensitive to heat.
CLEARANCE REQUIREMENTS W. MINIMUM ALCOVE WIDTH D. MAXIMUM ALCOVE DEPTH G. ALCOVE CEILING ABOVE STOVE TOP FLOOR PROTECTION REQUIREMENTS A. B. C. D. EXTENDING DISTANCE, BACK EXTENDING DISTANCE, RIGHT SIDE EXTENDING DISTANCE, LEFT SIDE EXTENDING DISTANCE, FRONT ALCOVE INSTALLATION USA CANADA 56’’ 24’’ 36’’ 1420 mm. 610 mm. 915 mm. NON-COMBUSTIBLE MATERIALS BENEATH STOVE USA CANADA 6’’ 6’’ 16’’ 200 mm. 200 mm. 200 mm. 450 mm.
Distance to furniture The recommended minimum distance from stove to furniture is 30 inches. Note that some furniture is more easily affected by heat and may need to be moved to a greater distance. This is your responsibility. In addition other combustible materials, away from the stove. In general, a distance of 30 inches must be maintained between the stove and moveable combustible item such as drying clothes, newspapers, firewood etc.
2.0 Operation 2.1 Before you start firing For Use with Solid Wood Fuel Only. Do Not Overfire, If Heater or Chimney Connector Glows You Are Overfiring. Inspect and Clean Chimney Frequently. Under Certain Conditions of use creosote buildup may occur rapidly. Because of risk of smoke and flame spillage, operate only with door fully closed. Caution: Hot while in operation. Keep children, clothing and furniture away. Contact may cause skin burns. Do not use chemicals or fluids to start the fire.
In principle Your stove has two air supplies: Primary air is controlled by the upper air controler of the door. The air eventually washes at high speed down the back face of the door glass. This super-heated air helps with the combustion of volatile gases produced by the fire. Secondary air is supplied to the top of the fire through two rows of holes in the steel baffle. This effectively burns off other residual gases, making for very clean emissions. This air supply isconstant and cannot be varied.
Do not for any reason attempt to increase the firing of your heater by altering the air control adjustment range outlined in these directions. Warning: Fireplace stoves must never be left unattended with doors open. If the door is left partly open, gas and flame may be drawn out of the fireplace stove opening, creating risks from both fire and smoke. We recommend you to fit a smoke detector in the room where the stove is installed. DO NOT OVERFIRE THIS HEATER.
3.0 Maintenance When perfoming maintenance on your stove, always protect yourself, using safety goggles and gloves. 3.1 Exterior Maintenance The stove surface is painted with heat-resistant Senotherm paint. It is best kept clean by vacuuming with a soft brush attachment or by wiping with a lint-free cloth. Over a period of time, the painted surface may become slightly grey. A can of Morsø touch-up spray paint should be available from your stove supplier.
2. Unscrew the five bolts that secure the glass. (In the event that a bolt sheers off when being unscrewed, remove the remaining body of the bolt by drilling down its cnetre with 1/8 inch high speed steel drill bit. Smaller drill bits may be successful, but do not use a lager bit. Make sure the bit stays away from the edges of the bolt - this may damage the thread in the cast iron). 3. Remove the old ceramic gaskets and clean up the surface underneath with wire wool or emery paper to remove loose particles.
Ceramic Gasket The gasket around the perimeter of the door may harden over a period of time. It should be replaced if it becomes difficult to close the door or if air starts to leak in around the perimeter of the door, causing the fire to become a little less controllable. A morsø rope gasket kit is available from your stove supplier. 3.3 Cleaning the Stove and the Flue Check for soot above the baffle plate and around the flue outlet every month or so to start with.
Clean the chimney connector disconnecting the sections, taking them outside, and removing any deposits with a stiff wire brush. Reinstall the connetor sections after cleaning, being sure to secure the joints between individual sections with sheet metal screws. If you cannot inspect or clean the chimney yourself, contact your local Morsø Deler or a professional chimney sweep. If you do experience a chimney fire, act promptly and: Close the air control. Get everyone out of the house. Call the Fire Department.
Date of print: 06-09-2013 43 18 10 47 56 69 49 52 46 3 60 55 24 74 23 21 40 45 48 51 9 29 7 70 25 32 50 14 6 53 33 61 53 41 38 54 37 27 22 16 3 48 74 2 53 35 12 15 1 53 34 75 72 17 71 39 53 35 4 8 42 39 11 39 19 73 13 34 53 30 28 Fjernet pos. 21 rystehåndtag. Sidesten delt i to pos. 48 og 74. Released: 1410 NA Itemno.: A2 1:1 23.09.2002 Date: 17.04.2009 18.11.2009 64142221/64142321 RSV Sign.: RSV RSV 06.09.2013 02.09.
3.6 Parts list for the model Morsø 1410 squirrel Pos.No. 1 2 3 4 5 6 7 8 9 10 11 12 13 14 15 16 17 18 19 20 21 22 23 24 25 26 27 28 29 30 31 32 33 34 35 36 37 38 39 40 41 42 43 44 45 46 Parts Rear plate, inside 34145100 Base plate 44140121 Side plate w.
47 48 49 50 51 52 53 54 55 56 60 61 69 70 71 72 73 74 75 Tightening tape 79074400 Stone 79140800 Locking device 79127000 Cotter pin 79186300 Cotter pin 791868 Cotter pin 791869 Air slider washer Washer Glass fitting 54146261 Handle 79118300 Glass fitting 54146361 Black steel screw Adaptor for handle 75140161 Access Door 34144600 Black steel set screw Fitting for draft reducer 71145461 Screw 79183600 Stone 79140900 Screw 73161661 Morsø Jernstøberi A/S - 28.10.