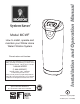
How to install, operate and maintain your Whole Home Water Filtration System Do not return unit to store If you have any questions or concerns when installing, operating or maintaining your Whole Home Water Filtration System, call our toll free number: 1-888-64 WATER (1-888-649-2837) Monday- Friday, 8 AM - 9 PM EST or visit www.systemsaver.com When you call, please be prepared to provide the model, date code and serial number of your product, located on the rating decal on back of the cover.
TABLE OF CONTENTS Page Specifications & Dimensions . . . . . . . . . . . . . . . . . . . . . . . . . . . . . . . . . . . . . . . . . . . . . . . . . . . . . . . . . . . . . . . . . . . 3 Inspect Shipment . . . . . . . . . . . . . . . . . . . . . . . . . . . . . . . . . . . . . . . . . . . . . . . . . . . . . . . . . . . . . . . . . . . . . . . . . . . . 4 Before You Start . . . . . . . . . . . . . . . . . . . . . . . . . . . . . . . . . . . . . . . . . . . . . . . . . . . . . . . . . . . . . . . . . . . . .
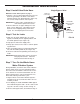
Specifications & Dimensions Model MCWF Rated Service Flow Rate Pressure Drop at Rated Service Flow Pressure Drop at 9.6 gpm Water Pressure Limits (minimum / maximum) Water Temperature Limits (minimum / maximum) Drain Flow Rate 0.50 0.75 Rated Capacity at Chlorine Concentration** of: 1.0 1.5 2.0 6.0 gpm 10 psig 15 psig* 30 - 125 psi 40 - 120 °F 3.
Inspect Shipment The parts required to assemble and install the Whole Home Water Filtration System are included with the unit. Thoroughly check the Whole Home Water Filtration System for possible shipping damage and parts loss. Also inspect and note any damage to the shipping carton. Remove and discard (or recycle) all packing materials. To avoid loss of small parts, we suggest you keep the small parts in the parts bag until you are ready to use them.
Before You Start Use care when handling the Whole Home Water Filtration System. Do not turn upside down, drop, or set on sharp protrusions. The Whole Home Water Filtration System has a maximum allowable inlet water pressure of 125 psi and a minimum of 30 psi. If daytime pressure is over 80 psi, nighttime pressure may exceed the maximum. Use a pressure reducing valve if necessary (Adding a pressure reducing valve may reduce the flow.).
Installation Requirements Location Requirements The Whole Home Water Filtration System works on 24 volt, 60 Hz electrical power only, supplied by a direct plug-in transformer (included). Provide an electrical outlet in accordance with NEC and local codes. Consider the following when selecting an installation location for the Whole Home Water Filtration System. Do not operate the Whole Home Water Filtration System where freezing temperatures occur. Do not attempt to treat water over 120ºF.
Installation Requirements Plumbing Codes Valve Drain Requirements All plumbing must be completed in accordance with national, state and local plumbing codes. Using the flexible drain hose (included), measure and cut to the length needed. Flexible drain hose is not allowed in all localities (check your plumbing codes). If local codes do not allow use of a flexible drain hose, a rigid valve drain run must be used. Purchase a compression fitting (1/4 NPT x 1/2 in.
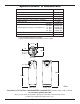
Installation Requirements Inlet - Outlet Plumbing Options 3 Valve Bypass Always install either a single bypass valve (provided) to the contractor/plumber-supplied plumbing, as shown in Figure 7 OR if desired, a 3 valve bypass system (parts not included) can be installed, as shown in Figure 6. Bypass valves allow you to turn off water to the Whole Home Water Filtration System for maintenance if needed, but still have water in house pipes.
Installation Instructions Level if Necessary Step 1. Turn Off Water Supply 1. Close the main water supply valve, near the well pump or water meter. 2. Open all faucets to drain water from the house pipes. NOTE: Be sure not to drain water from the water heater, as damage to the water heater elements could result. Step 2. Move the Whole Home Water Filtration System into Place 1. Move the Whole Home Water Filtration System into installation position. Set it on a level surface.
Installation Instructions Single Bypass Valve Step 5. Install Valve Drain Hose NOTE: See valve drain options on page 7. 1. Measure, cut to needed length and connect the 3/8" drain line (provided) to the Whole Home Water Filtration System valve drain fitting (See Figure 10). Use a hose clamp to hold the hose in place. Drain Line Connection IMPORTANT: If codes require a rigid drain line see “Valve Drain requirements" section. 2. Run the drain hose or copper tubing to the floor drain. Secure drain hose.
Start Up Procedure IMPORTANT: Run the start up cycle immediately after completing installation, before using any water in the home. The filtration media in this Whole Home Water Filtration System contains a small number of harmless activated carbon particles generated during shipping that are small enough to exit the system with water flow. It is normal for these particles to cause a temporary discoloration of the water coming out of the system.
Programming the Whole Home Water Filtration System Display UP button DOWN button PROGRAM button CLEAN button When the transformer is plugged into the electrical outlet, a model code and a test number (example: J1.4), begin to flash in the faceplate display. Then, 12:00 PM and the words “PRESENT TIME" begin to flash. FIG. 11 Start a Clean Rinse Cycle To manually start a Clean Rinse cycle, press and hold the CLEAN button for a few seconds, until “RECHARGE NOW” flashes in the display.
Customizing Features / Options Set Number of Days Between Clean Rinse Cycles By default the Whole Home Water Filtration System will automatically initiate a Clean Rinse every 14 days. This should be sufficient for most applications. To change the number of days between Clean Rinse cycles: 1. Press the PROGRAM button until “RECHARGE” is shown in the display.
Customizing Features / Options Operating in Manual Clean Rinse Mode Clean Rinse cycles will run automatically, unless the automatic Clean Rinse function has been disabled. If this function has been disabled, it will be necessary to manually initiate any Clean Rinse cycles. It is recommended that a Clean Rinse cycle should be run at least once each month, or more frequently if necessary.
Care of Your Whole Home Water Filtration Vacations and Extended Periods of No Water Use Protect the Whole Home Water Filtration System from Freezing If your Whole Home Water Filtration System will not be used for an extended period of time (several months), please follow one of these recommendations: If the Whole Home Water Filtration System is installed where it could freeze (summer cabin, lake home, etc.), you must drain all water from it to stop possible freeze damage.
Troubleshooting PROBLEM Water has black or gray color Low water pressure at house faucets CAUSE (NEW SYSTEM) Start up procedure has not been completed (NOT A NEW SYSTEM) Normal abrasion of filtration media Sediment filter screen is clogged Filtration media pores are blocked Water has objectionable taste and/or odor System is in bypass Filtration media pores are blocked No water flow to drain during Clean Rinse cycle Clean Rinse cycle does not run automatically Clean Rinse cycle does not run at the p
Troubleshooting Procedure for removing error code from display: 1. Unplug transformer from electrical outlet. 2. Correct problem. 3. Plug in transformer. 4. Wait 6 minutes. The error code will return if the problem was not corrected.
Whole Home Water Filtration System Components Faceplate Decal P/N 7310781 Power Supply Kit P/N 7238426 Cover P/N 7310773 Bypass Valve Kit P/N 7289752 (includes installation adaptors & clips) Drain Tube, 10 ft.
Valve Components Motor Switch Kit P/N 7285910 Motor Plate P/N 7231385 Drain Clip P/N 7142942 Bearing P/N 0503288 Cam & Gear P/N 7284964 Tubing Clamp P/N 0900431 Valve Cover P/N 7085263 Drain Adaptor P/N 7024160 O-Ring P/N 7170327 Rotor / Seal Kit P/N 7238468 Flow Plug P/N 7290410 Retainer, Nozzle & Venturi P/N 7081201 Plug, Aspirator Port P/N 7100940 O-Ring P/N 7170319 (2 req.