
User Manual


2
OPERATING INSTRUCTIONS
Read and understand this entire manual and its safety warnings before handling this rearm.
MECHANICAL SAFETY
Never rely on any mechanical safety device to prevent the dangers of careless
handling or pointing a rearm in an unsafe direction.
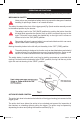
The safety is located at the front of the trigger guard (Fig. 2) and must be manually moved
to the desired position by the shooter.
The safety is set in the “ON” (SAFE) position by pushing the button from the
left side (side opposite the ejection port) so that it moves all the way to the
right. The button must always be pushed fully to the right until it moves no
further to be in the “ON” (SAFE) position.
Remember, a rearm’s manual safety is a mechanical device which can never
replace safe rearm handling practices.
Moving the safety button to the left will put the safety in the “OFF” (FIRE) position.
The safety button is designed to function only as described above and should
not be reversed. Do not attempt to remove or reverse the button. Doing so will
result in an unsafe condition which can cause serious injury or death.
The safety button is marked with a red ring for training purposes as a reminder that
moving it to the left with red showing is the “FIRE” position, moving it all the way to the
right with red not showing is the “SAFE” position.
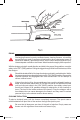
ACTION RELEASE CONTROL
The action lock lever is located on the left side of the trigger housing just rearward of the
trigger guard.
The action lock lever allows the action to be unlocked and opened for inspection of
the chamber or unloading without pulling the trigger. The action may be opened by
depressing the lever and pulling the forearm rearward (Fig. 3).
SAFETY
66626.indd 4 3/10/09 1:32:23 PM