
User's Guide
Chapter 2 Using your C5m/F5m Restoring your system 55
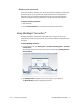
3. The File History window opens and will display any external drives connected to your PC.
If you want to specify another location for your backups such as a network drive, tap
Select Drive in the left-hand panel.
4. Tap
Advanced Settings to modify the way that File History works.
• Save copies of files—the default setting for backups is hourly back-ups, but you can
vary this period from 10 minutes to 24 hours.
• Size of offline cache—use this option to set a limit on the amount of disk space used
for backups.
• Keep saved versions—specify how long you want to keep old versions of your files.
5. Tap Turn on.
6. To restore files, tap Restore Personal Files in the File History window and follow the
instructions.
Restoring your system
Windows 8.1 includes specialized tools for restoring your system in case of issues or system
failure. This section covers:
• Creating a recovery image to use to restore your computer if necessary
• Using the recovery image to boot your system and easily access a number of recovery
and troubleshooting tools that you can use if you encounter any issues with your
Windows 8.1 installation
• Performing a System Restore
Creating a Windows 8.1 recovery drive
Once you’ve set up your C5m/F5m, you should create a recovery drive. A recovery drive will
allow you to boot your system and easily access a number of recovery and troubleshooting
tools that you can use if you encounter any issues with your Windows 8.1 installation.
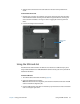
Before you begin
You’llneeda16GBUSBflashdrive.
NOTE: When you create a recovery drive, this will erase anything already stored on your USB flash
drive. You should transfer any important data to another storage device before creating a
USB recovery drive.
Create a USB recovery drive
To create a USB recovery drive:
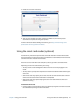
1. Swipe in from the right edge of the screen and tap Search.
2. Type recovery in the search box, tap Settings, and then choose Create a recovery
drive from the search results.