
Instruction Manual


Chapter 2 Using your CL900 Using the cameras with Motion QuickNav 35
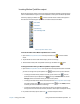
3. Tap the geotag icon to add geographical information or the time stamp icon
to add date and time information to the photo’s metadata information. If you want the
information to appear on the photo itself, tap the stamp icon
. For details, see
“Stamping photos with geographical locations and time” on page 33.
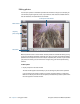
4. Frame the subject of your photo in the viewfinder and tap the shutter icon to take
the photo.
5. Continue to take photos and they will appear on the left of the viewfinder.
6. To add notes or make any other edits to a photo, tap the photo on the left. For more
information, see
“Editing photos” on page 36.
7. When you’re done, tap the close icon to close the viewfinder. A new email message
appears with the photos attached.
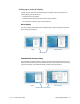
Taking photos and inserting them in an application
You can insert a photo directly into an application by choosing the clipboard icon
from the Action menu. Take a photo, close the viewfinder, then the photo appears where
your cursor is located in the application.
To insert a photo into an active application
1. From the application, place the cursor where you want the photo to appear.
2. Open the Motion QuickNav tool bar then tap the camera icon to open the
viewfinder.
3. Select the clipboard icon from the Action menu.
4. Tap the geotag icon to add geographical information or the time stamp icon
to add date and time information to the photo’s metadata information. If you want the
information to appear on the photo itself, tap the stamp icon
. For details, see
“Stamping photos with geographical locations and time” on page 33.
5. Frame the subject of your photo in the viewfinder and tap the shutter icon to take
the photo. The photo appears in the edit window.
6. You can add notes or make any other edits to the photo from here. For more information,
see
“Editing photos” on page 36.
7. Tap the close icon located at the top right of the viewfinder.
8. The photo appears in your application.