C5te/F5te Tablet PC Model CFT-003 User’s Guide
© 2013 Motion Computing, Inc. All rights reserved. This document contains information protected by copyright. No part of this document may be reproduced in any form without written consent from Motion. The information in this document is provided “as is” and is subject to change without notice. Motion is not liable for errors or omissions in this document. Motion, Motion Computing, View Anywhere, and QuickNav are trademarks or registered trademarks of Motion Computing, Inc. in the U.S.A.
Contents Chapter 1 Getting Started . . . . . . . . . . . . . . . . . . . . . . . . . . . 1 Optional features. . . . . . . . . . . . . . . . . . . . . . . . . . . . . . . . . . . . . . . . . . . . . . . . . . . . . . . . . . . . . . . . 2 Mobile broadband with GPS . . . . . . . . . . . . . . . . . . . . . . . . . . . . . . . . . . . . . . . . . . . . . . . . . . 2 Discrete GPS with WAAS, EGNOS, and MSAS (optional) . . . . . . . . . . . . . . . . . . . . . . . . 2 Security . . . . . . . . . . . . . . . . . .
Entering special keys with the extended keyboard. . . . . . . . . . . . . . . . . . . . . . . . . . . . 27 Using handwriting recognition . . . . . . . . . . . . . . . . . . . . . . . . . . . . . . . . . . . . . . . . . . . . . . 27 Using the front panel buttons. . . . . . . . . . . . . . . . . . . . . . . . . . . . . . . . . . . . . . . . . . . . . . . . . . . 28 Configuring front panel buttons . . . . . . . . . . . . . . . . . . . . . . . . . . . . . . . . . . . . . . . . . . . . .
Restoring your system . . . . . . . . . . . . . . . . . . . . . . . . . . . . . . . . . . . . . . . . . . . . . . . . . . . . . . . . . . 61 Creating a system image. . . . . . . . . . . . . . . . . . . . . . . . . . . . . . . . . . . . . . . . . . . . . . . . . . . . . 62 Restoring your system image from Windows® Control Panel . . . . . . . . . . . . . . . . . . 62 Restoring your system image if you can’t start Windows® 7 . . . . . . . . . . . . . . . . . . . 63 Restoring your system without a system image.
Getting Started 1 The Motion® C5te/F5te Tablet PCs are rugged, powerful, and provide robust computing power and a variety of integrated features to enable any mobile workflow. The C5te/F5te Tablet PCs include these features: • Intel® Core™ i3, i5, or i7 vPro™ Processors (i7 Processor includes Intel vPro™ technology) • Windows® 7 Professional (32-bit or 64-bit) • USB 3.0 port • mSATA SSD with capacities of 64GB, 128GB, or 256GB • DDR3L 1600MHz SDRAM memory • Intel® HD Graphics 4000 • 10.
Optional features This section describes the optional features available when you purchase your C5te/F5te. Mobile broadband with GPS You can purchase a C5te/F5te Tablet PC with an optional embedded mobile broadband with GPS module that enables you to connect to a variety of mobile broadband networks for sending and receiving data wirelessly. You can typically use mobile broadband anywhere you can use your mobile phone.
TPM With the built-in TPM and Infineon Security Platform Tools, you can create and manage digital certificates, user and device authentication, full disk data encryption, and restricted network access. These features are most commonly used by enterprises and enabled by the system administrator. To download and install TPM, go to http:// www.motioncomputing.com/support/driver_download.
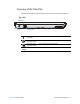
Overview of the C5te/F5te The following illustrations show the buttons, slots, and ports on the C5te/F5te Tablet PC. Top side RFID button RFID status light Chapter 1 Getting Started Barcode scanner button Fan cover RFID (optional) status light Shows the status of the RFID reader. RFID reader (optional) button Use to trigger the RFID reader. Barcode scanner (optional) button Use to trigger the barcode scanner. Fan cover Protects the fan assembly.
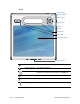
Front Function button Dashboard button Directional pad Battery gauge B button A button Microphones Web camera Touchscreen display Docking connector Chapter 1 Getting Started Function button Activate secondary functions for other buttons. Dashboard button Open Motion Dashboard. Directional pad Use for basic navigation. Equivalent to the arrow keys on a keyboard. The center button is equivalent to the Enter key. A button Set up a custom action. B button Set up a custom action.
Microphones Record sounds and use for speech recognition. Web camera (optional) Use for web-based video communication. Touchscreen display Use your finger or pen to navigate the tablet. Docking connector Connect to a C5te/F5te docking station. Right side Power button Windows® security button Power adapter port, USB 2.0/3.
Back Pen tether Fan cover Pen holder Camera light Speaker Camera lens Battery Battery gauge Battery latch Regulatory label Docking guide Smart card reader Pen tether Attach the pen tether. Pen holder Use to store the pen when not in use. Fan cover Protects the fan assembly. Camera (optional) lens Capture images to the hard drive. Camera (optional) light Provides light for the documentation camera. Speaker Use for listening to audio.
Battery gauge Indicates the level of battery charge when you press the button next to the gauge. Battery latch Opens the battery compartment’s door. Regulatory label Contains regulatory and safety information. Docking guide Aligns the unit with the docking station (sold separately). Smart card reader (optional) Reads information on a smart card. Pen The C5te/F5te Tablet PC supports touch with a pen as well as with your finger.
Where to begin with your C5te/F5te This section includes some steps you can follow to power up and get familiar with your C5te/F5te Tablet PC. Step 1: Power up the tablet 1. Plug the power cord into an outlet. 2. Plug the power cord into the AC adapter. 3 2 1 Power up the C5te/F5te 3. Pull out the port door located at the bottom of the right side of the C5te/F5te to expose the AC adapter port and plug the AC adapter cord into the port.
Step 2: Connect to a wireless network The C5te/F5te comes with built-in Wi-Fi and Bluetooth. Your Tablet PC may also include mobile broadband with GPS. To set up available wireless networks: • Enable wireless from the Motion Dashboard • Set up Wi-Fi • Set up mobile broadband with GPS • Set up Bluetooth Enable wireless from the Motion Dashboard To set up wireless, you must first enable the wireless network adapters from the Motion Dashboard.
The mobile broadband module includes a GPS receiver that provides the current location of your C5te/F5te. With the GPS receiver, you can use most GPS navigation and mapping applications. You use the Motion Connection Manager to manage your mobile broadband network connections and monitor the GPS. To set up mobile broadband: 1. Enable mobile broadband from the Motion Dashboard. 2. Start the Motion Connection Manager. From the Start menu, select All Programs > Motion Computing > Motion CM. 3.
Step 3: Get familiar with your C5te/F5te Tablet PC Once you’ve set up your C5te/F5te, take a few minutes to get familiar with your Tablet PC. • Calibrate touch. You can adjust the touch settings by calibrating the digitizer. (The digitizer is software that detects the position of the pen or your finger on the touchscreen display.) For details, see Calibrate touch on page 21. • Use Motion Computing tools to customize your tablet according to your work style. See Using the Motion Dashboard on page 18.
Lock and unlock the Tablet PC To lock the Tablet PC, either: • Press the security button on the right side of the tablet. • If a keyboard is attached, press Ctrl+Alt+Delete. To unlock the tablet: • Press the security button or Ctrl+Alt+Delete again. Sleep mode Place your tablet in Sleep mode when you go away for a short period of time. Sleep mode conserves battery power while you’re away and when you return, your desktop is the same as you left it. Sleep mode is sometimes called “standby.
For more information on power options, see Changing how the power button functions on page 49. Optional setup tasks Create a recovery image Once you’ve set up your C5te/F5te the way you like it, including installing your applications, create a system image on an external USB drive. This is a safety measure in the event that your system stops working. A system image is an exact copy of a drive and includes Windows® 7, your system settings, programs, and files.
Connect the tablet to a display monitor Connect a display monitor to your C5te/F5te Tablet PC using the VGA port located on the docking station. After connecting the monitor, set up the external display from the Motion Dashboard as described in Setting up an external display on page 30. For more information This User’s Guide introduces the full set of C5te/F5te features and provides instructions for common tasks you’ll perform.
Using your C5te/F5te 2 This chapter provides information about performing the following tasks: • Using the Motion Dashboard on page 18 • Using touch on page 20 • Entering text and handwriting recognition on page 24 • Using the front panel buttons on page 28 • Setting display options on page 30 • Using the built-in microphones on page 33 • Using speech recognition on page 33 • Using the cameras on page 35 • Using the barcode scanner on page 40 • Using the RFID reader on page 41 • Using the battery on page
Introducing the C5te/F5te desktop and applications When you start up your C5te/F5te for the first time, the desktop may look like the following illustration. Motion Computing applications appear in the taskbar and Windows® notification area. Getting Started document Windows® Notification Area Taskbar Motion Computing desktop The Motion Computing applications are described below. Motion Getting Started Document that contains tips for starting out with the C5te/F5te Tablet PC.
4. Under Taskbar location on screen, select Left. 5. Tap OK. TIP: As an option, you can hide the taskbar altogether; it reappears when you tap the area. From the Taskbar tab, tap the Auto-hide the taskbar checkbox. Using the Motion Dashboard The Motion Dashboard provides a convenient way to change common tablet-related settings. To open Motion Dashboard: • From the Windows® taskbar, tap the Motion Dashboard icon .
Dashboard Category Task Display • • • • • Rotate the display orientation. Adjust the brightness of the display. Set advanced graphic properties. Set up an external display. Dim the display automatically. Audio • • • • Adjust speaker and microphone volume. Adjust advanced audio settings. Suppress background noise. Balance speakers. Pen & Tablet • Configure your Tablet PC to use touch only, pen only, or both simultaneously. • Adjust touch to left-handed setting.
Arrow Wireless indicator Motion utilities Power indicator Motion icons in the Windows® notification area Tap the Motion icon to display: • Battery Health—Shows the current battery charge level. • Motion Dashboard—Opens the Motion Dashboard. • Options—Lists options you can set: – Show Hard Drive Activity—When selected, the Motion icon blinks when there is hard drive activity.
NOTE: If the tablet doesn’t respond when you tap with your finger, try using more area of your fingertip. Unlike other types of touchscreens, the C5te/F5te capacitive touchscreen doesn’t respond to other input. For example, you can’t tap it with another object such as a credit card or if you’re wearing gloves. Calibrate touch The digitizer is an application that detects the position of the pen or your finger on the touchscreen display.
Customizing touch input mode You can determine how touch input is configured by setting the input mode. You can use: • Your finger only; no pen input is detected. • The pen only; no finger input is detected. • Both your finger and a pen. • Switch between touch and pen input, in which case you double-tap to switch to touch input. This is useful to avoid the tablet from responding to unintentional touch input. To configure touch settings: 1. Open Motion Dashboard. 2. Tap Pen & Tablet. 3. Tap Touch Settings.
10.To change what the touch pointer looks like or where it’s positioned, tap Advanced Options. To change the location of menus for left-handed users: 1. Open Motion Dashboard. 2. Tap Pen & Tablet. 3. Tap Tablet PC Settings. 4. Tap the Other tab and tap Left-Handed. Adjusting pen settings If the pen doesn’t respond as accurately as you would like, you can make adjustments.
The Configure your pen and touch displays option on the Tablet PC Settings Display tab is useful for assigning touch to the appropriate display when one or more displays are connected to the tablet. By default, Windows® 7 assumes that an external display is for touch input. To change this, run Setup from Tablet PC Settings to assign touch to your tablet display. NOTE: A keyboard must be connected to the tablet to perform this procedure. To assign touch to the desired display: 1. Open Motion Dashboard. 2.
TIP: Tap the icons at the top of the input panel to view videos on making editing gestures. To hide the video tips, tap the icon on the right. By tapping the keyboard icon at the top of the pad, the input panel opens to the on-screen keyboard. Here’s the input panel open to the on-screen keyboard. Tap the Tools menu for more input panel options and for viewing Help Topics.
Docking or floating the input panel By default, the input panel is floating and you can move it anywhere on the screen by placing your finger or pen on the title bar and dragging it. If you prefer, you can dock the input panel so that it always appears in the same location, either at the top or bottom of the screen. To dock or undock the input panel: • At the top of the input panel, tap Tools. • Select Docking. • Select either Dock at the top of the screen, Dock at the bottom of the screen or Float.
Entering special keys with the extended keyboard You can enter special keys using the on-screen expanded keyboard. Special keys include Home, End, Insert, PgUp, PgDn, PrtScn, Pause, and ScrLk. To open the expanded keyboard: • Tap the Tools key at the top of the input panel and choose Show Expanded Keyboard. Special keys Tools Expanded keyboard Using handwriting recognition Handwriting recognition is enabled by default.
4. Tap Change automatic learning settings. 5. Select Don’t use automatic learning, and delete any previously collected data. You can find other handwriting applications at the Motion Computing Store. Using the front panel buttons You can use the buttons on the front of the Tablet PC to perform many functions without having to use the pen. The buttons are customizable, so you can modify their functions to suit the way you work.
Button Secondary (Function+button) Primary Directional pad Moves the pointer or navigates through documents. Equivalent to arrow keys on a keyboard.
Setting display options Use the procedures in this section to customize your display settings. You can adjust the brightness level, rotate the display, and change the order in which the display rotates. Adjusting the display brightness Changing the brightness of the display is useful when you want to conserve battery power. To adjust the display brightness: 1. Open Motion Dashboard. 2. Tap Display. 3. Move the Brightness slider to the desired level.
Display settings When connecting to an external display, specify whether to: • Duplicate (mirror) the displays • Extend the tablet’s display to span across the external monitor • Use the external monitor only or use the tablet only Mirror display The “mirror display” theme duplicates the tablet display on both the display and monitor. This is useful when using your Tablet PC with a projector.
Extended with tablet primary The “extended with tablet primary” display scheme expands the desktop area across the tablet and external monitor, with the tablet as the primary display. You can set the external monitor to use a different display resolution than the tablet. Monitor only The “monitor only” display scheme uses the external monitor only. Tablet only The “tablet only” display scheme uses the tablet display only.
7. Tap Touch Input. 8. Press the Enter key until you see the instructions appear on the display that you want to use for touch input. 9. Follow the on-screen instructions. 10.Press Esc to end the process.
Set up the microphones For best results, move to a quiet environment. To set up the microphones: 1. In Control Panel, tap the Ease of Access category, then tap Speech Recognition. 2. Tap Set up microphone. 3. If you’re using the tablet’s microphone array, select Other. 4. Follow the instructions in the setup program. 5. If the microphones are set to an appropriate level, the meter will stay in the green zone while you read the sentences.
4. Do one of the following: • For voice commands, say the appropriate command. For a list of commands, search Windows® Help and Support for “speech commands.” • For dictation, open the program you want to use and start speaking. For more information about speech recognition, search Windows® Help and Support for “speech recognition.” Using the cameras Your C5te/F5te may include built-in web and documentation cameras. Using the web camera The web camera is a 1.
SnapWorks™ by Motion® The C5te/F5te includes an application called SnapWorks™ that enables you to shoot, save, edit, email, print, and copy your photos. Taking a photo with SnapWorks 1. Press the Camera button to activate the camera and open the viewfinder. A B The SnapWorks camera screen is displayed. 2. Point your camera at the subject you want to photograph. You can use the grid and center circle to help you line up your subject(s). 3. Tap the camera icon take a picture.
After you take your photo, you can tap the Flip icon again to return to the documentation camera viewfinder. Configuring SnapWorks settings 1. Tap the Settings icon in the upper left-hand corner of the screen. The SnapWorks configuration screen is displayed. TIP: Setting Description Camera Resolution Change the resolution of your photos—High = 2048 × 1536 pixels; Med = 1024 x 768 pixels; Low = 640 x 480 pixels (Note: These resolution values apply to the documentation camera only.
SnapWorks help Tap the Help icon to open the Key screen where you can view all SnapWorks™ icon descriptions. Editing a photo in SnapWorks 1. Tap the Gallery icon in the upper left-hand corner of the screen to open the directory where your photos are stored. You’ll see the most recent photos you have taken. 2. Double-tap the photo you want to edit. The photo opens and you’ll see two icons at the bottom left-hand corner of the screen that you can tap to open the SnapWorks photo editing tools. 3.
Sending, printing, and copying your photos 1. To send your photo via email, tap the Gallery icon in the upper left-hand corner of the screen to open the directory where your photos are stored. 2. Tap your photo once to select it, then tap the Send icon . You’ll see a pop-up window that tells you to choose a method to send your image. 3. Tap the Email icon to send your photo as an email attachment. 4. Select the resolution of the image you want to email in the following pop-up window.
Using the barcode scanner Your C5te/F5te is available with an optional integrated 1D and 2D barcode scanner that you can use to retrieve information from barcodes. Many applications use barcodes for asset tracking, identification, and process controls. Supported barcode types The C5te/F5te barcode scanner supports several different types of barcodes—a minimum set of barcodes is enabled at the factory.
4. Press and release the barcode scanner button on the top of the unit. Ensure that the scan beam covers the entire barcode. If the scan was successful, the data will appear in the application and you will hear a chime sound as confirmation. Barcode scanner tips • You will typically get the best scans if the lens is six to seven inches from the barcode. • If you’re having trouble scanning a barcode, use two hands to steady the tablet while you scan.
The RFID reader supports the following formats: • ISO/IEC 14443A/B • ISO/IEC 15693 • ISO/IEC 18000-3 • MIFARE Classic To use the RFID reader: 1. Hold the unit by the handle with the right edge in front of you. 2. Aim the right edge of the unit at the RFID tag and align the RFID antenna/logo with the tag. Ensure that the tag is 1–1.5 inches (25–40 mm) from the RFID antenna scan area. RFID tag 1 – 1.5 inches 3. Press and release the RFID button on the top of the unit.
NOTE: RFID tags are typically used with specialized applications. See your system administrator for more information. Using the battery The C5te/F5te includes a high-capacity Lithium-ion battery that fits into the back of the unit. Under normal conditions, you can run the tablet on battery power for up to six hours. Battery life varies by configuration, applications in use, utilized features, and operating conditions. Maximum battery capacity decreases with time and use.
The battery gauge is located on the front of the C5te/F5te Tablet PC as shown: You can use the battery gauge on the front of the unit to monitor the status of the battery. A B To check the remaining battery power while running on the battery: 1. Locate the battery gauge on the front of the tablet. 2. Count the number of battery gauge lights. When the tablet is on battery power, the lights indicate: • Four green lights: The battery is 75% to 100% charged.
The indicator lights show the remaining charge. Each light represents about 25% of the total charge. Press To check the remaining battery power from the Motion Dashboard: 1. Open Motion Dashboard. 2. Tap Power, which displays the percentage of remaining battery charge. To check the remaining battery power from the Windows® notification area: • Tap the power indicator, which looks different depending on whether the tablet is plugged in. – If the tablet is plugged in, tap the plug icon .
To remove the battery: 1. With the back of the unit facing you, slide and hold the battery latch. 2. Insert your finger under the finger grip and remove the battery from the battery compartment. 2 1 To replace the battery: 1. Place the tabbed end of the battery into the battery compartment. 2. Press the battery down until it locks into place.
Hot-swapping the battery Changing a tablet battery while the tablet is in use and running on battery power is called “hot-swapping.” You can hot-swap a battery only if you have a second charged battery to replace the battery that is low on power. While hot-swapping the battery, you will notice the following behaviors: • The tablet’s display gets dimmer. Once the charged battery is in the tablet, the tablet’s display brightens again. • The battery gauge’s LED lights turn off.
Battery and power management tips • To lengthen the battery’s usable life, use AC power when you can. The battery charges automatically when the tablet runs on AC power. • For optimal battery life, use AC power when using a USB device such as a DVD player or external hard disk drive. • When running on battery power, place the tablet in Hibernate or Sleep mode if you’re going to leave it unattended for more than a few minutes.
Changing how the power button functions When you press and release the power button, it can go into one of the following modes: • Sleep—The tablet pauses all activity immediately and quickly resumes when awakened. This saves power when you’re away from your tablet for a short time. However, you will lose unsaved data if there’s a power failure. • Hibernate—The tablet saves the contents of memory to the hard drive and shuts down. Pressing the power button restores the desktop exactly as you left it.
NOTE: Wireless cards consume battery power. To reduce power consumption when running on battery power and when Wi-Fi is not being used, disable Wi-Fi in the Motion Dashboard. To enable or disable Wi-Fi: 1. Open the Motion Dashboard to the Wireless panel (page 18). 2. Select or clear the Enable Internal 802.11 Wireless check box. Setting up a Wi-Fi connection Follow these steps to create a Wi-Fi connection. To set up a Wi-Fi connection: 1. Open the Motion Dashboard to the Wireless panel (page 18). 2.
NOTE: Wireless cards consume battery power. To reduce power consumption when running only on battery power and when Mobile Broadband is not being used, disable Mobile Broadband and GPS in the Motion Dashboard. To enable Mobile Broadband with GPS: 1. Open the Motion Dashboard to the Wireless panel (page 18). 2. Select the Enable Mobile Broadband with GPS checkbox. Using the GPS receiver The Mobile Broadband module includes a GPS receiver.
NOTE: To use the discrete GPS receiver, you don’t need a network connection or an account with a Mobile Broadband network carrier or service provider. Using Bluetooth You can use Bluetooth to connect to accessory devices or other computers. The devices can communicate with each other when they are in range. Enabling or disabling Bluetooth Before you can set up a Bluetooth device, you must enable the Bluetooth adapter on the tablet.
5. The Select a device to add to this computer window is displayed and Windows® searches for your Bluetooth device. 6. If the device is not discovered, see Bluetooth wireless tips on page 76. 7. Select your Bluetooth device after Windows® shows the device, then click Next. 8. Select a pairing option, then click Next. 9. Once the device is added, Windows® displays a confirmation that the Bluetooth device has been added. 10.
Starting the OmniPass application You use the OmniPass application with the fingerprint reader to create and manage your fingerprints. After enrolling as an OmniPass user, you use OmniPass to secure files, applications and websites by requiring a fingerprint swipe. To start Motion OmniPass: • In the Windows® notification area, double-tap the Motion OmniPass icon ( ).
Create an OmniPass user account You can enroll as a new OmniPass user to register your fingerprint. Before you begin, read the following tips. Fingerprint reader tips • For best results, use the Practice option to familiarize yourself with the fingerprint reader before enrolling the first time. • Be consistent. Hold your finger and scan at the same angle each time. For example, if you enroll your finger with your hand open, hold your hand this way each time you scan. • The scanner is bi-directional.
Replace your passwords Once you’ve enrolled in OmniPass, you can use your OmniPass credentials instead of your password to log on to your accounts that require passwords. This is called password replacement. You set up password replacement the next time you’re prompted for a password. Instead of entering the password, you register your OmniPass credentials. To register OmniPass credentials: 1. At the user name and password prompt, enter your user name and password, but don’t log on.
After you restart the computer, you should configure the authentication rules for strong logon security. To configure authentication rules: 1. Start Motion OmniPass (page 53). 2. Tap Change Your OmniPass Settings. 3. Tap Set user authentication rules and policies. 4. Select the appropriate authentication rules. 5. Tap OK. Using the smart card reader Your tablet may include the optional smart card reader located on the back of the tablet next to the battery.
Smart card reader Smart card Using the SIM card slot The SIM card slot holds one SIM card. You need to use a SIM card only if you’re using mobile broadband on a GSM/UMTS/HSPA network. Contact your service provider for additional information. To insert a SIM card: 1. Turn off the tablet and remove the battery (page 45). 2. Locate the SIM slot door and open it. Diagnostic port SIM card slot Note: The SIM card slot and a diagnostic port are behind the SIM card slot door.
3. Place the SIM card label-side down on the battery tray. Ensure that the notch on the SIM card is in the upper-right corner. 4. Slide the SIM card into the SIM card slot until it clicks into place. You may need to use a paper clip to push the SIM card all the way in. To remove a SIM card: 1. Turn off the tablet and remove the battery (page 45). 2. Open the SIM card slot door. 3. Press the card in slightly until it pops out. You may need to use a paper clip to push the SIM card in to release it.
Using Windows® Action Center Windows® Action Center provides a central location for you to manage the tablet’s security settings and learn more about improving security. If a problem is detected (such as an outof-date antivirus application), the Action Center sends you an alert and provides recommendations for how to remedy the situation. To learn more, open Motion Dashboard to the Security panel, then tap Windows® Action Center.
Locating your serial number You can locate the serial number for your C5te/F5te in these places: • White label underneath the battery, which is located on the back of the tablet. The number begins with “S/N.” To remove the battery, see Removing and replacing the battery on page 45. • Windows® Start menu • BIOS setup utility To locate your serial number from the Start menu: 1. From the Start menu, tap Computer, then tap and hold anywhere in the window to open the options menu. Select Properties. 2.
Creating a system image You can use a system image to restore the contents of your tablet if it ever stops working. A system image is an exact copy of a drive and includes Windows® 7, your system settings, programs, and files. The system image requires an external drive, such as a USB flash drive, on which to store the image. NOTE: We recommend that you create a system image as soon as you set up your tablet and then periodically update it. To create a system image: 1.
Restoring your system image if you can’t start Windows® 7 If you need to restore your system and cannot access Windows® 7, you can access the recovery tool in the Windows® Advanced Boot Options screen. NOTE: Before starting, locate the external drive that contains the system image you created previously (page 62) and ensure that a keyboard is attached to your tablet. To restore your system image from the Windows® Advanced Boot Options screen: 1. Press the tablet’s power button to start the tablet. 2.
The message “Windows is loading files...” and a progress bar will be displayed and there will be a brief waiting period while the necessary files load. 5. Select a keyboard layout in the System Recovery Options dialog box, then press Enter. 6. Select a user name and enter the password, then press Enter. 7. In the System Recovery Options dialog box, use the Tab key to navigate to Reinstall Windows. 8. Press Enter to reinstall Windows®. 9.
Caring for your C5te/F5te 3 Proper care and maintenance will keep your C5te/F5te Tablet PC working and in good condition. For general information about care of the tablet and its components and accessories, see the Safety and Regulatory Guide included with your Tablet PC. WARNING: Follow the guidelines listed below when caring for your C5te/F5te Tablet PC and its components. Improper use may damage the Tablet PC and its components and void the warranty.
Caring for the display Follow these suggestions to keep your display clean: • Clean fingerprints and smudges from the display surface by wiping it with the cloth provided. • If needed, use a cleaning solution recommended by Motion Computing to clean the display. Spray the solution on a cloth then wipe the display. Never spray directly onto the display surface and never use an abrasive cleaner.
NOTE: To order pens or new pen tips, go to Motion Computing Accessories. Replacing pen tips Pen tips eventually wear down or get damaged, so the pen includes extra tips and a tool for replacing them. With typical use, you should change the pen tip every 90 days. If you use the pen in a dirty or dusty environment, you should change the pen tip every 30 days. Particles can become embedded in the pen tip and scratch the display. To replace the pen tip: 1. Grasp the old tip with the replacement tool.
Visibly soiled areas should first be cleaned and then disinfected, or a detergent disinfectant can be used. For disinfection, the cleaned areas should be moistened with the appropriate germicide and allowed to air-dry.
Caring for the tablet battery To maximize the performance of the battery, condition the battery once a month. To condition it, run the tablet on battery power until the battery’s charge level drops below 20%. Then use AC power until it is fully charged. You will receive a message if the tablet detects that the battery needs conditioning. For more information about batteries, see Using the battery on page 43.
4 Troubleshooting and FAQs Motion Computing Tablet PCs are thoroughly tested for performance and quality, but occasionally issues can still occur. If you don’t find the information you’re looking for in this section, go to Motion Computing Support. NOTE: Enterprise users should contact their support organization for assistance with resolving tablet, application, or connectivity issues. Troubleshooting Use the information in this section to identify and resolve common issues.
3. Press the camera, Windows® Security, and dashboard buttons simultaneously. For the locations of these buttons, see below. Dashboard button A B Windows® Security button Camera button The tablet won’t enter Hibernation mode • Hibernation might not be enabled. Enable hibernation by adjusting the power button behavior from Motion Dashboard. See Changing how the power button functions on page 49. The tablet doesn’t return from Hibernation mode while on battery power • The battery might be depleted.
Battery issues The battery doesn’t last very long (less than four hours) • Hot or cold conditions can adversely affect the battery charge. Use AC power if you’re operating the tablet in these conditions. • Accessory devices such as a DVD player and applications that make heavy use of the hard drive can drain the battery more quickly. Remove the accessory devices or use AC power if possible.
The display is too dim • The display brightness may be set too low. Use Motion Dashboard to brighten the display. Open Motion Dashboard, tap Display, then move the brightness slider to the desired level. The display is unreadable or distorted • The screen resolution and color quality may not be set correctly. Use Windows® Display Properties to reset the display settings. From Windows® Control Panel, select Hardware and Sound category. Under Display, change the resolution until the display appears normal.
The pen function button doesn’t work • You may not be pressing the button early enough. Try pressing and holding the pen function button before you touch the pen to the display surface. • The pen function button may be disabled. To enable it, open Motion Dashboard, then tap Pen & Tablet. Tap Pen & Input Devices and tap the Pen Options tab. Tap the checkbox next to “Use the pen button as a right-click equivalent.” The eraser doesn’t work • The eraser may not be enabled.
Network issues The wireless adapter keeps connecting even when I don’t want it to • Disable the desired wireless adapter from the Motion Dashboard. Open Motion Dashboard, tap Wireless, and clear the checkbox next to the wireless adapter that you want to disable. I can’t connect to a wired Ethernet network • To connect to an Ethernet network, your C5te/F5te must be connected to a docking station. The Ethernet port for the C5te/F5te is located on the dock. • The connection may be loose.
I tried to pair my Bluetooth device several times but it isn’t detected: • Bluetooth must be enabled from the Motion Dashboard. Open Motion Dashboard, tap Wireless, and tap the checkbox next to Enable Bluetooth Internal Wireless. • Ensure that the Bluetooth device you’re adding is discoverable. See the device’s manufacturer’s instructions for more information. • Ensure that the Bluetooth device battery is charged. • Check which Bluetooth devices are connected.
Mobile broadband with GPS issues I can’t connect to a mobile broadband network • Mobile broadband is only available if you purchased your C5te/F5te with the optional Mobile Broadband with GPS module. • A mobile broadband network requires you to have a data plan from a cellular network provider. • You may need a SIM card from your network provider.
My GPS isn’t working properly • Mobile Broadband with GPS must be enabled from the Motion Dashboard. Open Motion Dashboard, tap Wireless, and tap the checkbox next to Enable Mobile Broadband with GPS. • If performance is slow, you may be blocking GPS antenna, which is located on the right, bottom side of the Tablet PC. Don’t hold the tablet in this area (shown below) when using the GPS receiver.
simply adds unnecessary wear to the SSD. It is recommended that you disable any automatic or scheduled defragmentation utilities on your tablet. I want to make my tablet run faster • Change the Power plan to High Performance from the Motion Dashboard (see Using the Motion Dashboard on page 18), Power tab. • Adjust your Windows® settings. For instructions, open Windows® Help and search for “improve performance.
spray or pour any liquid, nor wipe any abrasive cleaner on the screen nor any surface of the unit. Don’t use tissues or paper towels to clean the screen. They contain wood fibers and may scratch the surface. Will scratches affect the performance of the display or digitizer? • Our testing has not found appreciable loss of performance on a scratched display.
Index Numerics 802.11 Wi-Fi 10 802.
Ctrl+Alt+Del 6, 13 customizing buttons 29 D Dashboard button about 28 configuring 29 desktop Getting Started doc 17 introduction 17 dictation mode 33 digital ink 24 digitizer Motion Dashboard options 22 digitizer pen calibrating 21 directional pad 5, 29 Discrete GPS receiver with WAAS, EGNOS, and MSAS 51 discrete GPS with WAAS, EGNOS, and MSAS 2 display automatic display rotation 20, 30, 80 care and cleaning 66 connecting external 15 Display Scheme 32 extended 31 locking display orientation 30 mirror 31 or
I indicator light 44 inking 22, 24 input mode 22 input panel docking 26 numbers pad 26 input panel, docking or floating 26 Insert key 27 integrated microphones 33 Internet Options 60 K keyboard 80 show special keys 27 Knowledge Base 15 knowledge base 80 L landscape mode 30 LCD View Anywhere 3 left-handedness 19, 23, 26, 80 locking the tablet 13 locking display orientation 30 M microphones 19, 33 using 33 mirror display 31 mobile broadband 10 mobile broadband with GPS troubleshooting 77 mobile Broadband w
power plan Motion Optimized 48 Power Saver 79 Power Switch on battery or plugged in 49 Print screen key 27 R recycle old computer 80 removing the battery 45 repairing Windows 63 replacing pen tips 67 replacing the battery 45 right-click 20, 23 rotating the display 30, 80 S scheme display 32 scratch resistance 1 scratches 80 screen. See display 80 Scroll lock key 27 security 2 serial number 61 setting up 802.
TPM 3 training 15 training classes corporate 80 training tutorials 80 traveling with your tablet PC 69 troubleshooting audio 78 battery 72 display 72 input 73 U USB 2.0 port troubleshooting 74 USB port 6 user accounts 60 using 802.