J3500 Tablet PC Model T008 User’s Guide
© 2012 Motion Computing, Inc. All rights reserved. This document contains information protected by copyright. No part of this document may be reproduced in any form without written consent from Motion. The information in this document is provided “as is” and is subject to change without notice. Motion is not liable for errors or omissions in this document. Motion, Motion Computing, Speak Anywhere, View Anywhere, and QuickNav are trademarks or registered trademarks of Motion Computing, Inc. in the U.S.A.
Contents Chapter 1 Getting Started . . . . . . . . . . . . . . . . . . . . . . . . . . . 1 Optional features. . . . . . . . . . . . . . . . . . . . . . . . . . . . . . . . . . . . . . . . . . . . . . . . . . . . . . . . . . . . . . . . 2 Mobile broadband with GPS . . . . . . . . . . . . . . . . . . . . . . . . . . . . . . . . . . . . . . . . . . . . . . . . . . 2 Security . . . . . . . . . . . . . . . . . . . . . . . . . . . . . . . . . . . . . . . . . . . . . . . . . . . . . . . . . . . . . . . . . . . .
Docking or floating the input panel . . . . . . . . . . . . . . . . . . . . . . . . . . . . . . . . . . . . . . . . . . 27 Entering numbers with numbers pad . . . . . . . . . . . . . . . . . . . . . . . . . . . . . . . . . . . . . . . . 28 Entering special keys with the extended keyboard . . . . . . . . . . . . . . . . . . . . . . . . . . . 28 Using the handwriting recognition program . . . . . . . . . . . . . . . . . . . . . . . . . . . . . . . . . 29 Using the Front panel buttons . . . . . . . . . . . . .
Creating a system image. . . . . . . . . . . . . . . . . . . . . . . . . . . . . . . . . . . . . . . . . . . . . . . . . . . . . 65 Restoring your system image from Windows Control Panel . . . . . . . . . . . . . . . . . . . 65 Restoring your system image if you can’t start Windows 7 . . . . . . . . . . . . . . . . . . . . 66 Restoring your system without a system image. . . . . . . . . . . . . . . . . . . . . . . . . . . . . . . 66 Finding other software . . . . . . . . . . . . . . . . . . . . . . . . . .
vi Contents
Getting Started 1 The Motion Computing® J3500 Tablet PC is rugged, powerful and purposely built for field professionals that require a highly mobile device for often harsh work environments. Built for business with Intel® Core vPro™ technology and running Microsoft® Windows® 7, the J3500 offers new levels of performance, security and manageability, and it's packed with integrated features that improve in-the-field productivity.
Optional features This section describes the optional features available when you purchase your J3500. Mobile broadband with GPS You can choose to purchase a J3500 Tablet PC with the optional mobile broadband with GPS module. When installed, the module provides: • Worldwide mobile broadband support • Worldwide global positioning (GPS) support Motion Connection Manager is an application that you use to manage your mobile broadband and GPS network connections.
View Anywhere display The View Anywhere display option enhances outdoor viewing and bright-light viewing environments. The View Anywhere display includes all the features of the standard display plus: • A protective layer that improves the sunlight contrast ratio and significantly reduces reflection and glare. • Improved sunlight contrast ratio, which enhances viewability at wide viewing angles. • Reduced reflection and glare and improved light pass-through efficiency.
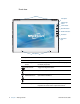
Front view speakers microphone ambient light sensor camera button QuickNav button Dashboard button Esc button directional pad microphones Speakers Listen to music or other audio. Microphones Record sounds and use for speech recognition. Ambient light sensor Measures background light and can automatically adjust the display brightness. Camera button Trigger the integrated camera. QuickNav™ button Open Motion QuickNav Dashboard button Open Motion Dashboard. Esc button Turn off the display.
Back view camera light FlexDock connector (cover shown) camera lens battery power indicator lights (right) battery (left) battery (right) battery gauge button (right) battery gauge button (left) battery power indicator lights (left) Chapter 1 Getting Started battery release switch (left) battery release switch (right) FlexDock connector (cover shown) Connects to the FlexDock when docked. Remove the cover before attaching the J3500 to the dock.
Right side view shoulder strap attach point battery status light air vent fingerprint reader Windows Security button pen tether attach point power button smart card slot (optional) Express card pen bay slot (optional) (Cover removed) 6 Chapter 1 Getting Started Shoulder strap attach point Attach point for the shoulder strap. Air vent Dissipates heat from the tablet PC. Battery status light Indicates amount of remaining battery power.
Left side view headphone port air vent USB ports video port (VGA) power adapter port microphone port universal lock slot Chapter 1 Getting Started Ethernet port shoulder strap attach point (port covers removed) Universal lock slot Connect a security cable to protect the tablet PC from theft. Air vent Dissipates heat from the tablet PC. Audio in/ Microphone port Connect a microphone or other audio source using a 3.5 mm jack.
Bottom view mobile keyboard connector Mobile keyboard connector Interface for the Mobile keyboard. Pen J3500 supports touch with a pen and optionally with your finger. You may find the pen handy when you want to write a quick email or take notes. The pen is particularly effective for precise data entry and navigation. The pen includes a pressure-sensitive tip, a function button, and an eraser. When pressed, the function button displays a shortcut (right-click) menu.
Where to begin with your J3500 Here are some steps you can follow to power up and get familiar with your J3500 Tablet PC. Step 1: Power up the tablet 1. Plug the AC adapter into the AC adapter port located on the bottom left side of the J3500. 2. Plug the power cord into an outlet. • The battery gauge turns amber to indicate that the battery is charging. • Keep the tablet on AC power until the battery is fully charged. Power up the J3500 3. Press and release the power button on.
To set up available wireless networks: • “Enable wireless from the Motion Dashboard” • “Set up Wi-Fi” • “Set up mobile broadband with GPS” • “Set up Bluetooth” Enable wireless from the Motion Dashboard The first task when setting up wireless is to enable the wireless network adapters from the Motion Dashboard. The Dashboard is a Motion Computing application for configuring your J3500 Tablet PC. To enable wireless adapters 1. Open the Motion Dashboard.
Set up mobile broadband with GPS If you purchased your J3500 with the optional mobile broadband module, you can connect to high-speed cellular networks worldwide. With the mobile broadband module and a data plan from one of several cellular network providers, you have full Internet access. The mobile broadband module includes a GPS receiver which provides the current location of this tablet PC. With the GPS receiver, you can use most GPS navigation and mapping applications.
Step 3: Get familiar with your J3500 Tablet PC Once you’ve set up your J3500, take a few minutes to get familiar with your tablet PC. • Calibrate touch. If you have a J3500 with a touchscreen display, you should adjust the touch settings by calibrating the digitizer. (The digitizer is software that detects the position of the pen or your finger on the touchscreen display.) For details, see “Calibrate touch” on page 22. • Use Motion Computing tools to customize your tablet according to your work style.
Hibernate mode If you intend to leave your tablet for several hours or more, you can put the tablet in hibernate mode. Like sleep, when you return from hibernate, your desktop is the same as you left it. It takes longer to start up from hibernate mode than sleep, but it consumes very little power, saves data to disk beforehand, and is still faster than starting your tablet after shutting it down.
A system image is an exact copy of a drive and includes Windows 7, your system settings, programs, and files. For more information, see “Creating a system image” on page 65. Attach the pen tether The J3500 pen comes with a tether so that you can attach the pen to your tablet to avoid misplacing it. The tether is essentially a string with loops at each end. To attach the pen tether 1. Slip one end of the tether through the hole at the end of the pen, then pull the pen through the loop until it is tight. 2.
While the keyboard touchpad is usually enabled, you can disable the touchpad if desired. By default, the touchpad is enabled when the tablet and keyboard are turned on. To disable the keyboard touchpad • Press the Function key and F1 key at the same time. To enable the keyboard touchpad • Press the Function key and F2 key at the same time. For more information This User’s Guide introduces the full set of J3500 features and provides instructions for common tasks you’ll perform.
16 Chapter 1 Getting Started For more information
2 Using your J3500 This chapter provides information about performing common tablet tasks such as customizing touch and changing tablet settings. Introducing the J3500 desktop and applications When you start up the J3500 for the first time, the desktop looks like the following picture where Motion Computing applications appear in the taskbar and notification area.
The Motion Computing applications are described below. Motion Getting Started Document that contains tips for starting out with the J3500 Tablet PC. Motion Dashboard Motion application for changing tablet settings. See “Using the Motion Dashboard” on page 18. Motion QuickNav User interface designed for touch devices. You can use this to access the web and documentation cameras. See “Using the camera (optional)” on page 32.
OR • Press the Dashboard button ( ) located on the front of the tablet. Dashboard button Motion Dashboard is organized into categories, which are listed on the left of the Dashboard. Tap a category to display its settings. In this illustration, Motion Dashboard is open to Display settings. Motion Dashboard The following table lists some of the tasks you can perform using the Motion Dashboard. NOTE: This is a partial list of tasks that you can perform with Motion Dashboard.
Dashboard Category Task Display • • • • • Rotate the display orientation Adjust the brightness of the display Set advanced graphic properties Set up an external display Dim the display automatically Audio • • • • Adjust speaker and microphone volume Adjust advanced audio settings Suppress background noise Balance speakers Pen & Tablet • Configure touch to use touch only, pen only or both simultaneously • Adjust touch to left-handed setting • Adjust sensitivity to flicks and gestures • Use the pen f
Tap the Motion icon to display: • Battery Health—Shows the current battery charge level. • Motion Dashboard—Opens the Motion Dashboard. • Options—Lists options you can set: – Show Hard Drive Activity—When selected, the Motion icon blinks when there is hard drive activity. – Automatic Display Rotation—When selected, the J3500 automatically changes the viewing orientation (landscape to portrait or vice versa) when the tablet is physically rotated.
Note: Press and hold your finger until a circle appears then lift your finger to display the menu. • Double-tap—Perform a double-click action • Tap and drag—Drag and drop • Pinch fingers together—Zoom in • Spread fingers apart—Zoom out • Flick—Scroll through a list or move quickly • Press and hold the pen’s function button (equivalent to a right-click on a mouse)— Open a shortcut (right-click) menu NOTE: If the tablet does not respond when you tap with your finger, try using more area of your fingertip.
Changing to one-tap open for touch With touch, you may want to change how you select and open items. By default, Windows folders are set up so that you tap once to select an item and double-tap to open it. For touchscreen displays, you can change the behavior to point to select an item and open an item with one tap instead of two. To change folder options 1. From the Windows Control Panel, tap Appearance and Personalization, Folder Options, then tap Specify single- or double-click to open. 2.
To change touch settings 1. Open Motion Dashboard. 2. Tap Pen & Tablet. 3. Tap Pen & Input Devices. 4. Tap the Touch tab. 5. To enable Touch, tap Use your finger as an input device. 6. To enable multi-touch gestures, tap Enable multi-touch gestures and inking. 7. To adjust the Double-tap action, under Touch action, tap Double-tap then tap Settings. Move the slider to make your adjustments. 8. To adjust the Press and hold action, under Touch action, tap Press and hold then tap Settings.
6. To adjust the speed and duration of the Press and hold action, under Pen action, tap Press and hold then tap Settings. Move the slider to make your adjustments. 7. To enable the function button on the pen, tap Use the pen button as a right-click equivalent. 8. To enable the eraser, select the Use the top of the pen to erase ink option. Adjusting tablet PC settings From Tablet PC Settings, you can change from right-handed to left-handed use. To change hand orientation 1. Open Motion Dashboard. 2.
Entering text and handwriting recognition You can enter text by either tapping characters on an on-screen keyboard or writing on a virtual writing pad. When you write on the writing pad, your handwriting converts to digital ink. “Digital inking” refers to the process of converting your handwriting to text. In the following picture of the writing pad, someone started writing Motion Computing and “Motion” has already been converted into digital ink.
Opening and closing the input panel The tablet PC input panel often opens automatically when you tap in a text field. You can also tap the tab located on the left side of the screen to expand the input panel. To open the input panel either • Tap at the place you want to enter text, such as in a text box. Then tap the input panel icon . • Tap the input panel tab on the left edge of the screen . To close the input panel • Tap the close button at the top-right.
Entering numbers with numbers pad If you find yourself typing a lot of numbers, use the numbers pad. To open the numbers pad • Tap the Num key at the bottom of the writing pad. Numbers pad Entering special keys with the extended keyboard You can enter special keys using the on-screen expanded keyboard.
Using the handwriting recognition program The more you write, the quicker your handwriting is recognized because the tablet has an automatic learning tool that collects data about the words you use and how you write them. This data is stored under your user profile. As a option, you can use the handwriting recognition application to train the tablet to recognize your handwriting style. You supply handwriting samples when prompted. To start the handwriting recognition program 1. Open Motion Dashboard. 2.
Using the Front panel buttons You can use the buttons on the front of the tablet PC to perform many functions without having to use the pen. The buttons are customizable, so you can modify their functions to suit the way you work. See “Configuring front panel buttons” on page 31. camera button QuickNav button Dashboard button Esc button directional pad Button Primary (press) Secondary (press and hold) Camera shutter Use to trigger an exposure in the built-in camera. Opens My Pictures folder.
Configuring front panel buttons As you become more familiar with your tablet PC, you may want to customize the buttons on the front panel. You can configure the buttons to start your favorite program, run a command, or enter a key combination. camera button Motion QuickNav button Dashboard button Esc button directional pad To configure the front panel buttons 1. Open Motion Dashboard to the Pen & Tablet panel (page 18). 2. Tap the Tablet PC Settings button. 3.
Using the camera (optional) Your J3500 may be equipped with a built-in 3.0 MP auto-focus camera with an illumination light. The JPEG format camera has a maximum resolution of 2048x1536 pixels, which supports taking photos and capturing video. The rear-facing camera can work with any application that uses a camera. The Motion QuickNav application that comes with the J3500 is one way you can use the camera. The J3500 camera lens is located on the back on the tablet.
Using Motion QuickNav Motion QuickNav is a user interface application designed specifically for touch. You can use Motion QuickNav to: • Take photos and insert them directly into your documents or email. For details on using the photo camera, see “Taking photos with Motion QuickNav” on page 36. • Record video clips. For details, see “Using the Motion QuickNav tools” on page 35.
The Motion QuickNav keyboard appears at the bottom of your desktop. Motion QuickNav tool bar icon Motion QuickNav keyboard NOTE: As Motion QuickNav starts up, the screen displays “Motion QuickNav powered by Dial Keys.” Dial Keys is the vendor that created Motion QuickNav for Motion Computing. 2. Tap the Motion QuickNav tool bar icon to open the Motion QuickNav tool bar.
Hiding and showing the Motion QuickNav tool bar While Motion QuickNav is running, the Motion QuickNav tool bar appears on the right side of the desktop. You can hide the tool bar from view and show it only when you want to use it. To hide and show the Motion QuickNav tool bar • From the notification area, tap the Motion QuickNav icon • To show the tool bar, tap the Motion QuickNav icon . again.
2. Tap the Options icon to set up the scanner. You can choose to • Set the type of barcode the scanner recognizes. For best performance, disable the codes you do not need. • Use the front- or rear-facing camera to scan the codes. • Change the resolution. Use a higher the resolution to improve accuracy; use a lower resolution to improve performance. NOTE: Motion QuickNav does not support PDF417 barcodes. To use the Motion QuickNav voice recorder 1.
When you select the camera tool from the Motion QuickNav tool bar, the viewfinder appears. options close Action menu photo reviewer shutter icon GPS tag time tag stamp camera information Motion QuickNav photo viewfinder The Action menu on the top right allows you to choose how Motion QuickNav handles your photos as you take them. You can store them on disk, email them, or send them to the clipboard where they are loaded into an active program on your desktop.
Take photos and save in a folder To take photos using Motion QuickNav and save them in a folder 1. Open the Motion QuickNav tool bar then tap the camera icon viewfinder. 2. Make sure the folder icon to open the is selected under the Actions menu. 3. Frame the subject of your photo in the viewfinder and tap the shutter icon the photo. to take 4. As you continue to take photos, they appear in the temporary folder located on the left of the viewfinder. 5.
Take photos and insert in an application You can insert a photo directly into an application by choosing the clipboard icon from the Action menu. Take a photo, close the viewfinder, then the photo appears where your cursor is located in the application. To insert a photo into an active application 1. From the application, place the cursor where you want the photo to appear. 2. Open the Motion QuickNav tool bar then tap the camera icon viewfinder. 3.
current photo in edit window folder selector temporary photo storage edit tool bar Motion QuickNav edit window Motion QuickNav calls this “review mode” because photos are available for editing as long as you have the Motion QuickNav viewfinder open. Once you close the viewfinder, Motion QuickNav sends the photo to the chosen output: clipboard, email, or folder. If you’ve saved your photos in a folder, you can make further changes using your favorite photo editing software. To edit a photo 1.
3. Tap the pencil icon to enter annotate mode. black pencil red pencil return to edit tool bar eraser highlighter Motion QuickNav pencil tool bar 4. Tap the desired pen color or highlighter. Use the eraser if necessary. Then tap the pencil icon again to return to the edit tool bar. 5. Make any other adjustments by selecting the appropriate icon. For example, you can crop, zoom, rotate, or adjust brightness or contrast.
photo folder video folder home directory voice recordings folder Motion QuickNav folder mode To locate the folders where Motion QuickNav stores content 1. Open the Motion QuickNav tool bar then tap the folder icon to switch to folder mode. 2. Tap the folder icon for the tool whose output you want to change. 3. To leave folder mode, from the QuickNav tool bar, tap the folder icon again. To change the folder where your Motion QuickNav output is stored 1.
Setting display options Use the procedures in this section to customize your display settings. You can adjust the brightness level, rotate the display and change the order in which the display rotates. Adjusting the display brightness You can change the brightness of the display which is useful for conserving battery power. To adjust the display brightness 1. Open Motion Dashboard. 2. Tap Display. 3. Move the Brightness slider to the desired level.
Setting up an external display You can use your tablet with an external monitor or projector. Display settings When connecting to an external display, specify whether to: • Duplicate (mirror) the displays • Extend the tablet’s display to span across the external monitor • Use the external monitor only or use the tablet only You can choose from one of the following display schemes: Mirror display Duplicates the tablet desktop on both the display and monitor.
tablet PC external monitor Extended with monitor primary display theme Display resolution You can change the display resolution of the external monitor or projector if you are using either extended scheme. However, when you are using the Mirror display scheme, the display resolution of the external monitor or projector is limited to the display resolution of the tablet PC. The J3500 12.1” WXGA display has a resolution of 1280x800.
Resetting touch after adding other monitors After setting up an external monitor, touch might be disabled on your tablet because Windows 7 assumes that the external display is for touch input. You can enable touch on the correct display from the Motion Dashboard by following the procedure below. You’ll need a keyboard. To enable touch when your tablet is connected to an external display 1. Attach a keyboard to the tablet. 2. Open Motion Dashboard. 3. Tap Pen & Tablet. 4. Tap Tablet PC Settings. 5.
Connecting headphones, external speakers, or a microphone You can connect headphones or external speakers with a 3.5mm plug into the headphones port located on the left side of the tablet. When speakers or headphones are connected, the internal speakers are disabled. You can connect an external microphone or headset with a 3.5mm plug into the microphone port using a 3.5 mm plug. When a microphone is connected, the internal microphones are disabled.
Set up the microphones For best results, move to a quiet environment. To set up the microphones 1. In Control Panel, tap the Ease of Access category, then tap Speech Recognition. 2. Tap Set up microphone. 3. If you are using the tablet’s microphone array, select Other. 4. Follow the instructions in the setup program. 5. If the microphones are set to an appropriate level, the meter will stay in the green zone while you read the sentences.
4. Do one of the following: • For voice commands, say the appropriate command. For a list of commands, search Windows Help and Support for “speech commands.” • For dictation, open the program you want to use and start speaking. For more information about speech recognition, search Windows Help and Support for “speech recognition.” Using the battery The J3500 includes a high-capacity Lithium-ion battery that fits into the back of the unit.
To check the battery power 1. Locate the battery status light located on the right side of the tablet. 2. Check the color of the battery gauge button for the current status: Steady green—Battery is fully charged and the tablet is running on AC power. Steady amber—One or both batteries are charging. Off—Not charging. The tablet is running on battery power. Flashing amber (slow)—Less than 10 percent battery charge is remaining. Flashing amber (fast)—There is an error. Call Motion Computing Support.
To check the battery status from the battery itself • Locate the battery gauge button and indicator lights on the back of the tablet. The indicator lights show the remaining charge. Each light represents approximately 20% of a full charge. Note: If you push the battery gauge button and the top, middle, and bottom lights on the battery illuminate simultaneously the battery has failed and must be replaced.
Removing and replacing the J3500 battery You can remove the battery to check the remaining power, or to replace it with a fully charged battery. To remove the battery 1. Ensure that the tablet PC is plugged in to AC power or turned off. 2. Turn the tablet PC over so that the back side is up. 3. For the battery you want to remove, slide the battery release switch until the battery is partially ejected, and then pull the battery out of the battery bay.
Hot swapping the battery Changing a tablet battery while the tablet is in use and running on battery power is called “hot swapping.” You can hot swap a battery only if you have a second charged battery to replace the battery that is low on power. To swap a battery with a tablet PC containing one battery and a battery bay cartridge (non-functioning) • If your tablet PC has a battery and battery bay cartridge (non-functioning) installed, remove the battery bay cartridge and install the second battery.
Battery and power management tips • To lengthen the battery’s usable life, use AC power when you can. The battery charges automatically when the tablet runs on AC power. • For optimal battery life, use AC power when using a USB device such as a DVD player or external hard disk drive. • When running on battery power, place the tablet in hibernate or sleep mode if you are going to leave it unattended for more than a few minutes.
Changing how the power button functions When you press and release the power button it can go into one of the following modes: • Sleep—The tablet pauses all activity immediately and quickly resumes when awakened. This saves power when you are away from your tablet for a short time. However, you will lose unsaved data if there’s a power failure. • Hibernate—The tablet saves the contents of memory to the storage drive and shuts down. Pressing the power button restores the desktop exactly as you left it.
You can also use the fingerprint reader as a scrolling device. Move your finger on the fingerprint reader to move the pointer on the screen. NOTE: The scroll function is disabled while scanning a fingerprint. With the fingerprint reader, you can avoid having to enter passwords for your applications and websites. For example, instead of entering various passwords to your different website accounts, you can use your fingerprint to serve as a master password that works for all your accounts.
When you start the application for the first time, the Motion OmniPass application looks like this: Motion OmniPass initial start up After you have enrolled as an OmniPass user, the application opens the OmniPass Control Center which looks like this: Motion OmniPass control center Chapter 2 Using your J3500 Using the fingerprint reader 57
Create an OmniPass user account You create (enroll as) a new OmniPass user to register your fingerprint. Before you begin, read the following tips. Fingerprint reader tips • For best results, use the Practice option to familiarize yourself with the fingerprint reader before enrolling the first time. • Be consistent. Hold your finger and scan at the same angle each time. For example, if you enroll your finger with your hand open, hold your hand this way each time you scan. • The scanner is bi-directional.
Replace your passwords Once you have enrolled in OmniPass, you can use your OmniPass credentials instead of your password to logon to your accounts that require passwords. This is called password replacement. You set up password replacement the next time you are prompted for a password. Instead of entering the password, you register your OmniPass credentials. To register OmniPass credentials 1. When you encounter a user name and password prompt, enter your user name and password, but do not log on.
After you restart the computer, you should configure the authentication rules for strong logon security. To configure authentication rules 1. Start Motion OmniPass (page 55). 2. Tap Change Your OmniPass Settings. 3. Tap Set user authentication rules and policies. 4. Select the appropriate authentication rules. 5. Tap OK. Using the smart card reader (optional) Your tablet may include a smart card reader located on the right side of the tablet PC, under the card slot cover, next to the pen bay.
To insert the smart card 1. Remove the card slot cover. 2. Slide the smart card into the slot, with the metal contacts of the embedded chip facing the top of the tablet PC, until the card is firmly seated in the reader. Depending on your smart card software, you may need to shut down the smart card software before removing the card. With this type of software, removing the smart card while the tablet PC is running can result in logging off or shutting down the tablet PC.
Using the SIM card slot The SIM card slot holds one SIM (Subscriber Identity Module) card. A SIM card is a smart card, about the size of a postage stamp, that stores information about your wireless account. You need to use a SIM card only if you are using mobile broadband on a GSM/UMTS/HSPA network. Contact your service provider for details. Use the following procedures to insert or remove a SIM card. To insert or remove a SIM card 1. Shut down the tablet PC. 2.
3. Do one of the following: • To insert a SIM, lift the plastic film covering the SIM slot and slide the card under the tabs in the slot. Ensure that the metal contacts are facing downward. • To remove a SIM, lift the plastic film covering the SIM slot and slide the card out. SIM slot 4. Replace the battery (page 52). Using Windows Action Center Windows Action Center provides a central location for you to manage the tablet’s security settings and learn more about improving security.
Locating your serial number You can locate the serial number for your J3500 from the: • White label inside one of the battery bays of the tablet PC. • Windows Start menu. • BIOS Setup Utility. To locate your serial number from the Start menu 1. From the Start menu, tap Computer, then tap and hold anywhere in the window to open the options menu. Select Properties. 2. Under the System section of the page, view Model. The serial number begins with “S/N.” To access the BIOS Setup Utility 1.
Restoring your system Windows 7 has specialized tools for restoring your system in case of system failure. This section covers: • Creating a system image to use to restore your computer if necessary • Restoring the computer from a system image using Windows control panel • Restoring the tablet from BIOS if Windows 7 cannot run NOTE: System images are designed for restoring your entire system at once when you have a serious problem with Windows 7.
For more information, open Windows Help and search for “Back up your programs, system settings, and files.” Restoring your system image if you can’t start Windows 7 If you need to restore your system and cannot access Windows 7, you can access the recovery tool from the BIOS screen. NOTE: Before starting, locate the external drive that contains the system image you created previously (page 65). To restore your system image from the BIOS screen 1.
4. On the Advanced Boot Options screen, select Repair your computer and press Enter. 5. Select a keyboard layout, then tap Next. 6. Select a user name and enter the password, then tap OK. 7. On the System Recovery Options menu, tap Reinstall Windows. 8. Tap Yes to reinstall Windows. 9. Check whether Windows was able to save any data from the tablet. Look in the folder called Windows.old. NOTE: If the Reinstall Windows option is not available, the tablet does not contain a recovery partition.
68 Chapter 2 Using your J3500 Finding other software
Caring for your J3500 3 Proper care and maintenance will keep your J3500 Tablet PC working and in good condition for a long time. For general information about care of the tablet and its components and accessories, see the Safety and Regulatory Guide included with your tablet PC. WARNING: Follow the guidelines listed below when caring for your tablet PC and its components. Improper use may damage the tablet PC and its components and void the warranty.
Caring for the display Follow these suggestions to keep your display clean: • Clean fingerprints and smudges from the display surface by wiping it with the display cloth provided. • If needed, use a cleaning solution recommended by Motion Computing to clean the display. Spray the solution on a cloth then wipe the display. Never spray directly onto the display surface and never use an abrasive cleaner.
NOTE: To order pens or new pen tips, go to Motion Computing Accessories. Replacing pen tips Pen tips eventually wear down or get damaged, so the pen includes extra tips and a tool for replacing them. With typical use, you should change the pen tip every 90 days. If you use the pen in a dirty or dusty environment, you should change the pen tip every 30 days. Particles can become embedded in the pen tip and scratch the display. To replace the pen tip 1. Grasp the old tip with the replacement tool.
Caring for the tablet battery To maximize the performance of the battery, condition the battery once a month. To condition it, run the tablet on battery power until the battery’s charge level drops below 20 percent. Then use AC power until it is fully charged. You will receive a message if the tablet detects that the battery needs conditioning. For more information about batteries, see “Using the battery” on page 49.
Troubleshooting and FAQs 4 Motion Computing tablet PCs are thoroughly tested for performance and quality, but occasionally problems can still occur. If you do not find the information you are looking for in this section, go to Motion Computing Support. Troubleshooting Use the information in this section to identify and resolve common issues. If an issue has more than one potential cause, the most common cause is listed first.
The display goes black while the tablet PC is still turned on • The tablet might have turned off the display to save power. To restore the display, touch the screen with your finger or the pen. • The tablet might have gone into Sleep mode. Press and hold the power button for about one second. • The tablet might have gone into low-battery Hibernation mode. In Hibernation mode, the power status light is off. Plug the tablet in to AC power, then press and hold the power button for about one second.
When I disconnect an external monitor, the desktop area is larger than the tablet PC display • The tablet may have expanded the desktop beyond the display area of the tablet PC display when it was connected to the external monitor. Use Motion Dashboard to reset the tablet PC to the display setting for stand-alone tablets. Open Motion Dashboard, tap Display. Then, from the Display Scheme drop-down list, select Tablet Only. • The display resolution might not match the native resolution of the LCD display.
Touch or pen problems The tablet PC does not respond to the pen I am using • Use only the J3500 pen with the tablet. The tablet PC does not respond to other digitizer pens, even Motion Computing pens for other models. When I add an external display, touch input does not appear on the desired display • Run touch set up on the desired display. Make sure a keyboard is attached to your tablet and then open Motion Dashboard. Tap Pen & Tablet, then tap Tablet PC Settings.
Front panel buttons The buttons on the tablet PC do not do what I expect them to do • The button functions may have been customized. You can use the Tablet and Pen Settings window to change the buttons to the desired functions. See “Configuring front panel buttons” on page 31. Ports and connectors problems The tablet does not recognize the USB device • Windows 7 may take a short time to recognize the USB device. Wait a few moments to see if Windows recognizes the device.
Wi-Fi problems I cannot connect to a wireless Wi-Fi network • Your J3500 may not have located a Wi-Fi network. From the Start menu, tap Control Panel then Network and Internet. View your active networks. If no network is connected, tap Connect to a network and select a network from the list. • Wi-Fi must be enabled from the Motion Dashboard. Open Motion Dashboard, tap Wireless and tap the check box next to Enable 802.11 Internal Wireless. • You may not have access to the network.
My Bluetooth device doesn’t work properly • Some issues arise when using Bluetooth devices as listed below. Bluetooth wireless tips Motion Computing and its Bluetooth partners have worked to ensure a positive experience with this technology and to ensure Bluetooth interoperability. In doing so, we have found the following issues: • Interference—If you are running Bluetooth and Wi-Fi at the same time, interference can affect the Bluetooth performance.
Mobile broadband with GPS problems I cannot connect to a mobile broadband network • Mobile broadband is only available if you purchased your J3500 with the optional Mobile Broadband with GPS module. • A mobile broadband network requires you to have a data plan from a cellular network provider. • You may need a SIM card from your network provider.
My GPS isn’t working properly • Mobile Broadband with GPS must be enabled from the Motion Dashboard. Open Motion Dashboard, tap Wireless and tap the check box next to Enable Mobile Broadband with GPS. • If performance is slow, you may be blocking the GPS antenna, which is located on the top of the tablet. Do not hold the tablet in this area (shown below) when using the GPS receiver.
Photos are backward (display mirror image) • Set the camera rotation to Flip X. Open the Motion QuickNav tool bar then tap the camera icon , tap Options icon , tap the Camera tab, tap the Camera tab then under Rotation, select Rotate 180 & Flip X. Camera makes a whirring sound and doesn’t take a photo • You may be covering up the camera lens. • This can occur if you take many photos in sequence. Wait a few seconds before taking another photo. If that doesn’t work, close the viewfinder and reopen it.
Frequently asked questions How can I make the battery charge last longer? • By default, the power plan for the J3500 is a balance between optimal performance and a long battery charge. If you want the tablet to run longer between charges, use the Power saver power plan. Open Motion Dashboard, tap Power. Tap Power Options and select Power saver. • Use the Dynamic display setting. This automatically controls the display to conserve power. Open Motion Dashboard, tap Display then tap Dynamic.
How sensitive is the screen to various elements? • As with any computer or electronic device, you should protect the tablet PC from liquids, dirt and sand, other contaminants and extreme heat. Will any monitor, USB device, keyboard or mouse work with the tablet PC? • If the device has a driver for Windows, it will work with the tablet PC. For a list of products that have been tested for Windows, look for the Windows Marketplace Tested Products page on the Microsoft website.
Index Numerics 802.
connecting display monitor 14 docking station 14 external speakers 47 headphones 47 microphone 47 context-sensitive menu 22, 24 credit card 22 crop photos 41 Ctrl+Alt+Del 6, 12, 81 customizing buttons 31 D Dashboard button about 4, 30 configuring 31 data encryption 2 desktop Getting Started doc 18 introduction 17 QuickNav 18 Dial Keys 34, 81 DialKeys.
H handwriting recognition applications 29 hard drive activity 21 hardware overview 4 headphones port 7 headphones, connecting 47 hibernate 13, 73 about 55 Home key 28 hot swapping battery 53 I inking 23, 26 input mode 23 input panel docking 27, 28 docking or floating 27 numbers pad 28 Insert key 28 Internet Options 63 K keyboard 84 show special keys 28 Knowledge Base 15 knowledge Base 84 L landscape mode 43 LCD View Anywhere 3 left-handedness 20, 24, 25, 27, 84 locating serial number 64 locking the table
photos attaching to email messages 38 editing 40 inserting in applications 39 taking with QuickNav 36 troubleshooting 82 port covers 7 portrait mode 43 portrait orientation 43 power adapter port 7 power button 6, 55 blinking 73 power plan Motion Optimized 54 Power Saver 83 power switch on battery 55 Print screen key 28 Q QuickNav 4, 18, 30, 81 help 35 keyboard 34 review mode 40 starting 33 starting and stopping 35 tool bar 34 troubleshooting 81 R recycle old computer 84 removing the battery 52 repairing W
taskbar 10, 18 moving to left 18 text entering 26–29 touch and pen 23 calibrating 22 disabling touch input 23 gestures 24 on multiple displays 46 pointer, adjusting 23 pointer, show or hide 24 setting spatial tolerance, speed, and duration 25 troubleshooting 76 using 21–25 using multiple monitors 25 touchscreen display 2 caring for 70 training 15 training classes corporate 84 training tutorials 84 traveling with your tablet PC 72 troubleshooting audio 81 battery 74 display 75 input 76 ports and connectors 7