
Operation Manual


54 Motion Computing LE-Series and LS-Series Tablet PCs User Guide
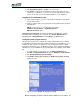
8. Tap Enter. The system returns to the Security screen and the System Pass-
word reads Set. A password is now required to enter the
PhoenixBIOS Set Up Utility.
9. To set up a Password on boot, tap Disabled next to
Password on boot until Enabled is highlighted. You will not be prompted to
type in another password because Password on boot uses the System
password.
NOTE: You cannot set up Password on boot until you set up a
System password.
10.If you have finished setting up a password, tap Exit or press the Esc key
on the Tablet PC to exit the PhoenixBIOS Set Up Utility.
11. When you exit, you are asked to select from the following options:
• Exit Saving Changes
• Exit Discarding Changes
• Load Set Up Defaults
• Discard Changes
• Save Changes
12. Select the desired action.
13. Confirm the selection by tapping Yes.
Hard Disk Drive (HDD) password. To set up a password to start the Tablet PC (so
no one can access the information on the HDD of your Tablet PC even if it is
removed and installed in another Tablet PC without the proxy password):
1. Start the Tablet PC.
2. When the Motion Computing splash screen appears, quickly press the
Rotate button. If you miss the splash screen, turn the Tablet PC off then
back on and try this step again.
3. From the PhoenixBIOS Set Up Utility, tap Security on the menu bar.
4. To set the HDD password, double-tap Enter next to Set Hard Disk Pass-
word.
5. Type in a New Password.
6. Tap Enter.
7. Type in the password to confirm it.
8. Tap Enter. The system returns to the Security screen and the HDD Pass-
word is Set. (When you exit then re-enter the PhoenixBIOS setup, the HDD
Password is Locked.)
9. If you have finished setting up a password, tap Exit or press the Esc key on
the Tablet PC to exit the PhoenixBIOS Set Up Utility.
10. When you exit, you are prompted to select from the
following options:
• Exit Saving Changes
• Exit Discarding Changes
• Load Set Up Defaults
• Discard Changes
• Save Changes
11. Select the desired action.