
User's Guide

Chapter 2 Using your R12 Using the cameras 34
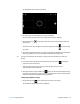
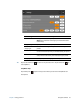
The SnapWorks camera screen is displayed.
2. Point your camera at the subject you want to photograph.
You can use the grid and center circle to help you line up your subject(s).
3. Tap the camera icon on the right side of the screen or press Function button 2 to
take a picture.
To zoom in or out on your subject, use the zoom adjustment slider on the left side of
the screen.
4. Your photo is saved and stored in the image storage location specified in the SnapWorks
settings. By default, this is the C:\Users\[your username]\Pictures directory.
T
IP: You can press and hold Function button 2 to open the Pictures directory to view your
photos.
5. If you want to take a photo with the web camera, tap the Flip icon in the upper
right-hand corner of the screen.
After you take your photo, you can tap the Flip icon again to return to the
documentation camera viewfinder.
6. To activate the flash, press the flash icon once if you want to use the flash for taking
all photos. Press the flash icon twice to initiate auto flash mode, which activates the flash
only when required by the ambient lighting conditions.
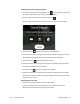
Configuring SnapWorks settings
1. Tap the Settings icon in the upper left-hand corner of the screen.
The SnapWorks configuration screen is displayed.