model no. 299-6962-4 TIRE DOLLY IMPORTANT: Please read this manual carefully before using this product and save it for reference.
headline bars model no. 299-6962-4 | contact us 1-888-942-6686 continuation tabs continuation tabs warnings notes notes Read and understand this instruction manual thoroughly before using the product. It contains important information for your safety as well as operating and maintenance advice. Keep this instruction manual for future use. Should this product be passed on to a third party, this instruction manual must be included.
bars 4 Introduction 4 Safety Information 4 Personal Safety Instructions 4 Technical Specifications Parts List Assembly Operation Maintenance 4 IMPORTANT: This manual contains important safety and operating instructions. Read all instructions and follow them while using the product.
headline bars model no. 299-6962-4 | contact us 1-888-942-6686 • • • • • • tabs TECHNICAL SPECIFICATIONS • • It is the owner’s and/or operator’s responsibility to read and understand all WARNINGS and operating instructions contained on the product labels and within the instruction manual prior to operation of this product. It is also the owner’s and/or operator’s responsibility to periodically inspect and maintain this product and its labels.
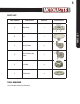
bars PARTS LIST PART NUMBER DESCRIPTION QUANTITY A Main Body 1 B Lid 1 C Swivel Castor 3 D Swivel Castor with Brake 1 E Lock Nut 4 F Flat Washer 4 ILLUSTRATION TOOLS REQUIRED 14 mm socket wrench (not included) PARTS LIST headline bars tion tabs
headline b headline bars model no. 299-6962-4 | contact us 1-888-942-6686 ASSEMBLY 1 tabs tabsdown on the lid in the centre of the main Press body. Hold and turn the lid counter-clockwise to unlock the lid. continuat 1 warnings 3 Replace the lid in the centre of the main body, and turn the lid clockwise to lock it. Make sure to turn the lid completely to the locked location. warnings Remove the lid and take out four swivel notes castors.
bars 4 Remove lock nut and flat washer on the top screw rod of the castor. Insert the castor rod from underneath the main body ensuring the hexagonal head of the castor fits snugly into the hexagonal hole. 5 Hold the castor by hand. Place the flat washer and lock nut over the top screw rod of the castor. Tighten securely using the 14 mm socket wrench (not included). Repeat for other castors. 6 Now the tire dolly is ready to use. WARNING! Never step on the dolly during assembly.
headline bars model no. 299-6962-4 | contact us 1-888-942-6686 Stack your tire and wheel assemblies or tires only (not included) on the dolly. Make sure loads are centred and evenly distributed on the dolly. Make sure all the tires are aligned vertically. Move the loaded dolly carefully and slowly to notes the desired place. 4 notes 3 continuation tabs Use a load restraint device (not included).
N° de modèle : 299-6962-4 CHARIOT À PNEUS IMPORTANT: Veuillez lire attentivement ce guide d’utilisation avant d’utiliser cet article et le conserver aux fins de consultation ultérieure.
2 headline bars N° de modèle : 299-6962-4 | Communiquez avec nous au 1 888 942-6686 SI DES PIÈCES SONT MANQUANTES OU ENDOMMAGÉES, OU POUR TOUTE QUESTION, tabs VEUILLEZ COMMUNIQUER AVEC NOTRE SERVICE D’ASSISTANCE TÉLÉPHONIQUE SANS FRAIS AU 1 888 942-6686. continuation tabs warnings notes Avant d’utiliser le produit, veuillez lire attentivement et bien comprendre ce guide d’utilisation.
3 bars 4 Introduction 4 Consignes de sécurité 4 Consignes de sécurité personnelle 4 Fiche technique Liste des pièces Assemblage Fonctionnement Entretien 4 IMPORTANT: Le présent guide d’utilisation contient un mode d’emploi et des consignes de sécurité importants. Lisez toutes les instructions et suivezles lorsque vous utilisez cet article.
4 headline bars N° de modèle : 299-6962-4 | Communiquez avec nous au 1 888 942-6686 • • • • • • • • warnings notes CONSIGNES DE SÉCURITÉ PERSONNELLE • • Il incombe au propriétaire et/ou à l’utilisateur de lire et de comprendre tous les AVERTISSEMENTS et instructions contenus sur les étiquettes et dans le guide d’utilisation avant d’utiliser cet article.
5 bars LISTE DES PIÈCES DESCRIPTION QUANTITÉ A Élément principal 1 B Couvercle 1 C Roulette pivotante 3 D Roulette pivotante avec frein 1 E Écrou autobloquant 4 F Rondelle plate 4 ILLUSTRATION OUTILS REQUIS Clé à douille de 14 mm (non incluse) headline bars tion tabs LISTE DES PIÈCES NUMÉRO DE PIÈCE
6 headline b headline bars N° de modèle : 299-6962-4 | Communiquez avec nous au 1 888 942-6686 ASSEMBLAGE tabs tabs sur le couvercle situé au centre de Appuyez l’élément principal. Maintenez et tournez le couvercle dans le sens inverse des aiguilles d’une montre pour déverrouiller le couvercle. continuat 1 warnings 3 Replacez le couvercle au centre de l’élément principal et tournez-le dans le sens des aiguilles d’une montre pour le verrouiller.
4 Retirez l’écrou autobloquant et la rondelle plate sur la tige supérieure de la roulette. Insérez la tige de la roulette sous l’élément principal en vous assurant que la tête hexagonale de la roulette rentre parfaitement dans le trou hexagonal. 5 Tenez la roulette dans votre main. Placez la rondelle plate et l’écrou autobloquant sur la tige supérieure de la roulette. Serrez fermement à l’aide de la clé à douille de 14 mm (non incluse). Procédez de même pour les autres roulettes.
8 headline bars N° de modèle : 299-6962-4 | Communiquez avec nous au 1 888 942-6686 3 Déplacez toujours le chariot chargé prudemment et lentement. notes 4 notes Utilisez un appareil de retenue de charge (non continuation tabs inclus). Vous pouvez entourer les pneus au moyen de deux attaches, comme illustré cicontre, pour les sécuriser sur le chariot. continuation tabs 2 Assurez-vous de verrouiller les roulettes après avoir déplacé le chariot.