GLADIATOR OWNER’S MANUAL Motor Trike, Inc. P.O.
TABLE OF CONTENTS INTRODUCTION ........................................................................................................................................ 3 SAFELY OPERATING YOUR TRIKE ....................................................................................................... 3 CAPACITY LIMITS .................................................................................................................................... 4 SPECIFICATIONS ..........................................
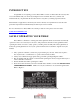
INTRODUCTION Congratulations on acquiring your new Motor Trike conversion. Please take the necessary time to become familiar with your vehicle by reading this owner’s manual. The more you know and understand about your particular unit the safer and more enjoyable your riding experience will be. This manual is a supplement to the motorcycle owner’s manual, not a replacement for it. Follow all procedures required and recommended by the motorcycle owner’s manual. For more information on Motor Trike, Inc.
Follow the maintenance schedule set forth by this owner’s manual and the original motorcycle owner’s manual in order to ensure the vehicle functions properly. The maintenance schedule can be found in the Maintenance/ Service section of each owner’s manual. Do not load the trike with passengers, cargo, accessories, etc. that will result in exceeding the recommended load capacity. This will ensure the vehicle is operating within its designed conditions.
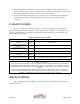
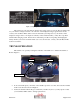
Table 2: Gladiator Specifications OVERALL LENGTH*: WHEEL BASE*: OVERALL WIDTH: TRACK WIDTH: BASE WEIGHT: TIRE SIZE: WHEEL SIZE: MAX. LOAD CAPACITY: 104" 64" 55" 43.5" 1200 lbs 225/60/R15 15" X 7" Bolt Pattern: 5 X 4.5" 500 lbs *Measured with stock rake. 4° rake kit adds 3 inches to the overall length and wheel base AIR SUSPENSION OPERATION An on-board air compressor allows for on-the-fly air suspension pressure adjustment.
Figure 3: Air Spring Pressure Sticker Trunk Location The suspension control module also displays the voltage of the 12v system. The acceptable range for your vehicle’s voltage is between 11V and 14V. If the displayed voltage is greater than 14 volts, contact your local Motor Trike dealer to have the electrical system inspected on your vehicle. If the displayed voltage is below 11V despite how much you have ridden the bike, you may have a problem with the bikes charging system.
PARKING When parking your trike, extra precaution needs to be taken in order to ensure the vehicle cannot roll away which could cause vehicle damage or personal injury. Several recommended steps that will help to ensure the trike is securely parked include: Lock the steering lock. Leave the transmission in gear. Park on level ground. Apply parking brake if equipped. AVAILABLE ACCESSORIES & OPTIONS Motor Trike offers an extensive line of accessories in order to further customize your trike.
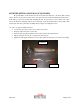
RECEIVER HITCH & DRAW BAR (IF EQUIPPED) Proper installation of the draw bar into the receiver hitch is critical for your safety while towing a trailer. There is a bolt located on the bottom of the draw bar receiver tube that eliminates the draw bar from rattling. Use a 9/16” wrench when adjusting this bolt. It is necessary to remove this bolt in order to remove the draw bar. Warning, this bolt is not intended to retain the drawbar when towing a trailer. The draw bar pin and safety pin must be installed.
RECIEVER TUBE PROPERLY INSTALLED DRAW BAR WITH SAFETY CLIP DRAW BAR ANTI-RATTLE BOLT Figure 6: Properly Installed Draw Bar Safety Pin ELECTRIC REVERSE (IF EQUIPPED) If used within the recommendations below, the electric reverse will meet all of your expectations. Before reversing, always check that the path behind the trike is clear and announce that you are backing up to anyone nearby.
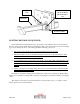
HOW TO USE THE ELECTRIC REVERSE: 1. Turn the ignition on and start the bike. Never use the reverse when the bike is not running. 2. Put the bike in neutral. 3. Turn the activation switch on and look for the red indicator light on the switch to illuminate. See switch location in Figure 7. NOTE: With the activation switch on and the neutral light on, the function of your horn button and start button has been changed to operate the reverse. ACTIVATION SWITCH Figure 7: Activation Switch Location.
STYLE A STYLE B Figure 8: Resetting the Reverse Breaker(s) MAINTENANCE If your vehicle requires professional services, Motor Trike has an extensive dealer network with specially trained technicians capable of servicing or repairing your vehicle. To locate the authorized Motor Trike dealer nearest you, go to the Motor Trike web site (WWW.MOTORTRIKE.COM) and access the Dealer Locater link.
Table 4: Maintenance Schedule FREQUENCY (Miles) COMPONENT Tire Pressure Wheels and Tires Air Suspension Pressure Lighting Belt Tension Brake Fluid Brake Rotors/ Pads CV Boots DAILY X 3,000 6,000 12,000 100,000 X X X X X X X Suspension Alignment Electric Reverse X X X: Inspect, Adjust, Lubricate/Replace if necessary R: Replace L: Lubricate using recommended lubricant WHEELS AND TIRES Having properly inflated tires is essential to a comfortable and safe ride.
LIGHTING Check that all lights are working properly before you ride your trike. This includes the brake lights, head lights, turn signals, and marker lights. BELT TENSION Belt tension should be checked every 3,000 miles. The belt tension should be set to the factory specifications provided in the motorcycle owner’s manual. DIFFERENTIAL GREASE The differential lubrication is maintenance free. It does not require replacement at any interval.
Check that all reverse wiring is properly secured every time you change your motorcycle’s engine oil. Warning: All large red cables have a constant 12 volts. Follow the battery maintenance plan recommended by the manufacturer of your battery. WARRANTY Your Motor Trike, Inc. trike kit carries a 3 year/ 60,000 mile warranty. The start date of warranty coverage will be determined by the date on the warranty card that is turned in by the customer or dealer upon purchasing the unit.