TABCONT.FM Page iii Monday, November 18, 2002 2:41 PM Table of Contents Table of Contents Table of Contents................................................................................ iii Welcome ............................................................................................... 1 TTY Access .................................................................................................... 2 Large-Print Manuals...............................................................................
TABCONT.FM Page iv Monday, November 18, 2002 2:41 PM VibraCall® Alert ......................................................................................... Selecting VibraCall Alert for All Incoming Calls and Messages......... Selecting VibraCall Alert for Individual Services................................ Setting the Ringer Volume........................................................................... Setting a Ring Style for the Alternate Line .....................................
TABCONT.FM Page v Monday, November 18, 2002 2:41 PM Table of Contents Clearing or Queueing a Call Alert......................................................... 30 Responding to a Queued Call Alert....................................................... 30 Quickstore of Private IDs .............................................................................31 Storing Your Private ID................................................................................ 31 Making Group Calls......................
TABCONT.FM Page vi Monday, November 18, 2002 2:41 PM Net Mail ....................................................................................................... 44 Voice Mail ............................................................................................. 45 Alert Receipt During Phone Call .......................................................... 45 Message Mail ............................................................................................... 46 Saving and Erasing Mail.....
TABCONT.FM Page vii Monday, November 18, 2002 2:41 PM Table of Contents Safety and General Information ...................................................... 67 RF Operational Characteristics..................................................................... 67 Portable Radio Product Operation and EME Exposure Guidelines ............. 68 Phone Operation .................................................................................... 68 Two-way Radio Operation ........................................
TABCONT.FM Page viii Monday, November 18, 2002 2:41 PM DECLARATION OF CONFORMITY Per FCC CFR 47 part 2 Section 2.1077(a) Responsible party name: Address: Phone number: Motorola Inc.
Welcome ongratulations on purchasing your Motorola iDEN r750plus datacapable, multi-service, digital portable phone. Superior features and state-of-the-art technology help to keep you in constant touch with all your business and personal contacts. C Important! Be sure to read Safety and General Information on page 67 before using your phone.
This manual provides information about how Net Mode works with various features of your r750plus phone. For information on using the microbrowser and other components of Net Mode, see the Net Mode User’s Guide. TTY Access TTY access is available on your phone. See the Wireless Data Services User’s Guide for complete instructions. Large-Print Manuals A large-print version of the phone’s User’s Guide is available.
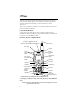
Welcome Some keys have multiple uses. For more information, see the Net Mode User’s Guide. Press any key or button to turn on the keypad backlight. Antenna Earpiece Volume Control/ List Buttons Install for optimal signal. Hold to your ear to hear the other party. Push-To-Talk (PTT) Button Transmit a Private or Group Call, or a Call Alert. Press and hold the PTT button to talk; release it to listen. Press to change modes.
Attaching and Charging the Battery Attaching the Battery 1. 2. Insert the battery bottom-end first into the battery guide holes on the housing of the phone. Push the battery forward into the housing of the phone until it securely locks. Detaching the Battery 1. 2. Press down on the battery release button. Pull on the battery and remove it. Charging the Battery You should charge your r750plus phone battery overnight before initial use. This allows your battery to achieve its maximum capacity and life.
Welcome Table 1: Battery Charging Status Icon Flashes Charging Low Battery 0-30% 3160% 6190% 91100% Discharging Low Battery 0-10% 1140% 4170% 71100% Turning On Your r750plus Phone Press and hold the On/Off button until a set of icons appears on your display. Next, a welcome message displays while the r750plus phone connects to your carrier’s network. The Status Light (LED) indicator on the r750plus phone shows the service state. See Table 2 .
Connecting the Supplied Antenna Turn your r750plus phone off before installing or removing the antenna. Insert the bottom of the antenna into the screw-in base on the top of the r750plus phone. Turn clockwise by hand until snug. Do not force.
Welcome Receiving New Mail Messages When you receive a new mail message (see “Using Mail Services” on page 44 for more information), the keypad lock will be temporarily disabled. You may perform the following: • Press under “Later” to return to Phone Ready and reactivate the • lock. Or, Press under “Now”. Press under “Read”. Press under “Save” or “Erase”. Once you have finished, press under “Exit” to return to Phone Ready and reactive the lock.
Display Icons Display icons appear on the screen to inform you of existing conditions. See the following list. The following icons may appear along the top of the display. Signal Strength Indicator Shows the signal strength. Six bars indicate the strongest signal. Calls and messages may not be sent or received in no-signal areas. Battery Strength Indicator Shows the remaining charge in your battery. Three bars show full charge.
Welcome About Modes and Menus Modes and menus are the navigational tools, providing access to the various features of your r750plus phone. Pressing the Mode key takes you through takes you through the menu the mode choices. Pressing the Menu key options within each mode. There are four modes: Phone—for cellular phone calls. See Page 12. • • Private—for one-to-one radio calls. See Page 28. • Group—for radio calls with all individuals in a designated talkgroup. See Page 32. • Net—for browser use.
You have a choice of either a MM/DD (month/day) or a DD/MM (day/month) date format. See Table 4:. Table 4: Date Display Options Date Month/Day Format (MM/DD) Day/Month Format (DD/MM) January 2nd 01/02 02/01 January 31st 01/31 31/01 October 9th 10/09 09/10 December 31st 12/31 31/12 If your carrier activates the time and date, they are displayed on the third line in all modes (Phone, Private, Group, Net). The time of day is also shown during an active Phone call.
Welcome 9. Select “Exit” again to leave the Time/Date Programming option. The Ready screen for each mode (Phone, Group, Private, and Net) now displays the selected time and date formats. Changing the Display Language You can customize your r750plus phone to display one of four languages: English, French, Spanish, or Portuguese. To change the displayed language: 1. 2. Press , Select “Ok”. Press or , 7 , 0 . 1 to scroll through the language options.
Making Phone Calls In addition to making and receiving phone calls in Phone mode, you can forward calls, use call waiting, put calls on hold, and create and use stored lists. Phone Ready is the main screen. NOTE: See “Additional Phone Services” on page 17 for more information. You can place a call by entering the phone number on the keypad. 1. From the “Phone Ready” screen, using the keypad, enter the desired number. 2. 3.
Making Phone Calls Name Search 1. 2. From the Phone Ready screen, select “Name”. Using the keypad, enter the first letter of the desired name, for example, to search for the name Bob: 3. 4. Enter “B” by pressing 2 twice. Press to scroll through all the names starting with “B” until you see “Bob”. to place the call. Press To end the call, press . 5. 6. Automatic Redial If you receive a “System Busy, Try Later” message, press to have your phone automatically redial the number.
Plus Dialing This feature enables you to place an International call from any country -without entering the local international access code. 1. Press and hold 0 for two seconds. A “0” appears, then changes to a “+” that precedes the appropriate international access code needed to place the call. 2. Enter the international telephone number. 3. Press . Hands-Free Speakerphone The r750plus phone provides the convenience of a speakerphone for holding impromptu meetings or listening to your voice mail messages.
Making Phone Calls What Is My Phone Number? Press , , 1 1 ,to display your own phone number. 1=Own Ph# 9545553434 VibraCall® Alert VibraCall Alert is a vibration alert system that notifies you Exit Edit of incoming Messages, Phone, Private, Group, and Data calls. You can set a vibration alert for all services or for individual services. When you set vibration alerts, they are set only for the current line.
Selecting VibraCall Alert for Individual Services To set a vibration alert for specific phone or mail services: 9 1. Press 2. until you see the Press “Selct” menu option. 3. 4. , , 1 . 9=Vibrate Alert:Off Exit Select “Selct”. The first choice is Phone Vibrate. To view the Vibe/Ring vibration alert choices, press All 1 9=Vibrate Alert:Off on the keypad. Select 5. 6. 7. To view other choices, press . • To receive vibration alerts only for Mail, select “Mail Vibe”, then select “On”.
Additional Phone Services Additional Phone Services NOTE: Some features may be network dependent or subscription only, and may not be available in all areas. Contact your service provider for more information. Call Waiting Using the Call Waiting feature, you can answer an incoming call when you are on another call. Call Waiting is on unless you turn it off for a particular call. 1. After the alert tone, your display shows the incoming 1 number and asks “Accept Call?”.
3-Way Calling If your carrier provides 3-way calling, you can combine two ongoing phone calls into one conversation. This option is available only when you initiate the second call. 1 Phone-In Use 5551212 10:42a 11/06 Hold 3way After you place or receive a phone call: 1. Select “3way”. This action places the current call on hold. 2. Enter the phone number for the second call and press . 3. When the second call is connected, select “3way” to join the calls.
Additional Phone Services Receiving a Call You can receive calls on either line, regardless of the active line setting. • If you receive a call on the currently active line, that icon simply flashes. • If you receive a call on the line that is not currently active, the active line icon remains lit and the alternate line icon flashes. Receiving a Call on Your Alternate Line 1. 2. Select “Yes” to answer the call on the other line. Your previous call will be placed on hold.
Call Forwarding Call forwarding lets callers reach you wherever you are. You have two options: forward all incoming calls (unconditional) or select those circumstances (conditional) when you want your calls forwarded. Unconditional Call Forwarding Unconditional call forwarding sends all incoming calls to the designated number. NOTE: When you set unconditional call forwarding, your phone does not ring. 1. 2. 3. 4. 5. 6.
Additional Phone Services 2. 3. 4. 5. 6. 7. 8. 9. Press once again until you see “Busy” and “NoAns” on the last line of your display. To forward your calls when your phone is in use, select “Busy”. To forward your calls when you do not want to answer them, select “NoAns”. 1 Forward:Off To: Busy Busy NoAns Press again until you see “NoRch” and “Rcl#”. 1 • To forward your calls when you cannot be reached, select “NoRch”. Forward:Off To: • To see the call forward number, select “Rcl#”.
Creating, Editing, and Using Stored Lists A stored list is a directory of phone numbers and Private IDs and their related names. Stored lists are convenient because you do not have to remember names and numbers—you simply scroll through your stored list. Combined Phone Number and Private ID List You can set a combined Phone and a Private ID with the associated name, which eliminates the need to program the Private ID separately.
Creating, Editing, and Using Stored Lists Storing Names and Numbers 1. Press , , 2 , 0 1 . 20=Phone/ Prvt List Exit 2. Select “Ok”. 1 The next screen briefly displays the remaining number of phone numbers and private IDs that you can store. 3. Ok Available 98 Phone # 3 Prvt IDs Enter the name that you wish to store. Select “Store”. See Figure 1 . for an example of entering a name. 1 Enter Name Exit Store Example To store the name “TIM”: 1. Enter “T” by pressing 8 once. 2. 3.
Pause Digit Entry When storing a number, you can program your phone so that it will not only dial a number but also pause and enter another series of numbers such as a personal identification number (PIN) or password. This feature is particularly useful for automated services such as voice mail and banking systems. Here’s how it works: Let’s say you have a company voice mail account that you frequently check while on travel.
Creating, Editing, and Using Stored Lists (4) At the “Edit Spd#” screen, edit the speed number, if you wish, then select “Store”. b. To erase an entry: (1) At the “Edit Entry” screen, press or (2) At the “Erase Entry” screen, select “Ok”. (3) Scroll to the desired entry, then select “Ok”. At the “Erase Entry?” screen, select “Yes”. 4. Select “Exit” to close the Phone List Edit screen. Editing and Erasing Private ID List Entries 1. 2. 3. Press , , 2 , 2 . Select “Ok”.
Last 10 Calls Received and Sent Lists If you subscribe to your carrier’s Caller ID service, you can view, dial, and store the list of the last ten phone numbers received and the last ten phone numbers dialed. The most recent call sent or received appears first in your call list. From the Phone Ready screen: 1. 2. 1 . The menu options change to “Calls” and Press “Spd#”. Select “Calls”. The Rcvd Calls screen opens. If the “Store” option appears, the number currently displayed is not in your Phone list.
Creating, Editing, and Using Stored Lists 2. Select “Store”. The Enter Name screen displays. 1 Phone Ready 0=5554455 Cancl 3. Enter the name then select “Store”. The combined name and number entry is stored in the first available storage space. Store 1 Enter Name Cancl The Stored message displays with the name that you stored.
Making Private Calls A Private call is a one-to-one conversation between two people. In Private mode, each phone is identified by a name or a number called a Private ID. To make a Private Call: 1. 2. 3. 4. until you see “Prvt Ready” on your disPress play. Use the keypad to enter the Private ID of the person that you want to reach. To speak, press and hold the PTT button, wait for the chirp, then speak into the microphone. To listen, release the PTT button.
Making Private Calls Private/Group Mode Speaker You can hear Private calls through either the earpiece or the speaker. Press the Speaker button on your r750plus phone to turn the Private/Group Mode Speaker on or off. • With the Speaker on, you will hear incoming calls through the speaker. • With the Speaker off, you will hear incoming calls through the earpiece. Call Alert Call Alert enables you to page an individual by sending an audible tone.
Receiving a Call Alert When you receive a Call Alert, you will hear an alert tone and see a message on your display. • To answer the Call Alert, press the PTT button. • To clear the Call Alert without answering it, select “Clear”. • To silence the Call Alert without clearing it, press any key other than the PTT button. NOTE: Until the Call Alert is cleared or returned, the alert plays intermittently and you will not be able to receive any additional Phone, Private, Group, or Net calls.
Making Private Calls Quickstore of Private IDs Name Quickstore allows you to quickly store a received or sent Private ID, without having to enter the programming menu. From the Private Ready screen, with the Private ID displayed: 1. Select “Store”. 2. If an ID is greater than 12 characters in length, the ID wraps to the third line. Enter the name associated with the Private ID. 1 Prvt Ready 56781 12:43p 07/22 Alert Store 1 Enter Name Cancl 3. Select “Store”. The Stored message displays.
Making Group Calls A Group Call allows you to communicate instantly with members of a selected Talkgroup–a pre-defined set of people who share a communication need. Talkgroups appear on your display as numbers or programmed names, such as Talkgrp10 or Sales Team. To make a Group Call: 1. 2. 3. 1 until “Group Ready” displays. Your most Press recently used talkgroup displays, for example, Group Ready “Talkgrp 10”.
Making Group Calls Area Selection In Group mode, you can call only those talkgroup members in a specific location. This is useful when you know where the individuals are located within the service area. 1. Press 2. 3. Press , then select “Area”. Press to scroll through the targeted areas specified by your local or carrier. Select “Ok” to select the targeted area. 4. until you see “Group Ready” on your display.
Advanced Features Some r750plus phones are provided with an advanced feature set as described in this section. Please contact your service provider for more information. Multi-Simultaneous Talk Group Scan Multi-Simultaneous Talkgroup Scan (Scan) allows users within a fleet to monitor more than one talkgroup. A Talkgroup Mode, within the range of 1255, is comprised of up to four talkgroups (one Primary Talkgroup and up to three Secondary Talkgroups).
Advanced Features Initiating a Group Call 1. Press and hold the PTT button to initiate a group call on your Primary Talkgroup. The example to the right illustrates the display if Fred pressed the PTT button to initiate a call on the Electricians talkgroup. This is Fred’s Primary Talkgroup for Mode 3. Group Ready 3:Electricia S.
Fred has released his PTT button, then begins to receive Julie’s response. Group Ready 3:Electricia Sts S.Off Fred’s Display Jason receives Julies’s response. After the Secondary Talkgroup call is completed, all receiving subscriber units’ displays will revert to their Primary Talkgroup of the selected Talkgroup Mode. Group Ready 3:Tg 3 S.Off Turning Scan On and Off Sts Jason’s Display The capability to turn scan on and off is available as an option key. 1. Press the “Scan” option key.
Advanced Features Talkgroup Mode Selection by Direct Entry You may select a different Talkgroup Mode at any time. 1. Press the 1 , key. To erase a digit, press . To clear all digits, press and hold . To return to your previously selected Talkgroup Mode, press the “Cancl” option key. 2. 3. Press the 8 key. Press the PTT button or the “Ok” option key. “Mode 18” will flash until affiliation is complete.
3. play. The Talkgroup Mode appears in the second line of the display as shown. To end an emergency call, press and hold the Emergency Button for 3 seconds. The portable will return to the last selected talkgroup mode. The initiator cannot exit the emergency call without first cancelling the emergency call. Canceling an Emergency Group Call Press the Emergency Button until the unit generates an Emergency Call Cancel tone. This tone indicates the cancellation has occurred.
Advanced Features You can also send any numeric Status Message from 1-255. A Status Message can be sent by selecting both the Status Message and target ID (alias) of the person who is to receive the Status Message. You can reduce talk time by sending Status Messages. You can also leave a Status Message for receivers while they are away from their portables. Entering the Status Message Function 1. Press the Status Option Key to get to the Status Message function.
Selecting a Status Message Using Memory Scroll You can select Status Messages by using the or keys to scroll through the ten named (aliased) Status Messages which you have programmed. 1. Press the until you find the message you want. In this case we scrolled to the Status Message “At Sts Message Lunch”. At Lunch 2. Press “Ok”. Ok Cancl 3. Press “Targt” to select a target for this message. Selecting a Target by Direct Entry 1. 2. 3. Enter the numeric ID of the person to whom you are sending the message.
Advanced Features Sending a Status Message After selecting both a Status Message and a desired target ID, press the PTT button to send the message. Two high pitched tones will be heard during transmission. If successful, two high pitched tones will be heard to indicate the message was successfully delivered to the target portable. Sts-Sent Successful If unsuccessful, an alert tone will be heard to indicate that the targeted unit is busy, out-of-range, or turnedoff.
Isolated Site Operation Isolated Site Operation (ISO) allows group call communications to continue within a single cell site when connectivity to the network is lost by allowing the cell to operate in a local, one cell only mode. ISO is limited to dispatch talkgroup calls only. In all modes the display will update to include “-Isoft” on the first line.
Advanced Features Initiating a Group Call If the portable has Scan enabled when the site enters ISO, the portable will be able to initiate a call on its Primary Talkgroup and can respond to calls started on either the Primary or any Secondary Talkgroup. The portable will not be able to select a new Talkgroup Mode while in ISO condition. If the portable has Scan disabled when the site enters ISO, the portable will be able to initiate and respond to calls on the Primary Talkgroup only.
Using Mail Services NOTE: Some features may be network dependent or subscription only, and may not be available in all areas. Contact your service provider for more information. Your r750plus phone provides the following mail services: • Net Mail • Voice Mail • Message Mail When you receive a new message, the icon appears and flashes. • To read your new mail immediately, select “Now”. • To read your new mail later, select “Later”. An asterisk * next to a mail service indicates new mail.
Using Mail Services 1 4. To read the message, select “View”. Inbox:1unread 1*Lunch 2 MEETING View Menu 1 5. After you read the message, do one of the following: LUNCH ---With client at 12:00 Next Menu • Select “Menu” to view a list of actions that you can take for this message, such as reply, delete, save, and so forth. • Or, select “Next” to read the next message.
• Receive Message Mail Alerts only See “Setting Programming Menus” on page 49 for more information. Message Mail Message Mail can be either a numeric page or a text message of up to 140 characters. Your phone can receive and store 16 mail messages at any time. 1. To postpone reading your mail and to clear the display, select “Later”. The icon stops flashing but remains on your display to remind you that you have unread messages. To read your mail now: 2. Select “Now”.
Using Mail Services Auto Call Back You can respond to numeric pages and text messages containing a call-back number. To automatically dial a number contained within a Message Mail, press . Mail Memory Full If all 16 message registers are full, your phone displays the message “Mail Waiting, Memory Full”. You cannot receive new Message Mail until you empty register space by erasing saved or unread messages.
Using Your Phone as a Modem NOTE: Some features may be network dependent or subscription only, and may not be available in all areas. Contact your service provider for more information. You can use your r750plus phone as a modem for data transfer from your laptop, handheld device, or desktop computer. This is particularly useful when there is no wired phone line (wall jack) available. You simply attach a data cable (available separately) to your phone and your computer.
Setting Programming Menus Setting Programming Menus You can customize the settings on your phone using the Programming Menu. 1. 2. 3. 4. until you see “Prgm” on the display. Press Select “Prgm”. Select “Ok”. Press or to scroll to the desired Programming Menu Option or enter the number of the Option. NOTE: You can press , , and then the corresponding keypad number to get to the desired programming menu.
Table 6: Programming Menu Options (Continued) Keypad Number Menu Option Function Vibrate Alert:Off Receive a non-audible alert for incoming phone and circuit data calls and messages. See “VibraCall® Alert” on page 15. 10 Last Call Timer Display the duration of the most recent phone call. 11 Display Timer:Off Turn on or off automatic display of the Last Call Timer at the end of each phone call. 12 Reset Timer Display cumulative airtime of all phone calls since last reset.
Setting Programming Menus Table 6: Programming Menu Options (Continued) Keypad Number Menu Option Function 21 Phone List Edit Edit and erase up to 100 frequently called phone numbers and associated names. See “Editing and Erasing Phone List Entries” on page 24. 22 Prvt ID List Edit Edit and erase up to 100 Private numbers and associated names. See “Editing and Erasing Private ID List Entries” on page 25.
Table 6: Programming Menu Options (Continued) Keypad Number 52 Menu Option Function 32 Mail Volume Set the volume of incoming Message Mail, Voice Mail, and Net alert tones using the volume control keys, or lower the volume to silence the mail alert tones. 33 Earpiece Volume Set the default earpiece volume using the volume control keys. 34 Keypad Volume Set the volume of the keypad tones using the volume control keys, or to silence the keypad tones.
Setting Programming Menus Table 6: Programming Menu Options (Continued) Keypad Number Menu Option Function 62 Pgm Data # View your circuit data (fax) number. See the Wireless Data Services User’s Guide. 63 IP Address Use the scroll keys to view the Internet Protocol (IP) Address-1 for your browser, as programmed in your phone. If your phone is cabled to a computer, view IP Address-2, the stored IP address of your computer. See the Wireless Data Services User’s Guide.
Table 7: Other Programming Menu Options Option Number Menu Option Function 41 Feature Reset Returns all feature settings to their original defaults. 42 Master Clear Performs Feature Reset and erases all stored lists. 43 Master Reset Resets the phone’s identification number. 44 Change Service Key Changes or resets the fraud prevention service key. 50 NAM Selects alternate Numeric Assignment Module (NAM). See local carrier for information.
Setting Programming Menus Table 8: Error Codes (Continued) Status Messages Message Description User Not Authorized The party that you called has not purchased this service. Please Try Later This service is temporarily not available. Please try again later. User Busy in Private The party that you called is busy in a Private call. Service Restricted This service was restricted by your carrier or it was not purchased. Service Not Available This feature is not available on the current network.
Optional Accessories Batteries NOTE: For best results, charge the batteries within the temperature range of 10° C to 40° C (50° F to 104° F). NOTE: Prolonged charging is not recommended. See Table 9 for battery charging guidelines. Charging the Battery To get the maximum use from the battery, charge it overnight before you use it for the first time. See Table 9 for battery charging times.
Optional Accessories Rapid Travel Charger Using the NTN9035 Rapid Travel Charger, you can charge a battery from an electrical outlet. Accessory Connector Rapid Travel Charger Figure 2. Using the Travel Charger Using the Rapid Travel Charger (110V/220V/240V) 1. 2. While holding the r750plus phone with its front facing you, insert the accessory connector (with the Motorola logo facing you) into the slot on the bottom of the r750plus phone until you hear a click.
Vehicular Battery Charger The NTN9034 Vehicular Battery Charger enables in-vehicle communications by charging the NiMH battery and providing power to your r750plus phone. The power light (green LED) will light when the Vehicular Battery Charger is receiving power. Accessory Connector Figure 3. Using the Vehicular Battery Charger Using the Vehicular Battery Charger 1. 2. 3. 4. Attach the Vehicular Battery Charger’s accessory connector to the bottom of the r750plus phone.
Optional Accessories Desktop Dual-Pocket Charger The NTN9036 Desktop Dual-Pocket Charger charges Motorola authorized batteries, as listed on Page 56, for the r750plus phone. Rear pocket Alignment rails – Battery only LED indicators Pin charge contacts Front pocket – phone with Battery Power supply cord receptacle (DC jack) Figure 4. Desktop Dual-Pocket Charger Charging a battery 1. 2. 3. 4. 5.
Inserting and removing a battery from the rear pocket Insert Remove 1 2 Figure 5. Adding and Removing a Battery from the Rear Pocket 1. 2. 3. Insert the battery with the Motorola label facing forward. To do this, align the sides of the battery with the charger rails. Make sure the metal contacts on the back of the battery are in contact with the charging contacts. To remove the battery, pull it up and out of the Charger.
Optional Accessories No LED indication • Check that the r750plus phone with battery, or a battery alone, is inserted correctly. • Make sure that the power supply is plugged into an appropriate AC outlet and that the connector is properly seated. • Rear pocket only: Remove the battery from the Charger. Use an ordinary pencil eraser to clean the three metal contacts on the battery and then place the battery in the Charger.
Audio Adapter The FLN2854A Audio Adapter connects an earpiece microphone or headset to your r750plus phone for privacy and hands-free operation. The Audio Adapter fits onto the bottom of the r750plus phone and provides a standard 2.5mm jack connection for an earpiece microphone or headset.
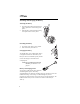
Optional Accessories Removing the Audio Adapter 1. Simultaneously press the release buttons located on either side of the Audio Adapter and pull the Audio Adapter from the r750plus phone. Battery Belt Clip Battery Belt Clip (HLN9844A) and Large Belt Clip (HLN9714A) provide a convenient means of carrying your r750plus phone with you. Belt Clip Tab Battery (partial view) Figure 7. Battery Belt Clip Using the Battery Belt Clip 1. 2. 3.
• Accommodates most r750plus phone accessories including travel chargers, audio accessories, vehicle accessories, and data accessories. Hard-Install Car Kit NOTE: The FLN2912AR Hard-Install Car Kit enables in-vehicle communications by providing extended RF coverage, the ability to connect to 12Vdc or 24-Vdc power sources, data interface, and the ability to rapidcharge the battery. Please note that the customer should purchase an external antenna.
Optional Accessories Remote Speaker/Microphone The FLN2800C Remote Speaker/Microphone (RSM) provides a convenient means of communicating by having a speaker, a microphone, and a Push-toTalk (PTT) button in a single, hand-held or clip-on accessory. The RSM also includes a 3.5 mm audio jack (located on the opposite side of the PTT) to accept secondary receiver audio accessories. PTT Button 3.
6. 1.Position the accessory connector so that its coiled cord extends from the bottom of the portable and its latch is on your left. 2.Insert the RSM’s accessory connector into the bottom of the portable (push both tabs on the accessory connector when inserting into the portable). 3.Push the accessory connector firmly against the portable to make sure it is held in place. 4.Attach the smaller end of the cable-restraint clip on the straight portion of the coiled cord. 5.
Safety and General Information Safety and General Information IMPORTANT INFORMATION ON SAFE AND EFFICIENT OPERATION. READ THIS INFORMATION BEFORE USING YOUR INTEGRATED MULTI-SERVICE PORTABLE RADIO.
Portable Radio Product Operation and EME Exposure Phone Operation When placing or receiving a phone call, or using the group and private call functions with a Group/Private Speaker OFF (muted speaker icon visible in the display), hold your radio product as you would a wireline telephone. Speak directly into the microphone.
Safety and General Information Approved Accessories For a list of approved Motorola accessories call (800) 323-9949, or look in the accessory section of this manual. Electro Magnetic Interference/Compatibility • NOTE: Nearly every electronic device is susceptible to electromagnetic interference (EMI) if inadequately shielded, designed or otherwise configured for electromagnetic compatibility.
Hearing Aids Some digital wireless radio products may interfere with some hearing aids. In the event of such interference, you may want to consult your hearing aid manufacturer to discuss alternatives. Other Medical Devices If you use any other personal medical device, consult the manufacturer of your device to determine if it is adequately shielded from external RF energy. Your physician may be able to assist you in obtaining this information.
Safety and General Information ! OPERATIONAL WARNINGS WARNING For Vehicles With an Air Bag Do not mount or place a mobile radio in the area over an air bag or in the air deployment area. Air bags inflate with great force. If a portable radio is placed in the air bag deployment area and the air bag inflates, the radio may be propelled with great force and cause serious injury to occupants of the vehicle. .
! Caution Operational Cautions Antennas Do not use any portable radio product that has a damaged antenna. If a damaged antenna comes into contact with your skin, a minor burn can result. Batteries All batteries can cause property damage and/or bodily injury, such as burns if a conductive material such as jewelry, keys, or beaded chains touches exposed terminals. The conductive material may complete an electrical circuit (short circuit) and become quite hot.
Safety and General Information If the phone does not work after following the steps listed above, contact your dealer for servicing information. Clean the external surfaces of the radio product with a damp cloth, using a mild solution of dishwashing detergent and water. Some household cleaners may contain chemicals that could seriously damage the radio product. Avoid the use of any petroleum-based solvent cleaners. Also, avoid applying liquids directly on the radio product.
Intrinsically Safe Radio Information FMRC Approved Equipment Anyone intending to use a radio in a location where hazardous concentrations of flammable material exist (hazardous atmosphere) is advised to become familiar with the subject of intrinsic safety and with the National Electric Code NFPA 70 (National Fire Protection Association) Article 500 (hazardous [classified] locations).
Intrinsically Safe Radio Information ! WARNING • Do not operate radio communications equipment in a hazardous atmosphere unless it is a type especially qualified (e.g. FM Approved) for such use. An explosion or fire may result. • Do not operate the FMRC Approved Product in a hazardous atmosphere if it has been physically damaged (e.g. cracked housing). An explosion or fire may result. • Do not replace or charge batteries in a hazardous atmosphere.
! WARNING • Failure to use an FMRC Approved portable radio with an FMRC Approved battery or FMRC Approved accessories specifically Agency approved for that product may result in the dangerously unsafe condition of an unapproved radio combination being used in a hazardous location. • Unauthorized or incorrect modification of an FMRC Approved Product unit will negate the Approval rating of the product.
Intrinsically Safe Radio Information Repair A repair constitutes something done internally to the unit that would bring it back to its original condition - Approved by FMRC. A repair should be done in an FMRC audited facility. Items not considered as repairs are those in which an action is performed on a unit which does not require the outer casing of the unit to be opened in a manner which exposes the internal electrical circuits of the unit.
Accessory Safety Information IMPORTANT: SAVE THESE ACCESSORY SAFETY INSTRUCTIONS • Before using any battery or battery charger, read all the instructions for and cautionary markings on (1) the battery, (2) the battery charger, which may include a separate wall-mounted power supply or transformer, and (3) the radio product using the battery. • Do not expose any battery charger to water, rain, or snow as they are designed for indoor or in-vehicle use only.
Accessory Safety Information • • • • • Maximum ambient temperature around the power supply or transformer of any battery charger should not exceed 40°C (104°F). The output power from the power supply or transformer must not exceed the rating given on the Desktop Dual-Pocket Charger. The disconnection from the line voltage is made by unplugging the power supply from the AC receptacle. To reduce risk of electric shock, unplug any battery charger from the outlet before attempting any maintenance or cleaning.
Warranty Limited Warranty Motorola Communication Products NOTE: This Warranty applies within the fifty (50) united states and the District of Columbia. I. What This Warranty Covers and For How Long: MOTOROLA, INC.
Warranty which may use the Product is unique, MOTOROLA disclaims liability for range, coverage, or operation of the system as a whole under this warranty. II. General Provisions: This warranty sets forth the full extent of MOTOROLA’S responsibilities regarding the Product, Repair, replacement or refund of the purchase price, at MOTOROLA’S options, is the exclusive remedy. THIS WARRANTY IS GIVEN IN LIEU OF ALL OTHER EXPRESS WARRANTIES.
c. Defects or damage from improper testing, operation, maintenance, installation, alteration, modification, or adjustment. d. Breakage or damage to antennas unless caused directly by defects in material workmanship. e.
Warranty option and expense, either to procure for such purchaser the right to continue to using the Product or parts or to replace or modify the same so that it becomes non-infringing or to grant such purchaser a credit for the Product or parts as depreciated and accept its return. The depreciation will be an equal amount per year over the lifetime of the Product or parts as established by MOTOROLA.
Limited Warranty Motorola Communication Products (International) I.
Warranty II. General Provisions: This warranty sets forth the full extent of MOTOROLA’S responsibilities regarding the Product, Repair, replacement or refund of the purchase price, at MOTOROLA’S options, is the exclusive remedy. THIS WARRANTY IS GIVEN IN LIEU OF ALL OTHER EXPRESS WARRANTIES.
f. Product which has had the serial number removed or made illegible. g. Rechargeable batteries if: h. i. j. k. l. 1. Any of the seals on the battery enclosure of cells are broken or show evidence of tampering. 2. The damage or defect is caused by charging or using the battery in equipment or service other than the Product for which it is specified. Freight costs to the repair depot.
Warranty non-infringing or to grant such purchaser a credit for the Product or parts as depreciated and accept its return. The depreciation will be an equal amount per year over the lifetime of the Product or parts as established by MOTOROLA.
Patent & Trademark Information This product is protected under one or more of the following patents: 4291475, 4365221, 4369516, 4374370, 4378603, 4390963, 4398265, 4400584, 4400585, 4434461, 4455534, 4486624, 4491972, 4523155, 4546329, 4574243, 4581602, 4581749, 4585957, 4593155, 4594657, 4602218, 4605987, 4616314, 4617520, 4628529, 4629829, 4633141, 4636593, 4636741, 4648125, 4649543, 4654655, 4680787, 4704588, 4711361, 4715063, 4717884, 4730195, 4731813, 4736277, 4737976, 4741018, 4742562, 4761621, 476473
Patent & Trademark Information 5424689, 5428362, 5428820, 5428836, 5430416, 5432017, 5434947, 5436802, 5438684, 5442680, 5444764, 5446763, 5446766, 5448763, 5448770, 5448771, 5453997, 5457744, 5459640, 5459774, 5461643, 5463351, 5463406, 5463628, 5463646, 5463674, 5463688, 5463694, 5465409, 5465412, 5469177, 5471671, 5475752, 5477192, 5485506, 5485513, 5486843, 5487184, 5488649, 5490177, 5491739, 5493198, 5493700, 5493714, 5495206, 5495208, 5497126, 5497382, 5497383, 5499273, 5499394, 5499397, 5502437, 550
5982881, 5983082, 5987012, 5988577, 5995050, 5996178, 5999115, 5999821, 5999832, 6002922, 6002937, 6005498, 6006104, 6008636, 6009168, 6009309, 6009325, 6009336, 6009552, 6011699, 6011784, 6011959, 6011961, 6012634, 6014376, 6014552, 6016312, 6016422, 6018584, 6018651, 6018671, 6020787, 6021332, 6023191, 6023615, 6025753, 6035182, 6035191, 6035522, 6038457, 6040683, 6040720, 6041241, 6043721, 6043786, 6044153, 6047066, 6047084, 6049192, 6049233, 6049532, 6049704, 6049725, D284759, D285439, D288432, D288683,
Patent & Trademark Information Additional patents are pending. MOTOROLA, the Stylized M Logo and all other trademarks indicated as such herein are trademarks of Motorola, Inc. ®Reg. U.S. Pat. & Tm. Off. © Copyright 2000 Motorola, Inc. All rights reserved. Manufactured under one or more of the U.S. patents listed in the User’s Guide. T9 is a trademark owned by Tegic Communications, Inc. All other product or service names mentioned in this manual are the property of their respective trademark owners.
Owner’s Information Mobile Equipment Identifier (IMEI) _____________________________ Own Phone Number _____________________________ Own Private Number _____________________________ Date Purchased ______________ Dealer Telephone Number _______________________ Customer Service Number _______________________ 92
Owner’s Information Private Number Directory Private Number Name 1 2 3 4 5 6 7 8 9 Talkgroup Directory Talkgroup Number Name 1 2 3 4 5 6 7 8 9 93
This page left blank intentionally 94