NITRO Portable PROFESSIONAL DIGITAL TWO-WAY RADIO EVOLVE Portable Radio User Guide OCTOBER 2020 © 2020 Motorola Solutions, Inc.
MN007267A01-AA Contents Contents Chapter 1: Read Me First............................................................................................6 1.1 Software Version..................................................................................................................... 7 Chapter 2: Radio Care................................................................................................ 8 Chapter 3: Radio Overview..........................................................................
MN007267A01-AA Contents 7.1.4 Deleting Device Name............................................................................................. 22 7.2 Wi-Fi Operation......................................................................................................................22 7.2.1 Turning Wi-Fi On or Off............................................................................................23 Turning Wi-Fi On....................................................................................
MN007267A01-AA Contents Chapter 15: Supervisory Override...........................................................................40 Chapter 16: Instant Personal Alert.......................................................................... 41 16.1 Sending Instant Personal Alert............................................................................................ 41 16.2 Receiving and Responding to Instant Personal Alert..........................................................
MN007267A01-AA Contents 21.5 Taking Screen Capture........................................................................................................57 21.6 Dark Theme......................................................................................................................... 57 21.6.1 Setting Dark Theme............................................................................................... 57 21.7 Smart Reply..........................................................................
MN007267A01-AA Chapter 1: Read Me First Chapter 1 Read Me First This user guide covers the basic operations of your radios. Notations Used in This Manual Throughout the text in this publication, you notice the use of Warning, Caution, and Notice. These notations are used to emphasize that safety hazards exist, and the care that must be taken or observed. WARNING: An operational procedure, practice, or condition, and so on, which may result in injury or death if not carefully observed.
MN007267A01-AA Chapter 1: Read Me First 1.1 Software Version All the features described in the following sections are supported by the software version R01.00.00 or later. Contact your dealer or administrator for more information.
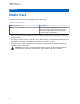
MN007267A01-AA Chapter 2: Radio Care Chapter 2 Radio Care This section describes the basic handling precaution of the radio. Table 2: IP Specification IP Specification Description IP68 Allows your radio to withstand two meters of water for two hours, and adverse field conditions such as water drops, snow, dirt, grease, or other surface contaminants. • Keep your radio clean and exposure to water should be avoided to help ensure proper functionality and performance.
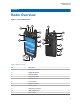
MN007267A01-AA Radio Overview Chapter 3 Radio Overview Figure 1: Front and Back View 2 1 3 4 15 5 6 16 17 7 8 9 10 18 20 19 21 22 23 11 14 24 12 13 Table 3: Radio Overview No.
MN007267A01-AA Chapter 3: Radio Overview No. Desciption 12 Home button 13 Overview button 14 Digital Microphone 15 Speaker 16 Rear Camera 17 LED Flash 18 Battery Latch 19 Push-to-Talk (PTT) button 20 Battery Door 21 3-Dot Programmable Feature button 22 1-Dot Programmable Feature button 23 Wake button 24 Charging Contact 3.1 Configuring Programmable Buttons You can set the programmable buttons as press or press and hold to perform various actions.
MN007267A01-AA Getting Started Chapter 4 Getting Started Getting Started provides instructions to prepare your radio for use. 4.1 Inserting SD Card Procedure: 1 Lift the SD card door. 2 Place the SD card onto the contacts.
MN007267A01-AA Chapter 4: Getting Started 3 Close the SD card door. 4.2 Inserting SIM Cards Your radio has two SIM card slots. Procedure: 1 Lift the SIM card door.
MN007267A01-AA Chapter 4: Getting Started 2 Place the SIM card onto the contacts. 3 Close the SIM card door.
MN007267A01-AA Chapter 4: Getting Started 4.3 Attaching or Removing the Battery WARNING: For Intrinsic Safe (IS) radio, if a non-IS or unapproved battery is inserted into the radio a warning message will prompt. Risk of explosion if the battery is replaced by an incorrect type. Attaching the Battery Procedure: 1 Align the battery with the rails on the back of the radio. 2 Push the battery down, until the latch snaps into place.
MN007267A01-AA Chapter 4: Getting Started 4.5 Turning the Radio On or Off Turning the Radio On Prerequisites: Ensure that the battery is fully charged before the first use. Procedure: To turn on the radio, rotate the On/Off/Volume knob clockwise until you hear a click. Turning the Radio Off Procedure: To turn off the radio, rotate the On/Off/Volume knob counterclockwise until you hear a click. 4.6 Adjusting the Volume This settings allows you to adjust the Radio and Voice Calls volume only.
MN007267A01-AA Chapter 4: Getting Started Action Results • Swipe At an empty area of the home screen, tap and hold to lauch a menu to select wallpapers, widgets and Home settings You can move your finger up, down, left, or right on the screen to perform the following actions: • Unlock the screen • View additional home screens • View additional application icons in the Launcher window • View more information on an application screen Double-tap You can tap twice on a webpage, map, or other scree
MN007267A01-AA Home Screen Overview Chapter 5 Home Screen Overview Figure 2: Home Screen 1 4 2 3 Table 5: Home Screen Overview No. Items Description 1 Status bar Display status and notification icons. 2 Application shortcuts Allow you to quickly access the desired application. 3 Google Search bar A shortcut widget used to perform Google search using Chrome. 4 Application Folder Allow you to group several applications into folders.
MN007267A01-AA Chapter 5: Home Screen Overview 5.1 Status Indicators Status Indicators explain the Icons and LED indicators used in the radio. 5.1.1 Status Icons These icons appear at the status bar to provide device-specific information or status. Icon Name Description Battery Indicates the remaining battery level of the radio. The icon blinks when the battery level drops to 10% or lower. Bluetooth On Steady – Bluetooth is on and ready for Bluetooth connection.
MN007267A01-AA Chapter 5: Home Screen Overview Indication Status • New SMS or MMS • New Email • Missed Call Blinking Red The battery capacity is at 10% or lower. Slow Blinking Red The battery is invalid. Solid Red The battery is charging. Blinking Green The battery capacity is at 90%. Solid Green The battery is fully charged.
MN007267A01-AA Chapter 6: Basic Functions Chapter 6 Basic Functions The following basic functions are available on your radio. 6.1 Accessing Files From a Computer Procedure: 1 Connect your device to your computer by using a Micro USB cable. 2 Open the Notifications panel by swiping down the screen from the Status bar. 3 Tap the Charging this device via USB button.
MN007267A01-AA Connectivity Chapter 7 Connectivity You can connect your radio to other devices, accessories, or network through different types of connectivity. 7.1 Bluetooth This feature allows you to use your radio with a Bluetooth-enabled accessory through a Bluetooth connection. Your radio supports both Motorola Solutions and Commercially available Off-The-Shelf (COTS) Bluetooth-enabled accessory. Bluetooth operates within a range of 10 m (32 ft) line of sight.
MN007267A01-AA Chapter 7: Connectivity 7.1.2 Viewing Device Details Procedure: Swipe up the home screen, tap → View Details. Settings → Connected devices → 7.1.3 Editing Device Name Procedure: Swipe up the home screen, tap → Edit Name → . Settings → Connected devices → The display shows Device Name Saved. 7.1.4 Deleting Device Name Procedure: Swipe up the home screen, tap → Delete.
MN007267A01-AA Chapter 7: Connectivity 7.2.1 Turning Wi-Fi On or Off Turning Wi-Fi On Procedure: Perform one of the following actions: • Swipe down the notification panel, tap Wi-Fi. • Swipe up the home screen, tap Settings → Network & internet → Wi-Fi → On. Your radio shows a list of available networks. Turning Wi-Fi Off Procedure: Perform one of the following actions: • Swipe down the notification panel, tap Wi-Fi. • Swipe up the home screen, tap Settings → Network & internet → Wi-Fi → Off.
MN007267A01-AA Chapter 7: Connectivity 7.3 Location The Global Navigation Satellite System (GNSS) integrates information from the Global Positioning System (GPS) and the Global Navigation Satellite System (GLONASS) to determine the approximate geographical location of your radio. 7.3.1 Turning Location On or Off Turning Location On Procedure: Perform one of the following actions: • Swipe down the notification panel, tap Location.
MN007267A01-AA Chapter 7: Connectivity • Swipe up the home screen, and tap → On. Settings → Network & internet → Airplane Mode Your radio shows the Airplane mode icon in the Status bar.
MN007267A01-AA Chapter 8: WAVE™ Application Chapter 8 WAVE™ Application The application provides instant communications at the push of a button. For more information, see https://waveoncloud.com/Home/Help. Table 7: WAVE Application Features Feature Description Alerts • Instant Personal Alert (IPA) – Allows you to send a message to another person asking for a callback. • Missed Call Alert (MCA) – Alerts you when you miss an incoming PTT call.
MN007267A01-AA Chapter 8: WAVE™ Application For more information, see https://waveoncloud.com/Home/Help. 8.1 Logging in WAVE Application Prerequisites: Turn off Battery Saver mode. Procedure: 1 Tap on the WAVE icon. 2 Tap Yes to Login. NOTICE: If activation code is requested during first time login, contact your dealer or administrator for more information. 8.2 Logging Out from WAVE Application Procedure: From the WAVE Application, navigate to Menu → Settings → Logout → Yes.
MN007267A01-AA Chapter 8: WAVE™ Application 8.
MN007267A01-AA Chapter 8: WAVE™ Application Label Name Description 2 History • The tab displays all your conversation history of calls, contacts, groups, alerts, and messages. • You can view your history, return a call, view messages, add contacts, delete history and messages, and forward any message to a contact or group. 3 PTT Allows you to make calls. 4 Contacts Displays your PTT contacts and allows you to search for contacts, start a PTT call, or send an alert.
MN007267A01-AA Chapter 8: WAVE™ Application There are two types of PTT Option available on your radio, you can use either one to initiate call to the PTT service. Table 9: Types of PTT Options PTT Options Description External PTT button You can access the WAVE application using the PTT button or an accessory with PTT button. On-Screen PTT button When you want to initiate a call in the WAVE Application, you can tap and hold the On-Screen PTT button.
MN007267A01-AA Talkgroup Chapter 9 Talkgroup Talkgroup (TG) is used to facilitate contact with each other. You can select the TG from the list of TGs in the WAVE application in order to communicate with the members in the group. Your radio can have up to 96 TGs with a maximum of 250 members per TG. 9.1 Viewing Talkgroups The Talkgroups are assigned to position one to eight on the main screen. Procedure: Tap the left or right arrow. Figure 4: Talkgroup View 9.
MN007267A01-AA Chapter 9: Talkgroup 9.2.1 Viewing Channels and Zones Procedure: Tap Menu → Channels/Zones. 9.3 Area-Based Talkgroup When you enter a geographic area, you are able to view and hear the notifications for the talkgroup area in that geofence. As you enter a georgraphic area, the talkgroup is shared and shown at the top of the channel list. You are allowed to PTT call and message within the talkgroup.
MN007267A01-AA Contacts Chapter 10 Contacts You can use the Contacts application to maintain phone numbers and other data. In the WAVE application, there are two types of contacts available: Table 10: Types of Contacts Contacts Maximum Contacts Allowed Description Administrator-Managed Contacts 1000 This contact is managed by the administrator and cannot be editted or removed from the WAVE application. Personal Contacts 300 This contact is created by you from WAVE application.
MN007267A01-AA Chapter 10: Contacts Option Actions d Tap NOTICE: You can tap 34 to confirm. Favourite to add the contact to favourites.
MN007267A01-AA Types of Calls Chapter 11 Types of Calls There are several ways that you can make a call using the WAVE applications depending on the types of calls you select. NOTICE: If the person you are trying to call has a presence status of Offline, you will receive an error message indicating that the contact is unavailable. The following are the calls available on your radio: Table 11: Types of Calls Calls Description Private Call A call from an individual radio to another individual radio.
MN007267A01-AA Chapter 11: Types of Calls Option Actions b Select → In-Call Add Participant → . 2 To call, press and hold the PTT button. 3 To end the call, tap End Call 11.2 Receiving Calls When you receive calls, your radio shows the incoming call screen and unmute to the incoming call. Procedure: Perform one of the following actions: 36 • To respond, press and hold the PTT button.
MN007267A01-AA Emergency Operation Chapter 12 Emergency Operation You can declare an emergency to contact or talkgroup through emergency calling and alert. NOTICE: If your radio does not support Emergency operation, your radio display a notification on the non-activated Emergency feature. 12.1 Declaring Emergency Procedure: Press and hold the Emergency button. Your radio shows the following indications: • The Emergency tone sounds. • The amber LED lights up.
MN007267A01-AA Chapter 13: User Check Chapter 13 User Check User Check allows authorized user to view the device status remotely. It is mainly used by supervisor or dispatcher. You are allowed to view the following device status: • Location • Cellular Network Signal Strength • Wi-Fi Signal Strength • Battery Level 13.1 Enabling User Check Procedure: 1 From the WAVE application, navigate to Contacts. 2 Perform one of the following actions: • Tap on the → User Check.
MN007267A01-AA Talkgroup Scan Chapter 14 Talkgroup Scan This feature allows your phone to scan through the scan list. You can assign top three priority talkgroups. The higher priority talkgroup calls take precedence over lower priority talkgroup calls. 14.1 Turning Talkgroup Scan On or Off Turning Talkgroup Scan On Procedure: From the WAVE Application, navigate to Menu → Talkgroup Scan → On. Your radio shows the following indications: • The display shows Updating Scan Mode. • The toggle move to on.
MN007267A01-AA Chapter 15: Supervisory Override Chapter 15 Supervisory Override Supervisory Override allows a supervisor to interrupt during an ongoing call except for Private Call and immediately start a supervisory call. If the user is receiving or transmitting a call and the current ongoing call is interrupted by a supervisory call, your radio unmutes to the supervisory call and display the alias of the supervisor. NOTICE: Contact your dealer or administrator for more information on the configuration.
MN007267A01-AA Instant Personal Alert Chapter 16 Instant Personal Alert Instant Personal Alert (IPA) is a notification that you can send to a contact that is busy or unable to reply to a group or private call. When you received an IPA, your radio sounds a tone and displays an icon and the sender alias. The IPA received is stored in the IPA Status List and allows you to view and reply at any time. When multiple IPAs are received, the latest IPA will appear at the top of the list.
MN007267A01-AA Chapter 17: Missed Call Alerts Chapter 17 Missed Call Alerts You will receive a Missed Call Alert when you are having the following scenarios: • You are on a regular phone call and someone make Private Call to you. • You receive a Private Call and you did not accept or respond to the call. You will not receive a Missed Call Alert when you are having the following scenarios. • You receives a Group Call but you do not respond.
MN007267A01-AA Map Chapter 18 Map The map is available to everyone. You need to turn on your location to use this feature. The default permission given to everyone is Individual. As for Supervisor, they can request the administrator to enable Location Capability to perform certain actions that an individual unable to perform. You can refer to the following types of permission for more information.
MN007267A01-AA Chapter 18: Map 18.2 Sharing Location with Location Capability Enabled Prerequisites: Turn on your radio location and enable the Location Capability feature. Procedure: 1 From the WAVE application, navigate to 2 Tap Map. Tracked Group Selector. Your radio displays the List of Groups with Location Capability. 3 Select your desired group and perform one of the following actions: • To share current location, tap My Location → Share.
MN007267A01-AA Chapter 18: Map 18.4.1 Creating Boundary Procedure: Map. 1 From the WAVE application, navigate to 2 Tap Tracked Group Selector. Your radio displays the List of Groups with Location Capability. 3 Select your desired group and tap Set Boundary. A Set Boundary message pops up and a blue circle appears surrounding the location on your map.
MN007267A01-AA Chapter 18: Map 18.4.3 Changing Boundary Settings Procedure: 1 From the WAVE application, navigate to 2 Tap Map Boundary Enable → Map. Boundary Settings. 3 Perform one of the following actions: • To update the interval, tap Update Interval → . • To set the duration of the boundary to be actived, tap Active Boundary Time → → . • To enable notification, tap Notify Me → On.
MN007267A01-AA Messaging Chapter 19 Messaging Push-to-Talk (PTT) Application allows you to send and receive messages to and from other PTT users. Your radio supports the following types of messages: • Text messages • Image messages • Video messages • File messages • Location messages 19.1 Sending Text Messages Procedure: 1 From the WAVE Application, tap Contacts. 2 Tap and hold the → Send Message. 3 Type your message using the On-screen Keyboard and tap Send. 19.
MN007267A01-AA Chapter 19: Messaging 2 Tap and hold the → → Edit → Delete → Yes. Send Message → Quick Text Access 19.4 Sending Multimedia Content Procedure: 1 From the WAVE Application, tap Menu → History → .. 2 Perform one of the following actions: Options Actions Sending an image or video a Tap Camera. b Perform one of the following actions: • To take photo using your radio, select Take a photo.
MN007267A01-AA Chapter 19: Messaging 19.5 Receiving Messages When you receive a message, your radio receives a notification with the following details: • Name of sender. • Preview of the message. Procedure: 1 Perform one of the following actions: • Tap Notification and skip the following steps. • From the WAVE Application, tap 2 Navigate to the Menu → History. unread message. History Details. 3 To view the unread message, tap 19.
MN007267A01-AA Chapter 19: Messaging 2 Tap History Details on the . 3 Tap and hold the . A context menu display. 4 Perform one of the following actions: Option Actions Forwarding message to a contact a Tap Forward to Contact → → OK. Forwarding message to a group a Tap Forward to Group → → OK. Forwarding message to a quick group a Tap Forward to Quick Group → → → OK. 19.
MN007267A01-AA Chapter 19: Messaging 4 To delete message, tap Delete Message → Yes.
MN007267A01-AA Chapter 20: User Disabled or Suspended Chapter 20 User Disabled or Suspended User Disabled or Suspended indicates that your account is disabled or suspended. When your account is disabled or suspended, you are not able to login to the PTT server. When you presses the PTT button, your radio tries to login to the PTT server. If your radio able to connect to the PTT server, it will bring you to the normal login screen, else the User Disable or Suspended icon flashes.
MN007267A01-AA Applications Chapter 21 Applications This section contains information on applications available on your radio. You can access these applications through the Home Screen or swiping up from the bottom of the Home Screen to open Applications Menu window. NOTICE: Google, Google Play, Google Maps, and other marks are trademarks of Google LLC. Table 13: Applications Icon Name Description Calculator Allows you to perform basic and scientific arithmetic functions.
MN007267A01-AA Chapter 21: Applications Icon Name Description Play Movies and TV Allows you to stream movies and TV shows on Google Play. Play Store Allows you to search, download, and manage applications. Settings Provides settings to configure the device. Sound Recorder Allows you to record sounds. WAVE Provides secure Push-to-Talk (PTT) service on the go. YouTube Allows you to watch videos and channels. YouTube (YT) Music Allows you to listen to music. 21.
MN007267A01-AA Chapter 21: Applications 21.2 Gallery You can manage your albums, photos, or videos using the Gallery application. NOTICE: The device supports the following image formats: JPEG, GIF, PNG, HEICand BMP.
MN007267A01-AA Chapter 21: Applications 2 To delete items, tap → Delete → OK. 21.2.4 Cropping Photos Procedure: Gallery. 1 From the menu, tap 2 To crop photos, tap → Edit → Crop. The cropping grid appears. 3 Perform one of the following actions: Option Actions Cropping the photo manually a To select the portion of the photo to crop, adjust the endpoints. Choosing automatic cropping dimensions a Tap 1:1.
MN007267A01-AA Chapter 21: Applications 4 To return to the previous screen, tap Back. 21.3 Scanning Barcode or QR Code Procedure: 1 From the menu, tap Camera. 2 To scan barcode or QR code, use the rear camera to frame the subject on your screen. A URL pops up. 3 Select the required applications to view the URL. 21.4 Turning On the Flash Light Procedure: Swipe down the notification panel, tap Flashlight . 21.
MN007267A01-AA Chapter 21: Applications 21.7 Smart Reply Smart Reply allows quick responses and actions directly from the notification without opening the application, mostly use for incoming messages. You can choose to reply the message with the suggested quick responses, mark as read, or reply with your On-screen Keyboard. If someone send you an address, you can directly open it with Google Map that brings up the address that was sent to you.
MN007267A01-AA Chapter 21: Applications Option Actions b To delete, tap Delete → OK Searching with Google Lens a Tap on the → For more options Tap Google Lens. More.
MN007267A01-AA Chapter 22: Settings Chapter 22 Settings There are two types of settings explained under this section, which are from WAVE application and phone settings such as device settings, display settings, and sound settings. You can personalize the settings based on your own preference. 22.1 Accessing WAVE Application Settings Procedure: 1 From the WAVE Application, navigate to Menu → Settings.
MN007267A01-AA Chapter 22: Settings Option Actions • To play the alert once, select Once. • To play the alert every 20 seconds for 10 minutes, select Repeat. • To play the alert every 20 seconds until the alert is cleared, select Continuous. Enabling or disabling alert for incoming messages Toggle Message Alert to on or off. Changing the message tone Select Message Alert Tone → . Adjusting network loss tone a Select Network Up/Down Tones.
MN007267A01-AA Chapter 22: Settings Option Actions • To reject either one of the incoming call during an ongoing call, select Ongoing. • To reject or end any PTT call when there is a phone call, select Phone. Enabling or disabling allow PTT call when screen is locked Toggle Call from Lock Screen to on or off. Setting tones to be played during a PTT call a Select In-Call Tones. b To enable the following tones, toggle the settings to on.
MN007267A01-AA Chapter 22: Settings Option Actions Setting audio interaction for PTT and Video Calls Select Audio Interaction → Enabling or disabling scan talkback Toggle Scan Talkback to on or off. Restoring the settings to default Select Restore Defaults. Viewing emergency contacts Select Emergency Settings. Logging out from WAVE application Select Logout. 22.2 Device Settings This feature allows you to personalize your radio by changing the default device setting.
MN007267A01-AA Chapter 22: Settings 22.2.2 Setting Date and Time When your radio is connected to a phone network, date and time are automatically synchronized. You can perform the following procedure to manually set date and time. Procedure: 1 Swipe up the home screen, tap Settings → System → Date & time. 2 Perform one of the following actions: Option Actions Disabling automatic date and time synchronization Toggle the Automatic date and time option.
MN007267A01-AA Chapter 22: Settings Option Actions • Wallpapers • Live Wallpapers • Photos c Tap → Set Wallpaper. Setting up sleep mode a Select Advance → Sleep. b Select the . Setting up screen saver a Select Advance → Screen saver → Current screen saver.
MN007267A01-AA Chapter 22: Settings Option Actions Adjusting sound settings Adjust the slider for the following sound settings: • Calls • Media • Alarms • Volume Setting vibrate for calls Toggle Also vibrate for call to on. Enabling or disabling howling suppression Toggle Howling Suppression to on or off. Setting do not disturb a Select Do Not Disturb.
MN007267A01-AA Chapter 22: Settings 22.4.2 Setting Automatic Rules Automatic rules allow you to set a schedule when Do not disturb turns on and off automatically. Procedure: 1 Swipe up the home screen, tap automatically. Settings → Sound → Do Not Disturb → Turn on 2 Perform one of the following actions: Option Actions Setting automatic rules for sleeping a Tap Sleeping. b Toggle Use rule to on.
MN007267A01-AA Chapter 23: Authorized Accessories List Chapter 23 Authorized Accessories List Motorola Solutions provides the following approved accessories to improve the productivity of your digital portable two-way radio. Table 14: Batteries Part Number Description BT000592A01 1 Battery Li-Ion, 2900 mAh BT000593A01 Hi-Capacity Li-Ion, 5800 mAh Table 15: Carry Devices Part Number Description NTN8266_ Belt Clip for 2.5 in. Belt Width PMLN7965_ Belt Clip for 3 in.
MN007267A01-AA Chapter 23: Authorized Accessories List 1 Not available to Intrinsic Safe (IS) model.
MN007267A01-AA Legal and Compliance Statements Legal and Compliance Statements Supplier's Declaration of Conformity Supplier's Declaration of Conformity Per FCC CFR 47 Part 2 Section 2.1077(a) Responsible Party Name: Motorola Solutions, Inc. Address: 2000 Progress Pkwy, Schaumburg, IL. 60196 Phone Number: 1-800-927-2744 Hereby declares that the product: Model Name: EVOLVE conforms to the following regulations: FCC Part 15, subpart B, section 15.107(a), 15.107(d), and section 15.
MN007267A01-AA Legal and Compliance Statements Notice to Users (FCC) This device complies with Part 15 of the FCC rules per the following conditions: • This device may not cause harmful interference. • This device must accept any interference received, including interference that may cause undesired operation. • Changes or modifications made to this device, not expressly approved by Motorola Solutions, could void the authority of the user to operate this equipment.
MN007267A01-AA Legal and Compliance Statements No part of this document may be reproduced, transmitted, stored in a retrieval system, or translated into any language or computer language, in any form or by any means, without the prior written permission of Motorola Solutions, Inc.
MN007267A01-AA Legal and Compliance Statements This device is restricted to indoor use only when operating in 5150 to 5350 MHz frequency range, except for transmission with 5.2 GHz High Power Data Communication System Base Station or Relay Station.
MN007267A01-AA Limited Warranty Limited Warranty MOTOROLA SOLUTIONS COMMUNICATION PRODUCTS I. WHAT THIS WARRANTY COVERS AND FOR HOW LONG: Motorola Solutions, Inc.
MN007267A01-AA Limited Warranty This warranty gives specific legal rights, and there may be other rights which may vary from state to state. IV. HOW TO GET WARRANTY SERVICE You must provide proof of purchase (bearing the date of purchase and Product item serial number) in order to receive warranty service and, also, deliver or send the Product item, transportation and insurance prepaid, to an authorized warranty service location.
MN007267A01-AA Limited Warranty 3 Should the Product or parts become, or in Motorola Solutions opinion be likely to become, the subject of a claim of infringement of a United States patent, that such purchaser will permit Motorola Solutions, at its option and expense, either to procure for such purchaser the right to continue using the Product or parts or to replace or modify the same so that it becomes non-infringing or to grant such purchaser a credit for the Product or parts as depreciated and accept it