ASTRO® XTL 5000 TM Digital Mobile Radio W4, W5, W7, W9 Control Heads User's Guide
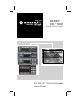
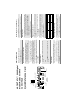
HOME HORN/ IGHTS Mic Dim H/L Home Emer Page BUSY XMIT Sel DIRECT INDICATOR Call Scan Phon SELECT CALL SCAN PHONE PRIORITY/ NON-PRIORITY INDICATORS PAGE or SECURE or EMERGENCY Pwr Mon Volume Dir MODE POWER ON/OFF/ KNOB VOLUME KNOB Mode DIRECT MONITOR Quick Reference Card ASTRO® XTL™ 5000 Digital Mobile Radio with W4 Control Head Delete from List Four times No indicator PRI blinks PRI lit 2 Press Dir again to return to repeater operation. 1 Press Dir (Direct).
The audio is muted and no display changes take place during the alarm. Silent Call (Trunked Modes only) A tone sounds and the display alternates between EMERGNCY and the zone/channel. When acknowledged, four more tones sound and the display shows ACK RCVD, then the radio returns to normal operation. Non-Silent After completing the call, press and hold the emergency actuator until a tone sounds to return to normal operation. Press the PTT button and talk.
A mode incapable of emergency transmission has been selected. Radio is out of range of the trunking system. NO EMERG displayed OUT RNG displayed 5 Press Sel to select key. 6 Press Home or the PTT button to quit. 4 Turn the Mode knob to select desired key. Radio is in emergency alarm or call state. 6 Press Home or the PTT button to quit. 3 Press Sel to enter the Key Selection Menu. P displayed EMERGNCY displayed 5 Press Sel to select index. Telephone dialing pause.
Call Alert Page System Busy 4 High-Pitched Tones every 6 seconds Phone-Type Busy Tone (when pressing the PTT button) All system radio channels in use. Release the PTT button, and wait for callback. Call Alert page has been received. You have an incoming call. Press Call, then the PTT button, then talk. Private Conversation Dispatcher is acknowledging your emergency transmission. Mobile unit has received your Call Alert.
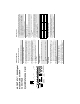
PWR DIM HOME HOME VOLUME Mic Vol Mode POWER ON/OFF MODE PAGE or SECURE or EMERGENCY Phon Call BUSY XMIT Sel H/L Mon DIRECT Dir MONITOR HORN/ LIGHTS SELECT CALL DIRECT INDICATOR Scan SCAN PHONE PRIORITY/ NON-PRIORITY INDICATORS Emer Page Quick Reference Card ASTRO® XTL™ 5000 Digital Mobile Radios with W5 Control Head 1 Hold Scan until a tone sounds and the scan indicator blinks. 4 To adjust squelch level, hold Mon until a tone sounds.
The audio is muted and no display changes take place during the alarm. Silent Call (Trunked Modes only) A tone sounds and the display flashes EMERGNCY. When acknowledged, four more tones sound and the display shows ACK RCVD, then the radio returns to normal operation. Non-Silent After completing the call, press and hold the emergency actuator until a tone sounds to return to normal operation. Press the PTT button and talk. A tone sounds and the display flashes EMERGNCY.
Unit being called with the Enhanced Private Conversation or Call Alert Page feature is not in service, or emergency alarm or status/message transmission is not acknowledged by dispatcher. NO ACK displayed OUT RNG displayed 6 Press HOME or the PTT button to quit. Radio is out of range of the trunking system. A mode incapable of emergency transmission has been selected. NO EMERG displayed 5 Press Sel to select the key. 6 Press HOME or the PTT button to quit.
Call Alert Page System Busy 4 High-Pitched Tones every 6 seconds Phone-Type Busy Tone (when pressing the PTT button) All system radio channels in use. Release the PTT button, and wait for callback. Call Alert page has been received. You have an incoming call. Press Call, then the PTT button, then talk. Private Conversation Dispatcher is acknowledging your emergency transmission. Mobile unit has received your Call Alert.
ii HOME HORN/ LIGHTS PWR Phon Call BUSY XMIT Sel H/L Pwr Mon Volume Dir Mon DIRECT Dir MONITOR HORN/ LIGHTS SELECT CALL DIRECT INDICATOR Scan SCAN PHONE PRIORITY/ NON-PRIORITY INDICATORS Emer Page Mode MONITOR DIRECT MODE POWER ON/OFF/ KNOB VOLUME KNOB W5 Control Head HOME HOME DIM VOLUME Mic Vol Mode POWER ON/OFF MODE BUSY XMIT Sel DIRECT INDICATOR Call Scan Phon SELECT CALL SCAN PHONE PRIORITY/ NON-PRIORITY INDICATORS Emer Page PAGE or SECURE or EMERGENCY
ASTRO® XTL™ 5000 Digital Mobile Radio with W4, W5, W7, and W9 Control Heads User’s Guide 68P81096C68-A ASTRO XTL 5000 Digital Mobile Radio with W4, W5, W7, and W9 iii
Product Safety and RF Exposure Compliance Before using this product, read the operating instructions for safe usage contained in the Product Safety and RF Exposure booklet C a u t i o n enclosed with your radio. ! ATTENTION! This radio is restricted to occupational use only to satisfy FCC RF energy exposure requirements.
Notations Used in This Manual Throughout the text in this publication, you will notice the use of WARNINGS, CAUTIONS, and Notes. These notations are used to emphasize that safety hazards exist, and care that must be taken or observed. ! WARNING WARNING: An operational procedure, practice, or other condition, which might result in injury or death if not carefully observed.
Notes vi
Contents W4 and W5 Control Heads Foldout Page . . . . . . . . . . i Computer Software Copyrights ........................................................ iv Documentation Copyrights ............................................................... iv Disclaimer ........................................................................................ iv Notations Used in This Manual ......................................................... v Introduction . . . . . . . . . . . . . . . . . . . . . . . . . . . .
Emergency Call .........................................................................20 Initiating an Emergency Alarm ..................................................21 Initiating an Emergency Call .....................................................22 Initiating an Emergency Call and Alarm ....................................23 Initiating a Silent Emergency Alarm ..........................................24 Special Considerations for Emergencies ..................................25 Scan Operation ...
Storing a Unit ID Number in the List (W7 and W9 Control Heads Only) ......................................... 54 Editing a Name in the List (W7 and W9 Control Heads Only) ......................................... 55 Conventional Radio Features. . . . . . . . . . . . . . . . . . . 57 Features Used in Conventional Operation ...................................... 57 Status Calls (Digital Modes Only) .................................................... 58 Sending a Status Call (W7 and W9 Control Heads Only) ..
(W7 and W9 Control Heads Only) .........................................82 Selecting Enable and Disable (Digital Modes Only) ..................83 Requesting a Dynamic Regrouping (W7 and W9 Control Heads Only) (Digital Modes Only) ........83 SmartZone (W7 and W9 Control Heads Only) ................................85 Site-Button Operation ...............................................................86 Locking onto a Site ...................................................................87 Site Trunking ...
Introduction Using Your Radio: The Basics This chapter gives you the basic knowledge you need in order to use your radio.
Introduction Getting Started The ASTRO® XTL™ 5000 Digital Mobile Radio is among the most sophisticated two-way radios available. It can operate in the following frequency ranges: VHF UHF 700/800 MHz 136-174 MHz 380-470 MHz 762-776 MHz 794-806 MHz 806-825 MHz 851-870 MHz These channels provide maximum communications capability under varying operating conditions.
Introduction Note: In this manual— Analog mode refers to a mode that uses traditional, non-ASTROdigital signaling. ASTRO mode refers to a mode that uses ASTRO digital signaling. Your ASTRO XTL 5000 Digital Mobile Radio utilizes Motorola’s revolutionary FLASHport™ technology. This allows your radio’s capabilities to be flexible, because FLASHport makes it possible to add software that drives these capabilities both at the time of purchase and later on.
Introduction Identifying Your Radio The ASTRO XTL 5000 Digital Mobile Radio’s capabilities, and the operation of its features, differ depending on which control head is ordered. Keep the foldout pages open for reference as you read this manual. Your radio has one of the following control heads: W4 Control Head The W4 has rotary Mode and Volume knobs and a limited set of control buttons, eight-digit display, and no 12-button keypad (page i).
Introduction Operating Your Control Head Your advanced control head is designed for ease of use and flexibility of feature control. Before operating the radio, familiarize yourself with the various controls, indicators, and alert tones. Refer to the foldout diagrams in the front and back of this manual for your particular control head. Turning On the Radio Basic operation is the same for all radio control heads. Control heads with additional features are noted.
Introduction Setting the Volume Choose one of the following: • W4 Control Head: Rotate the Volume knob clockwise to increase the volume and counterclockwise to decrease the volume. A volume indication (0-15) appears on the display; for example, VOL 10. • W5, W7, and W9 Control Heads: Press and hold the Vol rocker switch. A volume indication (0-15) appears on the display. For example, VOL 10 (W5, W7) or VOLUME 10 (W9). Hold the button until the sound level increases (or decreases) to the desired level.
Introduction Trunked Modes or Conventional Channels Depending on how your radio is programmed, you can select conventional channels or trunked talkgroup. Conventional channels consist of a transmit and receive frequency pair, an associated squelch code pair, and a time-out timer value. See “Conventional Radio Features” on page 57. Trunked modes consist of the system/announcement group/talkgroup combination and a time-out timer value. See “Trunking Operation” on page 73.
Introduction Display Status The control head display indicates your selected mode, or the currently active receive mode when scan is on. Feature Control You can turn the various radio features on or off, change modes, and adjust the volume. To exit a feature, such as phone, press the HOME button or the feature button (for example, Phon). Alert Tones Tone Type Name Two highpitched tones Private Conversation™ Indicate that a private call has been received.
Introduction Tone Type Name Description Sound similar to a telephone busy signal System Busy Indicates, when you press the microphone push-to-talk (PTT) button, that you cannot transmit because all system radio channels are in use. Release the PTT button and wait for call back. A series of three short, high-pitched tones Automatic Call Back Indicate that a channel is now available for your previously requested transmission.
Introduction Tone Type Name Description Continuous, low-pitched tone Illegal Mode Indicates that you have entered a mode where normal system traffic will be missed, or you are attempting something which is not permitted. Examples include: forgetting to exit the telephone interconnect mode after a call ends (fleet and subfleet calls cannot be received), attempting to transmit on a receive-only conventional mode, attempting to select a dynamic mode where no dynamic ID assignment has been made.
Basic Operating Procedures Basic Functions This chapter shows you how to access the radio’s basic functions and includes the following topics: • Selecting the Zone or Mode (page 12) • Selecting the Home Mode (page 14) • Transmitting (Conventional Modes Only) (page 15) • Transmitting (Trunked Modes Only) (page 15) • Selecting the Transmit Power Level (page 16) • Monitoring Conventional Mode Activity (page 17) • Adjusting the Squelch Level (page 18) ASTRO XTL 5000 Digital Mobile Radio with W4, W
Basic Operating Procedures Selecting the Zone or Mode A zone is a grouping of modes. A mode is a group of characteristics such as transmit/receive frequencies, Private-Line™ codes, radio parameters, and an alphanumeric name. Selecting or Changing the Zone Press the (Zone up) button or (Zone down) button.
Basic Operating Procedures Selecting or Changing a Mode in the Current Zone To access a mode in the current zone, do one of the following: • W4 Control Head: Turn the Mode knob until the display shows the desired mode name. • W5 Control Head: Press the Mode rocker switch until the display shows the desired mode name. • W7 and W9 Control Heads: 1 Press and hold HOME .The zone/mode flashes. 2 Release 3 Enter the number by the keypad, and press HOME . HOME again.
Basic Operating Procedures Selecting the Home Mode This feature must first be enabled by a qualified radio technician. Press Home (W4, W9) or HOME (W5, W7) to select the home mode contained within the home zone, from any other zone and mode in the radio.
Basic Operating Procedures Transmitting (Conventional Modes Only) 1 Lift the microphone off-hook, and listen for activity on that mode. 2 If you hear no activity, press and hold the microphone PTT button. Transmitting (Trunked Modes Only) 1 Lift the microphone off-hook, and press the microphone PTT button. 2 Do one of the following: • If you hear three quick tones, or if you hear no tone and the red XMIT (transmit) indicator lights steadily, proceed with your message.
Basic Operating Procedures Selecting the Transmit Power Level The L PWR button lets you select (toggle) the transmit power level. Press L PWR . The display momentarily shows LOW PWR or HIGH PWR (W4, W5, W7), or LOW POWER or HIGH POWER (W9) to indicate the transmit power level selected. Also, when low-power transmission is selected, the L PWR indicator lights.
Basic Operating Procedures Monitoring Conventional Mode Activity This feature allows you to monitor channel traffic on conventional channels by defeating the coded squelch. This feature must first be enabled by a qualified radio technician or system administrator. Do one of the following: • Take the microphone off hook (This is the same as monitor on. You hear all channel traffic.), OR • W4, W5, and W7 Control Heads: Pressing Mon momentarily toggles between MON ON and MON OFF.
Basic Operating Procedures Adjusting the Squelch Level 1 Choose one of the following: • W4, W5, and W7 Control Heads: Press and hold Mon The display shows SQL XX; where XX is a squelch level setting of 0 to 15. • W9 Control Head: Press and hold Sql . momentarily. The dis[play shows SQUELCH XX, where XX is a squelch level setting of 0 to 15. 2 Adjust the squelch level by turning the Mode knob (W4) or by pressing the Mode rocker switch (W5, W7, W9) to reach the desired squelch level setting.
General Radio Features Often-Used Features This chapter shows you how to access the most frequently used features.
General Radio Features Emergency Call and Alarm The emergency call and alarm features allow you to have priority channel access and/or send an emergency data transmission to the dispatcher in an emergency situation. The desired type of emergency feature—alarm, call, call and alarm, or silent alarm—can be preprogrammed by a qualified radio technician. The radio must be turned on to activate any emergency feature.
General Radio Features Initiating an Emergency Alarm The emergency alarm feature sends a data transmission to alert the dispatcher of your emergency condition and identify your unit ID. Press the emergency button. A tone sounds and the display alternates EMERGNCY (W4, W5, W7) or EMERGENCY (W9) with the current zone/channel. For trunking modes, a high-pitched tone indicates that the alarm has been received by the trunked system’s central controller.
General Radio Features Initiating an Emergency Call 1 Press the emergency button. A tone sounds and the display alternates EMERGNCY (W4, W5, W7) or EMERGENCY (W9) with the current zone/channel. 2 Press the PTT button and announce your emergency. 3 After completing the emergency call, press and hold the emergency button until a tone sounds. The alternating EMERGNCY (W4, W5, W7) or EMERGENCY (W9) display disappears, and the radio returns to normal operation.
General Radio Features Initiating an Emergency Call and Alarm If the radio has both emergency call and alarm features, it automatically proceeds to the call mode after the alarm is acknowledged. 1 Press the emergency button to activate the emergency call/ alarm feature. The display begins alternating EMERGNCY (W4, W5, W7) or EMERGENCY (W9) with the current zone/channel. For trunking modes, a high-pitched tone sounds, indicating that the alarm has been received by the trunked system’s central controller.
General Radio Features Initiating a Silent Emergency Alarm 1 Press the emergency button to activate the silent alarm feature. During a silent emergency alarm, there are no display changes, and the receiver audio mutes so that no indication is given that an emergency alarm has been sent. 2 To exit the silent alarm mode, press and hold the emergency button until a tone sounds.
General Radio Features Special Considerations for Emergencies • If you press the emergency button while in a mode that has no emergency capability, a low-pitched tone sounds. • If the unit is out of the range of the system and/or the emergency alarm is not acknowledged, a tone sounds and the display shows NO ACK.
General Radio Features Scan Operation The scan feature allows you to monitor activity on different conventional or trunked modes by scanning a scan list of modes. The modes to be scanned in a scan list are programmed by a qualified radio technician. You can select the modes to be scanned in a scan list if operator-selectable scan is enabled.
General Radio Features Turning On Scan Press Scan scanning. momentarily on a non-autoscan mode to start The Scan indicator lights and a list of modes is scanned for activity. When a scanned mode becomes active, the display changes to show the active mode name, the appropriate priority indicator lights, and the radio unmutes. The radio will not begin scanning again for a predetermined hang time after the call ends, giving you time to respond.
General Radio Features Turning Scan On While Disregarding the Squelch Code (Conventional Modes Only) Choose one of the following: • W4, W5, and W7 Control Heads: Press Mon momentarily. The brief MON ON display indicates that the radio is disregarding the squelch code. • W9 Control Heads: Press momentarily. The brief Sql MONITOR ON display indicates that the radio is disregarding the squelch code.
General Radio Features Viewing a Scan List 1 Press and hold Scan until the Scan indicator blinks and a beep is heard. The radio suspends scanning while a scan list is being reviewed. 2 Choose one of the following: • W4 and W5 Control Heads: Turn the Mode knob or press the Mode rocker switch to scroll up or down through the programmed modes. Those modes that are in the scan list are indicated by a N PRI, PRI or blinking PRI indicator (indicating the mode’s assigned priority).
General Radio Features Transmitting While Scan Is On Radio Programmed for Talkback Scan Press the microphone PTT button to transmit on the mode indicated by the display. The radio does not begin scanning again for a predetermined hang time (programmable by a qualified radio technician) after you release the PTT button, allowing the other party to respond.
General Radio Features Temporarily Deleting a Nuisance Mode with Scan On (W7 and W9 Control Heads Only) To temporarily delete a mode that you do not wish to hear (nuisance mode), press Del active (indicated by the display). once while the mode is You can delete undesired modes. Note: Priority modes, the selected mode, and the designated transmit mode cannot be deleted.
General Radio Features Restoring a Nuisance Mode (W7 and W9 Control Heads Only) To restore the original scan list, do one of the following: • Press • Turn scan off, then on. • Change modes. • Turn off the radio, and then turn it back on. Rcl . Note: Nuisance mode delete can be disabled by the system administrator.
General Radio Features Changing Mode Priorities While Scan Is On (W7 and W9 Control Heads Only) When active, this dynamic priority feature allows you to change the priority of a non-priority mode in the scan list to priority 2. To change the priority of a non-priority channel in the scan list to priority 2, press Sel . You cannot alter the status of the priority 1 member.
General Radio Features Programming a Scan List To program a scan list, operator-selectable scan list members first must be enabled in the radio programming by a qualified radio technician. Adding a Channel to the Scan List 1 Press and hold until the scan indicator blinks and a Scan good-key chirp is heard. 2 Using the Mode knob (W4) or Mode rocker switch (W5, W7, W9), locate the channel to be added.
General Radio Features Deleting a Channel from the Scan List 1 Press and hold Scan until the scan indicator blinks and a good-key chirp is heard. 2 Using the Mode knob (W4) or the Mode rocker switch (W5, W7, W9), locate the channel to be deleted. Note: If the desired channel resides in a different zone, press the Zone up or Zone down button to change zones, then use the mode changer to find the desired channel.
General Radio Features Hang Up Box (HUB) To temporarily suspend Scan Mode operation, remove the microphone from the Hang Up Box (HUB). You are allowed to use the microphone while scan is suspended. Priority Member scanning is not suspended, however. This feature applies to all Scan Lists and Scan Types. Scan is resumed once the microphone is returned to the holding clip and the preprogrammed hang time has elapsed.
General Radio Features Permanent Horn and Lights 1 Press H/L momentarily. The last selected alarm(s) are enabled. The display briefly shows the enabled alarms, and then reverts back to the selected mode. 2 Press H/L a second time to turn off the alarm(s).
General Radio Features Changing the Selected Alarms 1 Press and hold H/L until a tone sounds and the display indicates the currently selected alarm. 2 3 Turn the Mode knob (W4) or press the Mode rocker switch (W5, W7, W9) to review the choices until the display shows the desired alarm: • HORN ON • LITES ON (W4, W5, W7) or LIGHTS ON (W9) • H/L ON (both horn and lights) Press HOME or H/L return to normal operation.
General Radio Features Receiving a Call While Alarms Are Turned On When a call is received, the vehicle’s horn sounds for four seconds, and/or the car lights turn on for 60 seconds. The time interval can be modified by a qualified radio technician. The display alternates between the type of call received (CALL, PAGE, or PHONE) and the selected mode name. Turning Off Non-Rearmable External Alarm 1 To turn off the external alarm(s), press the PTT button or any control-head button.
General Radio Features Time-Out Timer All ASTRO XTL 5000 Digital Mobile Radios provide a time-out timer function that prevents locking up a repeater or channel by prolonged keying of the transmitter. You cannot transmit longer than the preset timer setting. If you attempt to do so, the radio automatically stops your transmission, and you hear a talk-prohibit tone. Note: You will hear a brief, low-pitched, warning tone four seconds before the transmission times out.
General Radio Features Telephone Interconnect List (Conventional and Trunking) With any of the control heads, you can initiate and receive telephone calls if the system is properly equipped. All calls between the mobile operator and the land line are private, regardless of who initiates the call. All control heads feature a phone list capability of up to 100 preprogrammed phone numbers. The radios can be programmed by a qualified radio technician so that a name can be assigned to each number in the list.
General Radio Features Answering a Phone Call When a phone call is received, telephone-type ringing sounds and the display shows PHONE CALL (W9) or PHN CALL (W4, W5, W7). 1 Press 2 Press the PTT button to talk; release it to listen. 3 When the call is completed, press Phon . HOME or Phon to hang up and return to normal operation. Initiating a Telephone Call from the List 1 Press Phon momentarily to select the phone function. (All Control Heads) A valid-key chirp is heard.
General Radio Features Note: If the number contains a programmed pause, the dialing pauses briefly when the display shows P. After the brief pause, the rest of the numbers are dialed. If you are out of range of the trunked system, the display shows NO PHONE, and a continuous low-pitched tone sounds. Press HOME or Phon to resume normal operation.
General Radio Features Unlimited Telephone Interconnect (W7 and W9 Control Heads Only) Calling a Phone Number Not in the List 1 Press Phon momentarily to select the phone function. The Phone indicator lights (W7 only), and the display shows the last number dialed (W7 and W9). 2 Enter the desired phone number from the keypad. The display updates as the numbers are entered. Note: To include a pause in the dialing sequence, press the * button followed by the # button. A P appears in the display.
General Radio Features Note: If you are out of range of the trunked system, the display shows NO PHONE, and a continuous low-pitched tone sounds. Press HOME or Phon to resume normal operation. If the trunked phone interconnect is in use or the phone interconnect is out of service, a telephone-type busy tone sounds, and the display shows PHON BSY (W7) or PHONE BUSY (W9). Your number is automatically dialed when the phone interconnect becomes available. If you hang up, you lose your place in the queue.
General Radio Features Storing a Number in the List 1 Press and hold Phon to select the phone programming function. The phone indicator flashes (W7 only). 2 Do one of the following: • Press the Mode rocker switch to locate the number you want to change. OR • Use the keypad to move directly to the phone number you want to change. 3 Press 4 Enter the new phone number on the keypad. Sel to edit the number in the display.
General Radio Features Editing a Name in the List (W7 and W9 Control Heads Only) 1 Press and hold Phon to enter Phon ID list programming. The Phon indicator flashes and a high-pitched tone sounds. 2 Press the Mode rocker switch to locate the list member you want to change. OR Use the numbered keys to go immediately to the location of a member in the list. For example, press 2 to go to the second member in the list; press 1 and 0 to go to the tenth member in the list, and so on.
General Radio Features • To delete characters, press the Mode down rocker switch to move backwards over existing characters. When the last character on the display has been erased, press the Mode down rocker switch again to leave the name-edit mode, without making any changes, and begin the procedure again at step 2. 4 To save the changes, press and hold Sel . Note: Press momentarily to confirm changes to a Sel number in the list.
General Radio Features Table 1: Entering Characters Using the Keypad Number of times the key is pressed Key 1 2 3 4 5 6 7 0 0 1 1 2 A B C 2 a b c 3 D E F 3 d e f 4 G H I 4 g h i 5 J K L 5 j k l 6 M N O 6 m n o 7 P Q R S 7 p q 8 T U V 8 t u v 9 W X Y Z 9 w x * * / + - # # 8 9 r s y z ASTRO XTL 5000 Digital Mobile Radio with W4, W5, W7, and W9 49
General Radio Features Call Alert Page (Conventional and Trunking— Digital Modes Only) The Call Alert feature allows a radio to selectively alert another radio, and to determine whether or not that radio received the alert. A Call Alert page can be initiated after an unsuccessful Private Conversation call or as a separate feature. All Control Heads are capable of responding to a Call Alert initiated by another radio.
General Radio Features Sending a Call Alert Page 1 Press Page . The Page indicator lights and a valid-key chirp sounds. The display shows the last transmitted/received unit ID number. 2 Select a radio in one of the following ways: • From the ID number list: – Do nothing if you want to call the unit ID currently displayed. OR – Use the prestored list by turning the Mode knob (W4) or by pressing the Mode rocker switch (W5, W7, W9) to locate the name/ID you want to call.
General Radio Features 4 Choose one of the following: • When the called radio acknowledges the page, four additional tones sound and the display changes to ACK RCVD. The radio returns to normal operation. • If you are out of the range of the system, a low-pitched tone sounds. Try again by pressing the PTT button or Sel , OR Press HOME operation.
General Radio Features Answering a Call Alert Page If you are not available when a caller sends you a Call Alert page, a PAGE RCV message and the caller’s ID are left. If the page also triggers an external alarm, the display shows PAGE RCV and four tones repeat every five seconds. 1 Do one of the following: • Make a normal dispatch call. Press the PTT button and ask about the page. OR • Press Call . The display shows the unit ID of the caller.
General Radio Features Storing a Unit ID Number in the List (W7 and W9 Control Heads Only) The Selective Call and Call Alert page features share the same prestored list of unit IDs. 1 Press and hold Page to review the list. The Page indicator flashes and a valid-key chirp sounds. 2 Press the Mode rocker switch to locate the list member you want to change. 3 Press 4 Enter the new unit ID number on the keypad. Sel to select the unit ID store function.
General Radio Features Editing a Name in the List (W7 and W9 Control Heads Only) The Selective Call and Call Alert page features share the same prestored list of unit IDs. 1 Press and hold Call , Page , or 2Pge to enter Call ID list programming. The Call indicator flashes and a high-pitched tone sounds. 2 Press the Mode rocker switch to locate the list member you want to change. OR Use the numbered keys to go immediately to the location of a member in the list.
General Radio Features • To leave a space in the text, press the Mode up rocker switch to move the blinking cursor to the next character position, and then enter the next character. • To delete characters, press the Mode down rocker switch to move backwards over existing characters. When the last character on the display has been erased, press the Mode down rocker switch again to leave the name-edit mode, without making any changes, and begin the procedure again at step 2.
Conventional Radio Features Features Used in Conventional Operation This chapter shows you how to access features available in conventional operation.
Conventional Radio Features Status Calls (Digital Modes Only) Radio status calls are used to inform the dispatcher of the present state of the mobile unit. For example, a status might be ENROUTE or AT SITE. Status names are field programmable. Each radio can have up to 8 separate statuses. Sending a Status Call (W7 and W9 Control Heads Only) 1 Press Sts , and the display shows the last-acknowledged status name.
Conventional Radio Features • If there is no acknowledgment, do one of the following: Press the microphone PTT button or Sel to resend the status transmission. OR Press HOME to return to normal dispatch operation.
Conventional Radio Features Sending a Direct-Entry Keyboard (DEK) Status (Digital Modes Only) Press the desired Sts # button on the DEK. The red indicator flashes while the radio is waiting for an acknowledgment. The control head momentarily displays the selected status, then shows PLS WAIT (W7) or PLEASE WAIT (W9).
Conventional Radio Features Smart PTT Smart PTT is a per-mode feature that gives the system manager better control of radio operations. When smart PTT is enabled in your radio, you will not be able to transmit on an active mode. If you try to transmit (press the PTT button) on a busy or active smart PTT channel, a continuous tone sounds until you release the PTT button, and the transmission is inhibited. The yellow BUSY LED lights when the radio is receiving to indicate that the mode is busy.
Conventional Radio Features Conventional Talkgroup Calls Digital Modes Only This feature allows you to define talkgroups for your conventional system. Talkgroups, combined with selective squelch operation, allow groups of users to transparently share a conventional channel. Talkgroups can be slaved to a personality through programming, or you can select them. Encryption keys are slaved to talkgroups. When conventional talkgroups are enabled, encryption keys are changed by changing the active talkgroup.
Conventional Radio Features Note: To select the default talkgroup, press Sel while the radio displays PRESET. Selecting PRESET causes the radio to return to its preprogrammed talkgroup. To abort the talkgroup menu, press HOME or the PTT button: – Pressing HOME exits the talkgroup select menu without saving the selected talkgroup choice. – Pressing the PTT button exits the menu without saving the selected talkgroup and allows the radio to transmit.
Conventional Radio Features Conventional Talkaround Talk Direct (Mobile-To-Mobile) To talk directly to another unit without going through the conventional repeater system: 1 Press Dir momentarily. The Dir indicator lights, indicating that the radio is now transmitting directly to another unit. 2 To return to repeater operation, press Dir again. The Dir indicator goes out. Note: A conventional personality can be configured to always transmit on the direct mobile-to-mobile frequency.
Conventional Radio Features Selective Calls (Digital Modes Only) The Selective Call feature not only allows you to carry on a conversation that is heard only by the two parties involved, but also enables you to determine whether the unit you are calling is in service. All Control Heads are capable of responding to a Selective Call initiated by another radio. The following further describes each Control Head’s capability: • All Control Heads: Feature a unique list of preprogrammed ID numbers.
Conventional Radio Features Answering a Selective Call When a Selective Call is received, two high-pitched tones sound and the display alternates between CALL RCV and the home display. 1 Press Call within 20 seconds of receiving the call. (This time is programmable by a qualified radio technician.) The display shows the ID number of the calling unit. 2 To respond to the call, press the PTT button and talk.
Conventional Radio Features Initiating a Selective Call To initiate a Selective Call, select a unit to call, then place the call. 1 Press Call . The Call indicator lights, and the display shows the last transmitted/received unit ID number. 2 Select a unit in one of the following ways: • From the ID number list: – Do nothing if you want to call the unit ID currently displayed.
Conventional Radio Features 4 Choose one of the following conditions that applies to your current call: • If the receiving unit answers, identify yourself and begin your Selective Call. • If, after a programmable time period, you are not connected, the display shows NO ACK and a momentary, low-pitched tone sounds. Try again, or press HOME or Call button to return to normal operation. • If you are out of the system’s range, a low-pitched tone sounds.
Conventional Radio Features Viewing Your Unit ID Number 1 Press Call momentarily to select the Selective Call feature. The Call indicator lights. 2 Do one of the following: • Turn the Mode knob (W4) counterclockwise or press the Mode down rocker switch (W5, W7, W9) to locate the MY ID display. OR • W7 and W9 Control Heads only: When not in the scratchpad, press the * button. The display will alternate between MY ID and your ID number.
Conventional Radio Features Storing a Unit ID Number in the List (W7 and W9 Control Heads Only) The Selective and Call Alert page features share the same prestored list of units’ IDs. 1 Press and hold Call , Page , or to review 2Pge the Call ID list. The Call indicator flashes and a high-pitched tone sounds. 2 Press the Mode rocker switch to locate the list member you want to change. 3 Press 4 Enter the new unit ID number on the keypad. to select the unit ID store function.
Conventional Radio Features Editing a Name in the List (W7 and W9 Control Heads Only) The Selective Call and Call Alert page features share the same prestored list of unit IDs. 1 Press and hold Call , Page , or 2Pge to enter the Call ID list. The Call indicator flashes and a high-pitched tone sounds. 2 Press the Mode rocker switch to locate the list member you want to change. OR Use the numbered keys to go immediately to the location of a member in the list.
Conventional Radio Features • To leave a space in the text, press the Mode up rocker switch to move the blinking cursor to the next character position, and then enter the next character. • To delete characters, press the Mode down rocker switch to move backwards over existing characters. When the last character on the display has been erased, press the Mode down rocker switch again to leave the name-edit mode, without making any changes, and begin the procedure again at step 2.
Trunking Operation Features Used on Trunking Systems This chapter shows you how to access features available on trunking systems.
Trunking Operation Enhanced Private Conversation (Digital Modes Only) The enhanced Private Conversation feature not only allows you to carry on a conversation that is heard only by the two parties involved, but also enables you to determine whether the unit you are calling is in service. All Control Heads are capable of responding to a Private Conversation call initiated by another radio.
Trunking Operation Answering an Enhanced Private Conversation Call When a Private Conversation Call is received, two high-pitched tones sound and the display alternates between CALL RCV and the home display. 1 Press Call within 20 seconds of receiving the call. (This time is programmable by a qualified radio technician.) The display shows the ID number of the calling unit. 2 To respond to the call, press the PTT button and talk.
Trunking Operation Initiating an Enhanced Private Conversation Call To initiate an Enhanced Private Conversation Call, select a unit to call, then place the call. 1 Press Call . The Call indicator lights, and the display shows the last transmitted/received unit ID number. 2 Select a unit in one of the following ways: • From the ID number list: – Do nothing if you want to call the unit ID in the display.
Trunking Operation 4 Choose one of the following conditions that applies to your current call: • If the receiving unit answers, identify yourself and begin your Private Conversation. • If, after a programmable time period, you are not connected, the display shows NO ACK and a momentary, low-pitched tone sounds. Try again, or press HOME or Call button to return to normal operation. • If you are out of the system’s range, a low-pitched tone sounds.
Trunking Operation Storing a Unit ID Number in the Private Conversation List (W7 and W9 Control Heads Only) The Private Conversation and Call Alert page features share the same prestored list of unit IDs. 1 Press and hold Page to review the list. The Page indicator flashes and a valid-key chirp sounds. 2 Press the Mode rocker switch to locate the list member you want to change. 3 Press 4 Enter the new unit ID number on the keypad. Sel to select the unit ID store function.
Trunking Operation Editing a Name in the Private Conversation List (W7 and W9 Control Heads Only) The Private Conversation and Call Alert page features share the same prestored list of unit IDs. 1 Press and hold Call , Page , or 2Pge to enter Call ID list programming. The Call indicator flashes and a high-pitched tone sounds. 2 Press the Mode rocker switch to locate the list member you want to change.
Trunking Operation • To delete characters, press the Mode down rocker switch to move backwards over existing characters. When the last character on the display has been erased, press the Mode down rocker switch again to leave the name-edit mode, without making any changes, and begin the procedure again at step 2. 5 To save the changes, press and hold 6 Repeat steps 2 through 5 until you have modified all the desired names, Sel .
Trunking Operation Failsoft If the trunked system’s central controller fails for any reason, the radio indicates failsoft. In this condition, the radio transmits and receives on a pre-determined frequency in a conventional mode. Failsoft ensures that you will have communications capability at all times. Radios can be programmed by the system administrator so units that normally communicate on the same trunked mode will be assigned to the same failsoft repeater frequency.
Trunking Operation Dynamic Regrouping (Digital Modes Only) The dynamic regrouping feature allows the dispatcher to temporarily reassign selected individuals, operating in separate trunked talkgroups, into a single group so that they can communicate. Receiving a Dynamic Regrouping ID Assignment (W7 and W9 Control Heads Only) When your unit receives a dynamic regrouping ID assignment, a unique chirp sounds to alert you that your unit has been dynamically regrouped.
Trunking Operation Selecting Enable and Disable (Digital Modes Only) The dispatcher may classify regrouped units into one of two categories: select-enabled or select-disabled. Select-enabled Units are free to make mode changes to any of the available talkgroups, including the dynamic group. Select-disabled Units cannot change modes because the dispatcher has specifically chosen to force the unit to remain in the dynamic mode.
Trunking Operation If the regrouping request is not acknowledged within six to eight seconds, the display alternates between showing NO ACK and RPGM or (W9 Control Head) RPGM RQST, and a low-pitched tone sounds. At this time, do one of the following: • Press the microphone PTT button or Sel regroup request. OR • 84 Press HOME to return to normal operation.
Trunking Operation SmartZone (W7 and W9 Control Heads Only) The SmartZone® feature extends communications beyond the reach of a single-trunked site (antenna location) when operating in a SmartZone system. SmartZone units provide expanded wide-area coverage. SmartZone automatically switches the radio to a different site when the current site signal becomes unacceptable. This usually happens when the vehicle in which the radio is located is driven out of the range of one site, and into the range of another.
Trunking Operation Site-Button Operation To check which site the radio has currently selected: Press Ste (W7) or Site (W9) momentarily. The display momentarily shows the current site name and RSSI (received signal strength indicator). One of the following conditions can also occur: • If the radio is not locked onto a site, but is scanning for a new site, the display shows SCANNING. • If the radio has not yet received site ID information for the current site, the radio displays SITE XX.
Trunking Operation Locking onto a Site In areas that commonly have weak signals, use the SmartZone lock function to prevent the radio from automatically scanning for a new site. 1 Press Lck (W7) or Lock (W9) momentarily to display the current lock status. W7 Control Head: Either the display shows LOCKED or UNLOCKED. W9 Control Head: Either the display shows SITE LOCKED or SITE UNLCKD.
Trunking Operation Site Trunking In a SmartZone system, if the zone controller for a particular site fails, the site enters into a site-trunking operational mode. In this mode of operation, the user can only communicate with other units at the same site. Radios in a SmartZone system can be programmed by a qualified radio technician to display STE TRNK (W7) or STE TRUNK (W9) when site trunking becomes active. The display alternates with the current mode display as long as the radio remains in site trunking.
Trunking Operation Out-of-Range Indication The out-of-range display/audible indication feature can be enabled by a qualified radio technician. The display alternately shows OUT OF RANGE and the current selected mode, and a low-pitched tone sounds every six seconds: • When the radio is out of range of the system and can no longer lock onto the control channel OR • When the radio is in failsoft and cannot lock onto the failsoft channel.
Trunking Operation Trunked Announcement The announcement capability allows a user to make announcements to the entire user group, as well as monitor talkgroup calls and other announcements. Announcement calls are handled in two different ways, depending on the trunked central controller configuration. The two types are called ruthless and non-ruthless preemption. • Ruthless Preemption: When a ruthless preemption announcement call is initiated, the requesting radio begins transmitting immediately.
Trunking Operation Initiating an Announcement If your radio has been programmed to allow announcement calls: 1 Turn the Mode knob (W4) or press the Mode rocker switch (W5, W7, W9) to locate the announcement-group mode. 2 Press the microphone PTT button to initiate the announcement.
Trunking Operation Notes 92
Secure Operation Features Available on Secure XTL 5000 This chapter covers features available on XTL 5000 Digital Mobile Radios with secure encryption.
Secure Operation Receiving a Private Message 1 Select a mode by turning the Mode knob (W4) or pressing the Mode rocker switch (W5, W7, W9). 2 Using the Volume knob (W4) or the Vol rocker switch (W5, W7, W9), adjust the volume to a comfortable listening level. In conventional modes and, if enabled, in trunking modes, the BUSY light blinks and the radio unmutes when the radio is receiving a private message. Note: The secure on/off state does not affect received messages.
Secure Operation System Considerations • Trunked Systems only: If you press the PTT button when no secure-voice channel is available, the display shows NO SEC (W4, W5, W7) or NO SECURE (W9), and a continuous talk-prohibit tone sounds until you release the PTT button. • Analog trunking systems: You are not allowed to change from a secure transmission to a clear transmission during a secure trunked call.
Secure Operation Loss Indication When you press the PTT button while in the coded mode and without the encryption module containing a valid key, the speaker generates bursts of alert tones, and the display shows KEY FAIL until you release the PTT button. When the radio is first turned on, six medium-pitched tones sound and the display momentarily shows KEY FAIL to indicate that the encryption module does not contain a valid key for the current mode.
Secure Operation Selecting an Encryption Key (Conventional Only) The Select Key feature allows you to manually select any one of the 16 encryption keys. If the current mode is programmed with key selection being strapped to force the current mode to use a predetermined key, the Select Key menu will not appear as a Secure menu item. 1 Press and hold down D until a tone sounds, which indicates entry into the Advanced Secure menu.
Secure Operation Note: When you scroll to an erased key, the display alternates between the key name and ERASED. 6 To abort this menu, press Pressing HOME HOME or the PTT button. exits the key-select menu without saving the selected key choice. Pressing the PTT button exits the menu without saving the selected key choice and allows the radio to transmit. When you abort the key-select menu, the radio uses the key that was selected prior to entry into the menu.
Secure Operation Selecting an Encryption Index (Conventional Only) The Select an Index feature allows you to select one or more groups of several encryption keys from among the available keys stored in the radio. For example, you could have a group of three keys structured to one index, and another group of three different keys structured to another index. By changing indices, you would automatically switch from one set of keys to the other.
Troubleshooting Troubleshooting The following are suggestions to assist you in troubleshooting possible operating problems. ! CAUTION The cables that connect to the rear of the radio could have live voltage on some of their pins. Do not remove or reconnect these cables. Only a qualified radio technician should perform this task. Service performed by unauthorized personnel may cause the radio to transmit an emergency alarm even if the unit is turned off.
Glossary ACK Acknowledgment of communication. Channel A group of characteristics, such as transmit/ receive frequency pairs, radio parameters, and encryption encoding. Coded Squelch Tone Private-Line™ or Digital Private-Line. Used on conventional channels to make sure you hear only the communication meant for you. Control Channel In a trunking system, one of the channels that is used to provide a continuous, two-way/data communications path between the central controller and all radios on the system.
Glossary Hang Up Disconnect. Home Display The first display information after the radio completes its self test. LCD Liquid-Crystal Display. Mode A programmed combination of operating parameters; for example, a channel or talkgroup. Mode-Slaving Radio programmed to automatically give the proper operation for a given mode you have selected. Monitoring (Conventional Operation) Press a programmed monitor button to listen to another user active on the channel.
Glossary Squelch The muting of audio circuits when received signal levels fall below a pre-determined threshold. With carrier squelch, you hear all channel activity which exceeds the radio’s preset squelch level. Standby An operating condition whereby the radio’s speaker is muted but still continues to receive data. Talkgroup An organization (or group) of radio users who communicate with each other, using the same communication path.
Glossary Notes 104
Patent Disclosure This product is covered by one or more of the following United States patents: 4,512,035 4,551,856 4,653,117 4,816,774 4,829,594 4,837,853 4,864,252 4,885,550 4,914,321 4,918,403 4,959,617 4,975,650 4,994,768 5,006,730 5,021,754 5,079,526 Commercial Warranty (Standard) Motorola radio communications products are warranted to be free from defects in material and workmanship for a period of ONE (1) YEAR, (except for crystals and channel elements which are warranted for a period of ten [10] y
Non-Motorola manufactured products are excluded from this warranty, but subject to the warranty provided by their manufacturers, a copy of which will be supplied to you on specific written request. In order to obtain performance of this warranty, purchaser must contact a Motorola salesperson or Motorola at the address shown above, Attention Quality Assurance Department. This warranty applies only within the United States.
Index Symbols 800 MHz frequencies ....................2 A add scan list channel ..................34 adjust display brightness .....................6 squelch level ...........................18 volume .......................................6 alarms activate non-permanent ..........36 activate permanent ..................37 change selected ......................38 horn and lights .........................36 initiate emergency ...........................21 emergency call and alarm ....23 silent emergency ...
Index scan list ...................................26 selecting talkgroup ...................62 talkaround ................................64 talkgroup calls ..........................62 conventional mode, monitoring activity ........................................17 current zone change mode ...........................13 select mode .............................13 select unit to call ................ 67, 76 entering keypad characters ........ 49 external alarms ...........................
Index interconnect, unlimited telephone 44 introduction to radios ....................1 K key, encryption index selection ........................99 selecting ..................................97 keypad character selection sequence ..49 entering characters .................49 knob Mode ...................................4, 29 Volume ......................................4 L list edit name ................................47 editing a name ...................55, 79 phone, place call .....................
Index PRI (priority) indicator .................27 priority scanning ..........................26 private message receive .....................................94 transmit ....................................94 programming scan list .................34 PTT button ..................................30 PTT-ID (Push-to-Talk identification) ............................40 Push-to-Talk identification (PTT-ID) ...............40 R radio identification .........................4 rearmable external alarms ..........
Index T talk direct (mobile-to-mobile) .......64 talkback scan ..............................30 talkgroup scan list .......................26 telephone interconnect list ..........41 time-out timer ..............................40 tones, alert ....................................8 transmit conventional modes ................15 private message ......................94 trunked modes ........................15 with scan on ............................30 transmitting .................................
Index Notes 112
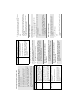
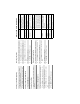
ASTRO XTL 5000 Digital Mobile Radio with W4, W5, W7, and W9 PWR HOME DIM HOME VOLUME Vol Mode MODE XMIT BUSY VOLUME SECURE MODE Scan SCAN Call O SELECT Sel Srch SEARCH NON-PRIORITY INDICATOR HOME Home Pri Non Pri Call CALL PRIORITY INDICATOR 2 Sql SQUELCH RECALL Rcl 0 8 7 Sts 5 H/L 4 Phon Page Rpgm 1 PAGE DELETE Del Msg 9 Lock 6 Site 3 DIM DELETE #Del 9Dir MONITOR RECALL Rcl 8Mon 4Sts 7H/L 3Lck 6Msg 2 5Rpg 1Ste LOCK SITE PAGE STATUS BUSY XMIT
PWR Mic POWER ON/OFF HOME DIM HOME VOLUME Vol Mode MODE Emer Phon Call 2 or 2Pge O DELETE #Del MAEPF 23213 A MONITOR RECALL Rcl 9Dir 6Msg 8Mon 5Rpg 4Sts 7H/L 3Lck 2 1Ste LOCK SITE PAGE STATUS BUSY XMIT Sel SELECT CALL DIRECT INDICATOR Scan SCAN PHONE PRIORITY/ NON-PRIORITY INDICATORS EMERGENCY or SECURE REPROGRAM MESSAGE HORN/LIGHTS DIRECT Quick Reference Card ASTRO® XTL™ 5000 Digital Mobile Radio with W7 Control Head 3 State your FCC call sign at the beginning of
A tone sounds and the display flashes EMERGNCY. When acknowledged, four more tones sound and the display shows ACK RCVD, then the radio returns to normal operation. The audio is muted and no display changes take place during the alarm. Non-Silent Silent Press the PTT button, or press and hold the emergency button to stop the emergency condition and unmute the radio. Indications/Actions Alarm Type Depending on your radio’s programming, one of the emergency sequences described in the table below occur.
Press Ste momentarily. If the radio is scanning for a new site, the display shows SCANNING. View the Current Site Automatic Multiple Site Selection (AMSS) Press Rpg. A central acknowledgement tone sounds and the display shows RPGM RQST while the request is being processed. When the dispatcher acknowledges, four additional tones sound, the display shows ACK RCVD, and your radio returns to normal operation. Requesting Dynamic Regrouping Press the HOME button.
Meaning Indicates you are transmitting. Radio is in direct (mobile-tomobile) operation. The display shows a mode in the scan list with the indicated priority level. Telephone dialing pause. Press Sel to continue the dialing. Unit being called with the Enhanced Private Conversation or Call Alert Page feature is not in service, or emergency alarm or status/message transmission is not acknowledged by dispatcher.
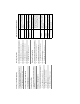
BUSY Dir MODE Mode Emer XMIT Vol Scan SCAN SELECT Sel Srch NON-PRIORITY INDICATOR HOME Home Pri Non Pri Call CALL PRIORITY INDICATOR 2 Sql SQUELCH RECALL Rcl 0 8 7 Sts 5 H/L 4 Phon Page Rpgm 1 PHONE DELETE Del Msg 9 Lock 6 Site 3 DIM Quick Reference Card ASTRO® XTL™ 5000 Digital Mobile Radio with W9 Control Head 3 State your FCC call sign at the beginning of each transmission.
2 Press the Mode rocker switch or use the keypad to select other statuses. 1 Press Sts. The display shows the last acknowledged status or first status name. Sending a Status Transmission 2 After completing the call, press and hold the emergency actuator until a tone sounds to return to normal operation. 1 Press the PTT button and talk. After the display shows ACK RCVD, your radio has priority voice-channel access.
5 Press Sel to select the index. 6 Press HOME or the PTT button to quit. To toggle to the opposite condition, press and hold Lock until a tone sounds and the display changes to the other condition. The radio then returns to normal operation. 4 Press the Mode rocker switch to select the desired index. 3 Press Sel to enter the Index Selection Menu. 2 Press the Mode rocker switch to scroll to INDX SEL. 1 Press and hold the D button until a tone sounds.
Meaning Indicates you are transmitting. Mode displayed is first priority. Mode displayed is second priority. Mode displayed is non-priority. Telephone dialing pause. Press Sel to continue the dialing. Unit being called with the Enhanced Private Conversation or Call Alert Page feature is not in service, or emergency alarm or status/message transmission is not acknowledged by dispatcher. Scan list full. Delete a mode before adding another. Trunked phone interconnect is busy.
Motorola, Inc. 8000 West Sunrise Boulevard Ft. Lauderdale, FL 33322 MOTOROLA, the Stylized M Logo, and ASTRO are registered in the U.S. Patent and Trademark Office. All other product or service names are the property of their respective owners. © Motorola, Inc. 2003. All rights reserved. Printed in U.S.A.