GM3688 User Guide
English.book Page 1 Friday, November 7, 2003 12:41 PM COMPUTER SOFTWARE COPYRIGHTS The Motorola products described in this manual may include copyrighted Motorola computer programs stored in semiconductor memories or other media. Laws in the United States and other countries preserve for Motorola certain exclusive rights for copyrighted computer programs including, but not limited to, the exclusive right to copy or reproduce in any form the copyrighted computer program.
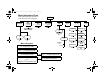
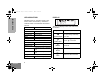
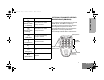
English.book Page 1 Friday, November 7, 2003 12:41 PM Menu Navigation Chart (Refer to Menu Navigation guidelines— lower, left-hand corner of this page) Radio Call G H Rptr/ Talkarnd (p. 17) G H System Scan (p. 24) G repeater mode/ talkarnd mode Selective Call Call Alert select/enter ID select/enter ID D G H H on/off Edit PL/ DPL Codes (p. 19) G Program Lists G H H add/delete/ edit/edit code entry Scan List (p.
English.book Page 1 Friday, November 7, 2003 12:41 PM Getting Started . . . . . . . . . . . . . . . . . . . . . . 15 CONTENTS Safety . . . . . . . . . . . . . . . . . . . . . . . . . . . . . . 3 Product Safety and RF Exposure Compliance . . . . . . . . . . . . . . . . . . 3 Introduction . . . . . . . . . . . . . . . . . . . . . . . . . 4 Conventional Radio Systems . . . . . . . . . . . . GM3688 Radio Features. . . . . . . . . . . . . . . . Radio Wide Features . . . . . . . . . . . . . . . .
CONTENTS English.book Page 2 Friday, November 7, 2003 12:41 PM Scan . . . . . . . . . . . . . . . . . . . . . . . . . . . . . . .24 User Settings . . . . . . . . . . . . . . . . . . . . . . . 41 Talkback . . . . . . . . . . . . . . . . . . . . . . . . . . . .24 Start System Scan . . . . . . . . . . . . . . . . . . . .24 Stop System Scan . . . . . . . . . . . . . . . . . . . .25 Start Auto Scan . . . . . . . . . . . . . . . . . . . . . .25 Stop Auto Scan. . . . . . . . . . . . . . . . . . . . . . .
English.book Page 3 Friday, November 7, 2003 12:41 PM SAFETY PRODUCT SAFETY AND RF EXPOSURE COMPLIANCE ! Caution For a list of Motorola-approved antennas, batteries, and other accessories, visit the following web site which lists approved accessories: http://www.motorola.com/cgiss/ index.shtml. Before using this product, read the operating instructions for safe usage contained in the Product Safety and RF Exposure booklet enclosed with your radio.
English.book Page 4 Friday, November 7, 2003 12:41 PM INTRODUCTION CONVENTIONAL RADIO SYSTEMS Conventional radio systems typically refer to unit-to-unit communications through a single channel. Conventional systems also allow radio users to extend communication coverage by relaying their messages through a repeater. To ensure coordinated use by multiple users, each radio user must monitor the channel or repeater before transmitting to verify that the system is not currently busy.
English.
RADIO OVERVIEW English.book Page 6 Friday, November 7, 2003 12:41 PM LED INDICATORS DISPLAY Indicates power up, transmit, receive, scan, monitor status, channel busy, Call Alert™ receive/transmit, and Selective Call receive/ transmit.
English.book Page 7 Friday, November 7, 2003 12:41 PM H Priority 1 Scan ( flashing) • H Priority 2 Scan ( steady) • J Talkaround F Call Received Indication Indicates scan has stopped and landed on an active Priority 1 channel. Indicates scan has stopped and landed on an active Priority 2 channel. Your radio may be ordered with an optional DTMF (Dual-Tone Multi-Frequency) microphone that has a direct entry keypad.
RADIO OVERVIEW English.book Page 8 Friday, November 7, 2003 The keypad is used for: • Dialing a phone number. • Entering information when programming phone lists. • Directly accessing preprogrammed features (see page 11). Each key can generate several different characters. For example, to enter the character “C,” press the 2 button three times. (Refer to the Entering Characters Using the DTMF Microphone Keypad table.
English.
RADIO OVERVIEW English.book Page 10 Friday, November 7, 2003 12:41 PM PROGRAMMABLE BUTTONS Your radio has four programmable buttons. Your dealer/programmer can program these buttons as shortcuts to various radio features. Check with your dealer/programmer for a complete list of functions your radio supports. Programmable buttons include: • The four front buttons (C, D, E, and F). • The three buttons (A, B, and C) of the optional DTMF microphone.
English.book Page 11 Friday, November 7, 2003 12:41 PM Function Menu Mode Indicator — Short Press Long Press D button enters Menu Mode and selects menu options. C button is automatically Hold Down — Page Button 14 re-assigned to exit Menu Mode.† Volume Set Monitor — C — Toggle silent monitor operation (also turn off open squelch monitor when it has been activated). — Turn on open squelch monitor. Sounds a tone for adjusting your radio’s volume level.
RADIO OVERVIEW English.book Page 12 Friday, November 7, 2003 Programmable Features (Continued) Function † Indicator Short Press Long Press Hold Down Page Button This function is activated by EITHER a short OR a long press, but not both. Voice Operated Transmission (VOX) — Toggle VOX on and off.† — 18 Radio Call — Directly access the radio call menu.† — 20, 21 — 24, 26 Scan/Nuisance Channel Delete G Toggle scan on and off. Delete a nuisance channel while scanning.
English.book Page 13 Friday, November 7, 2003 12:41 PM Programmable Features (Continued) Option Board † Indicator A Short Press Long Press Toggle the option board on and Hold Down off.† — Page Button 43 This function is activated by EITHER a short OR a long press, but not both.
RADIO OVERVIEW English.book Page 14 Friday, November 7, 2003 12:41 PM MENU BUTTONS Menu Button If preprogrammed by your dealer/programmer, the two front buttons (C and D) can be used, in conjunction with other programmable features, to access and select menu options (D); and exit menu mode (C). The D button can be preprogrammed by your dealer/programmer to either a short or long press to access the Menu Mode. Menu Scroll Buttons Used to scroll while in Menu Mode.
English.book Page 15 Friday, November 7, 2003 12:41 PM ADJUST THE VOLUME GETTING STARTED TURN THE RADIO ON OR OFF On/Off/Volume Control Knob Turn the On/Off/Volume Control knob clockwise to increase the volume, or counterclockwise to decrease the volume. – or – Note: Your dealer/programmer can preprogram one of the programmable buttons to Volume Set. ON OFF Rotate the On/Off/ Volume Control knob clockwise.
English.book Page 16 Friday, November 7, 2003 12:41 PM RECEIVE 1 Turn your radio on. 2 Adjust the radio’s volume, if necessary (see page 15). 3 G or H to select the desired channel. GETTING STARTED • 4 The red LED indicator flashes while your radio is receiving. 2 You hear a high-pitched tone. A short press of the Monitor button cancels Silent Monitor mode and returns the radio to normal operation. Open Squelch Monitor 1 To respond, hold the microphone vertically 1 to 2 inches (2.
English.book Page 17 Friday, November 7, 2003 12:41 PM TRANSMIT 1 Turn your radio on. 2 G or H to select the desired channel. 3 Hold the microphone vertically 1 to 2 inches (2.5 to 5 cm) from your mouth. Press the PTT button to talk. 4 The red LED indicator lights steady while the call is being sent. Release the PTT button to listen.
English.book Page 18 Friday, November 7, 2003 12:41 PM HOME REVERT MEMORY CHANNEL (1 & 2) The Home Revert Memory Channel feature allows you to instantly access up to two of your favorite channels at the touch of a button. GETTING STARTED To Activate Home Revert Memory Channel Press the preprogrammed Home Revert Memory Channel 1 button or Home Revert Memory Channel 2 button (see page 11).
English.book Page 19 Friday, November 7, 2003 1 12:41 PM G or H to select a channel that has been 6 frequencies or DPL codes. preprogrammed to enable VOX. Note: 2 Enter a non-standard or standard 4-digit TPL frequency or the 3-digit octal code (numbers 0-7 only) for DPL via the DTMF microphone keypad. G or H to select a channel that has not been preprogrammed to disable VOX. 1 D to enter menu mode. 2 G or H until EDIT PL 3 D to select EDIT PL 4 G or H until RX XXX.
English.book Page 20 Friday, November 7, 2003 12:41 PM RADIO CALLS SELECTIVE RADIO INHIBIT Your radio is equipped with a security feature that can temporarily render the unit inoperative when an inhibit signal is sent from the base station.
English.book Page 21 Friday, November 7, 2003 6 12:41 PM G or H to locate the desired ID in the Radio Call List. - or When using the enhanced keypad microphone, enter a valid DTMF digit to move to that location in the list. The call sends automatically. Skip to step 8. 7 Press the PTT button to send the call. 8 Press and hold the PTT button to talk; release to listen. 9 When the call is completed, C until you exit menu mode.
English.book Page 22 Friday, November 7, 2003 6 12:41 PM G or H to locate the desired ID in the Radio Call List. - or - When using the enhanced keypad microphone, enter a valid DTMF digit to move to that location in the list. The page sends automatically. Skip to step 8. 7 Press the PTT button to send the page. 8 When the page is completed, C until you exit menu mode. REPEATER ACCESS Use with Enhanced Keypad Microphone (RMN5029) RADIO CALLS Use this feature to send DTMF tones to a repeater.
English.book Page 23 Friday, November 7, 2003 12:41 PM SEND AN EMERGENCY ALERT E CLEAR AN EMERGENCY ALERT A priority Emergency Alert can be sent to a specific radio or dispatch center by pressing either a foot switch or a push button accessory. An Emergency Alert can be cleared by long pressing either a foot switch or a push button accessory. • The display shows: EMER IN Note: Emergency alerts have priority over all other calls.
English.book Page 24 Friday, November 7, 2003 12:41 PM SCAN SCAN Your radio is equipped with the Scan feature, which allows you to search for, lock onto, and monitor voice activity on channels. Scan lists are assigned per channel, by your dealer/ programmer. Your radio automatically switches to a channel, within that scan list, when it detects activity. You can also edit these lists through your radio’s menu (see page 27).
English.book Page 25 Friday, November 7, 2003 12:41 PM The display shows the current scan status. G or H to select a channel that contains a Scan list. 2 D to enter menu mode. 3 4 5 G or H until G or H until SCAN D to select SYS SCAN The display shows the current scan status. 5 G or H until 6 D to select the current setting. ON SCAN OFF D to select the current setting. • SYS SCAN 4 SCAN 1 The Gsymbol disappears from the display.
English.book Page 26 Friday, November 7, 2003 12:41 PM SCAN STOP AUTO SCAN G or H to select a channel that has not been preprogrammed for Auto Scan by your dealer/ programmer. • The Gsymbol disappears from the display. designated scan channel, a priority channel, or the last remaining channel in the scan list. Restore Channels to the Scan List 1 DELETE A NUISANCE CHANNEL Note: Your dealer/programmer must preprogram a button to Nuisance Delete to access this feature.
English.book Page 27 Friday, November 7, 2003 12:41 PM EDIT A SCAN LIST Note: One Scan list per channel is available. 6 D to select SCAN 7 G or H until ADD ITEM – or – until DELETE LST SCAN Your radio can support up to 16 Scan lists. Each Scan list can contain up to 16 channels. The same channel can be included in several Scan lists, and the same Scan list can be assigned to several channels. Scan lists are assigned per channel, by your dealer/ programmer.
English.book Page 28 Friday, November 7, 2003 SCAN 13 14 12:41 PM C to return to ADD ITEM – or – DELETE C until you exit menu mode. Set Priority Channels PRIORITIZE A CHANNEL IN A SCAN LIST Note: You cannot have the same priority on two different channels. You may want to check the activity on one or two channels more frequently than others. You can do this by prioritizing them: 1 D to enter menu mode.
English.book Page 29 Friday, November 7, 2003 9 D to select the desired priority level. 12 C to return to You see the current priority channel. 13 C until you exit menu mode. EDIT PRI SCAN 10 12:41 PM G or H until you see the channel you want to prioritize. 11 D to prioritize that channel.
English.book Page 30 Friday, November 7, 2003 12:41 PM PHONE Your radio allows you to place and receive telephone calls through a repeater (depending on phone line availability). You can edit the phone list through your radio’s menu (see page 33). PHONE • D appears on the display when you are in Phone mode. Your dealer/programmer can preprogram your radio in one of three ways to enter your access/de-access code to the repeater.
English.book Page 31 Friday, November 7, 2003 5 6 Your dealer/programmer can preprogram your radio in one of three ways to enter your access code to the repeater. Immediate Auto – automatically sends the access code. Delayed Auto – your radio will transmit the access code upon a PTT button press. Manual - Enter your access code using the DTMF microphone keypad and press the PTT button. Hold the radio in a vertical position with the microphone 1 to 2 inches (2.5 to 5 cm) away from your mouth.
English.book Page 32 Friday, November 7, 2003 5 PHONE 6 12:41 PM Enter the phone number using the DTMF microphone keypad. The number will scroll to the left, – or – XXXXXXX G or H to select a XXXXXXXX Note: – or – 32 b. Press the key (0 to 9) corresponding to the number you want to call. Note: Only the first 8 digits are displayed. To redial the last number dialed (if not using Speed Dial), press and release the PTT button immediately after the access code is sent.
English.book Page 33 Friday, November 7, 2003 9 12:41 PM To disconnect a phone call, do one of the following: Add an Entry D to enter menu mode. 2 G or H until PROG LST 3 D to select PROG LST 4 G or H until PHN LST 5 D to select PHN LST Press the preprogrammed Phone button (see page 12). 6 G or H until ADD ITEM – or – 7 D to select, ADD ITEM you see: NAME Enter the deaccess code using the DTMF microphone keypad and press the PTT button.
English.book Page 34 Friday, November 7, 2003 12:41 PM 10 Use the DTMF microphone keypad to enter the phone number. You can also add a Pause Indicator (press # three times until the # character on the display changes to a “-”). 11 D to store the phone number. you see: 12 LOC PHONE 14 D to select PROG LST 4 G or H until PHN LST 5 D to select PHN LST 6 G or H until DELETE 7 D to select DELETE 8 G or H until you see the entry you want to delete.
English.book Page 35 Friday, November 7, 2003 12:41 PM Edit an Entry 10 D to enter menu mode. 2 G or H until PROG LST 3 D to select PROG LST 4 G or H until PHN LST 5 D to select PHN LST 6 G or H until EDIT 7 D to select EDIT 8 G or H until you see the entry you want to D to select the entry. – or – until (to edit the phone number), NUMBER – or – until (to edit the location in the phone list). LOC (to edit the name), 11 D to confirm your selection.
English.book Page 36 Friday, November 7, 2003 12:41 PM Edit Access/Deaccess Codes PHONE You can edit the access/de-access codes that are used to connect or disconnect you from a repeater. 9 G or H until ACCESS – or – until DEACCESS D to select the current setting. 1 D to enter menu mode. 2 G or H until PROG LST 3 D to select PROG LST 4 G or H until PHN LST 5 D to select PHN LST 12 G or H to edit another code. 6 G or H until EDT CODE 13 C until you exit menu mode.
English.book Page 37 Friday, November 7, 2003 12:41 PM TONE PREFERENCES You can use the radio’s menu to access useradjustable settings to customize the tones on your radio by: 1 D to enter menu mode. 2 G or H until TONES 3 D to select TONES 4 G or H until you see the feature you want to change (see the table on page 38). 5 D to select the feature. You see the feature’s current setting. 6 G or H to see a list of available settings. 7 D to select the desired setting.
English.book Page 38 Friday, November 7, 2003 12:41 PM You can use the radio’s menu to access useradjustable settings to customize the tones on your radio by: 1 D to enter menu mode. 2 G or H until TONES 3 D to select TONES 4 G or H until you see the feature you want to change (see the table on page 38). 5 D to select the feature. You see the feature’s current setting. 6 G or H to see a list of available settings. 7 D to select the desired setting. 8 C until you exit the menu mode.
English.book Page 39 Friday, November 7, 2003 12:41 PM TONES ON/OFF You can program your radio to enable or disable all alert tones. 1 D to enter Menu mode. 2 G or H until TONES 1 D to enter Menu mode. 3 D to select TONES 2 G or H until TONES 4 G or H until KPD TONE 3 D to select TONES 5 D to select KPD TONE 4 G or H until TONE 6 G or H until ON 5 D to select TONE – or – until OFF 6 G or H until ON – or – until OFF D to select the desired setting.
English.book Page 40 Friday, November 7, 2003 12:41 PM G or H until TONES 3 D to select TONES 4 G or H until TONE TAG 5 D to select TONE TAG Press the preprogrammed Escalert button (see page 12) and proceed to step 5. 6 G or H until CALL ALT – or – – or – until SEL CALL 1 D to enter menu mode. D to select the desired setting.
English.book Page 41 Friday, November 7, 2003 12:41 PM You can use the radio’s menu to access useradjustable settings to customize some of your radio features by: 1 D to enter menu mode. 2 G or H until UTILITY 3 D to select 4 G or H until you see the feature you want to change (see the table on page 41). 5 D to select the feature. You see the feature’s current setting. 6 G or H for available settings. 7 D to select the desired setting.
USER SETTINGS English.book Page 42 Friday, November 7, 2003 SET SQUELCH LEVEL SET POWER LEVEL B Use this feature to filter out nuisance (unwanted) calls and/or background noise. However, tightening squelch could cause calls from remote locations to be filtered out as well. In this case, normal squelch may be more desirable. Each channel in your radio has a predefined transmit power level that can be changed.
English.book Page 43 Friday, November 7, 2003 7 G or H until HIGH -or - until LOW D to select the current setting. 6 7 G or H until ON -or- until OFF D to select the current setting. OPTION BOARD ON/OFF A SET THE BACKLIGHT INTENSITY Use this feature to enable or disable an option board. Use this feature to change the brightness of the backlight. The A symbol appears on the display when the option board feature is On. • 1 D to enter menu mode.
USER SETTINGS English.book Page 44 Friday, November 7, 2003 DISPLAY THE SOFTWARE VERSION 3 D to select UTILITY Use this feature to view the current software version of your radio. 4 G or H until SOFTWARE 1 D to enter menu mode. 5 D to view the software version. 2 G or H until 6 C until you exit menu mode.