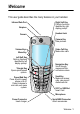
Welcome This user guide describes the many features in your handset. Infrared Data Port Right Soft Key Perform functions identified by right display prompt. Earpiece Headset Jack Camera Camera Key Take pictures. Volume Keys Video Call Key Make video calls. Menu Key Left Soft Key Perform functions identified by left display prompt. Navigation Key Scroll through menus and lists, set feature values. Triangle Key Opens quick-access options. Power/End Key Press & hold to power phone on & off.
www.hellomoto.com MOTOROLA and the Stylised M Logo are registered in the US Patent & Trademark Office. All other product or service names are the property of their respective owners. The Bluetooth trademarks are owned by their proprietor and used by Motorola, Inc. under licence. Java and all other Java-based marks are trademarks or registered trademarks of Sun Microsystems, Inc. in the U.S. and other countries. © Motorola, Inc. 2003.
Contents Menu Map . . . . . . . . . . . . . . . . . . . . . . . . . . . . . . . . . . . . . . . . . 7 Getting Started. . . . . . . . . . . . . . . . . . . . . . . . . . . . . . . . . . . . 16 What’s in the Box?. . . . . . . . . . . . . . . . . . . . . . . . . . . . . . . . 16 About This Guide . . . . . . . . . . . . . . . . . . . . . . . . . . . . . . . . . 16 Installing the UICC or SIM Card . . . . . . . . . . . . . . . . . . . . . 16 Installing the Battery . . . . . . . . . . . . . . . . . . . . . . . . .
Setting a Wallpaper Image . . . . . . . . . . . . . . . . . . . . . . . . . 54 Setting a Screen Saver Image. . . . . . . . . . . . . . . . . . . . . . . 54 Setting Display Colour . . . . . . . . . . . . . . . . . . . . . . . . . . . . . 55 Adjusting Lights on Your Phone. . . . . . . . . . . . . . . . . . . . . . 55 Setting Your Display Timeout. . . . . . . . . . . . . . . . . . . . . . . . 56 Conserving Battery Power . . . . . . . . . . . . . . . . . . . . . . . . . . 57 Calling Features. . . . . . . . . .
Storing a PIN Code with a Phone Number . . . . . . . . . . . . . 86 Recording a Voice Name For a Contacts Entry . . . . . . . . . . 87 Dialling a Contacts Entry . . . . . . . . . . . . . . . . . . . . . . . . . . . 88 Editing a Contacts Entry . . . . . . . . . . . . . . . . . . . . . . . . . . . 89 Using Contacts Categories . . . . . . . . . . . . . . . . . . . . . . . . . 90 Showing or Hiding Private Entries . . . . . . . . . . . . . . . . . . . . 93 Sorting the Contacts List . . . . . . . . . . . . . . .
Service Dialling . . . . . . . . . . . . . . . . . . . . . . . . . . . . . . . . . 116 Quick Dialling. . . . . . . . . . . . . . . . . . . . . . . . . . . . . . . . . . . 116 Using DTMF Tones . . . . . . . . . . . . . . . . . . . . . . . . . . . . . . 117 Monitoring Handset Use . . . . . . . . . . . . . . . . . . . . . . . . . . 117 Using Hands Free Features. . . . . . . . . . . . . . . . . . . . . . . . 121 Using Applications During a Call . . . . . . . . . . . . . . . . . . . .
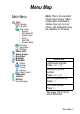
Menu Map Main Menu Tools Calendar Calculator Web Access • Browser • Web Shortcuts • Stored Pages • History • Goto URL • Browser Setup Shortcuts Quick Menu SIM Apps Recent Calls Games & Apps Ring Styles Messages Multimedia Videos Pictures Sounds Camera Video Camera Connection Contacts Settings (see next page) Note: This is the standard phone menu layout. Menu organisation and feature names may vary on your phone. Not all features may be available for all users.
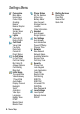
Settings Menu Personalise Main Menu Home Keys Colour Style Greeting Banner Banner Graphic Wallpaper Screen Saver Quick Dial Lights Call-Light ID Notice Lights Call Divert Voice Calls Fax Calls Data Calls Cancel All Divert Status In-Call Setup In-Call Timer Call Cost Setup My Caller ID Answer Options Call Waiting Msg Alert Initial Setup Time and Date VideoGateway 1-Touch Dial Auto Redial Display Timeout Backlight Scroll Animation Vibe Sync Language Battery Save DTMF Master Reset Master Clear 8 - Menu Map Ph
Safety and General Information IMPORTANT INFORMATION ON SAFE AND EFFICIENT OPERATION. READ THIS INFORMATION BEFORE USING YOUR PHONE. The information provided in this document supersedes the general safety information in user guides published prior to December 1, 2002. Exposure To Radio Frequency (RF) Energy Your phone contains a transmitter and a receiver. When it is ON, it receives and transmits RF energy.
Phone Operation When placing or receiving a phone call, hold your phone as you would a wireline telephone. Body-Worn Operation To maintain compliance with RF energy exposure guidelines, if you wear a phone on your body when transmitting, always place the phone in a Motorola-supplied or approved clip, holder, holster, case, or body harness for this phone, if available. Use of accessories not approved by Motorola may exceed RF energy exposure guidelines.
facilities that may be using equipment that is sensitive to external RF energy. Aircraft When instructed to do so, turn off your phone when on board an aircraft. Any use of a phone must be in accordance with applicable regulations per airline crew instructions. Medical Devices Pacemakers Pacemaker manufacturers recommend that a minimum separation of 6 inches (15 centimetres) be maintained between a handheld wireless phone and a pacemaker.
Use While Driving Check the laws and regulations on the use of phones in the area where you drive. Always obey them. When using your phone while driving, please: • Give full attention to driving and to the road. • Use hands-free operation, if available. • Pull off the road and park before making or answering a call if driving conditions so require. Operational Warnings For Vehicles With an Air Bag Do not place a phone in the area over an air bag or in the air bag deployment area.
Blasting Caps and Areas To avoid possible interference with blasting operations, turn OFF your phone when you are near electrical blasting caps, in a blasting area, or in areas posted “Turn off electronic devices.” Obey all signs and instructions. Batteries Batteries can cause property damage and/or bodily injury such as burns if a conductive material such as jewellery, keys, or beaded chains touch exposed terminals.
or playing video games. These seizures or blackouts may occur even if a person never had a previous seizure or blackout. If you have experienced seizures or blackouts, or if you have a family history of such occurrences, please consult with your doctor before playing video games on your phone or enabling a blinkinglights feature on your phone. (The blinking-light feature is not available on all products.
European Union Directives Conformance Statement Hereby, Motorola declares that this product is in compliance with • The essential requirements and other relevant provisions of Directive 1999/5/EC • All other relevant EU Directives IMEI: 350034/40/394721/9 0168 Type: MC2-41H14 Product Approval Number The above gives an example of a typical Product Approval Number. You can view your product's Declaration of Conformity (DoC) to Directive 1999/5/EC (the R&TTE Directive) at www.motorola.
Getting Started What’s in the Box? Your digital wireless handset has a battery and typically comes equipped with a charger. Other accessories can customise your handset for maximum performance and portability. About This Guide Optional Features Features marked with this label are optional network, SIM card, and/or subscription-dependent features. These features may not be offered in all geographical areas. Contact 3 for information about availability.
Caution: Do not bend or scratch your card. Avoid exposing your card to static electricity, water, or dirt. Do This 1 Push the battery door down to release it from the handset. 2 Open the card door on the right side of your phone. 3 Insert the card with the gold plate facing down and the notch as shown. 4 Close the card door. 5 Place the battery door back on the handset and push it up to snap it into place.
Installing the Battery You must install and charge the battery to use your handset. Caution: Your handset is designed to be used only with Motorola Original batteries and accessories. We recommend that you store batteries in their protective cases when not in use. Do This 1 Remove the battery from its protective clear plastic case. 2 Push the battery door down to release it from the handset. 3 Insert the battery, printed arrow first, under the tab at the top of the battery compartment and push down.
Charging the Battery New batteries are partially charged. Before you can use your handset, install and charge the battery, as follows. Note: Some batteries perform best after several full charge/ discharge cycles. Do This 1 Plug the travel charger into your handset with the release tab up. 2 Plug the other end of the travel charger into the appropriate electrical outlet. 3 When your handset indicates Charge Complete, press the release tab and remove the travel charger.
To maximise performance: • Always use Motorola Original™ batteries and battery chargers. The handset warranty does not cover damage caused from using non-Motorola batteries and/or battery chargers. • New batteries or batteries that have been stored for long periods of time may require a longer charge time. • Maintain the battery at or near room temperature when charging. • Do not expose batteries to temperatures below -10°C (14°F) or above 45°C (113°F).
Turning Your Handset On Do This 1 Press and hold the power key To turn on your handset Power key 2 If necessary, press S to scroll to the User Account you want, then press SELECT (+) 3 If necessary, enter your SIM card PIN code and press OK (+) 4 If necessary, enter your four-digit unlock code and press OK (+) select the user account you want from the list of accounts (stored on the SIM card) unlock your SIM card Caution: If you enter an incorrect PIN code three times in a row, your SIM card is disable
Adjusting Volume Press the upper or lower volume keys to: • increase and decrease earpiece or speakerphone volume during a call • increase and decrease the ringer volume setting when the idle display is visible • turn off an incoming call alert Making and Answering Calls This section describes basic calling features. To make video calls, see page 49. For more features, see page 58.
Answering a Call To answer a call, your handset must: • be turned on with the handset unlocked • have a SIM card inserted and unlocked • have a network connection with adequate signal strength When you receive a call, your handset rings and/or vibrates and displays an incoming call message. Press 1 N or ANSWER (+) 2 O (end key) To answer the call end the call Viewing Your Phone Number To view your phone number in idle, press M #. While you are on a call, press M > My Tel. Numbers.
Learning to Use Your Handset See page 1 for a basic handset diagram. Using the Display The idle display (shown below) is the standard display when you are not on a call or using the menu. Move the navigation key (S) up, down, left, or right for quick access: Messages Video Camera Recent Calls Contacts The menu indicator (G) at the bottom centre of the display indicates that you can press the menu key (M) to display a menu. Labels at the bottom corners of the display show the current soft key functions.
At the top of the display are the following status indicators: Service Signal Security Current Line Text Case Messages or Entry Method AGPS Service Data Service 5D GkJÜiîY9 ¡ Alert Type Signal Strength ¢ Battery Level 1/1/02 12:00 QUICKMENU STYLES n Signal Strength Indicator Indicates the strength of your handset’s connection with the network. Strong 5 4 3 2 1 0 No signal You cannot make or answer calls when the “no signal” indicator is displayed.
q Service Indicator Indicates when your handset uses your home network (K) or another network (k). When you leave your home network area, your handset roams or seeks another network. r Current Line Indicator Indicates when you have Voice Privacy on, a call in progress, or Call Diverting on. This icon also indicates which line is active (if you have a call on hold), and whether you have Caps Lock, Numeric Entry, or Symbol Entry switched on (when entering text).
To change the entry method, press # (see page 40). AGPS Service Indicator Indicates when AGPS Service is off (grey icon), on (white icon), or on and finding your location (green icon). v Alert Type Indicator Indicates the current selected alert profile. The default alert setting is a ringer. Y = loud ring X = soft ring W = vibrate Z = ring and vibrate a = silent w Battery Level Indicator Indicates the amount of charge left in the battery. The more bars visible, the greater the charge.
Using the Video Call and Triangle Keys Your handset has special keys that provide access to important features. Enter a phone number and press the Video Call key (K) to make a video call (see page 49). Pressing the Triangle key (J) opens a menu of 3 services. Press S up and down to choose the service you want, then press SELECT (-). To return to this menu when you are in a service, press J. To close it, press O. Using Menus From the idle display, press M to display the main menu.
Press S to highlight a menu feature icon in the main menu. The following icons represent features that may appear in the main menu. Games & Apps Tools Settings Ring Styles Contacts Messages Recent Calls Connection Web Access Multimedia Tip: To change this menu, see page 106.
Selecting a Feature Option Some features require you to select an item from a list. 5 9 Dialled Calls 10) John Smith 9) Lisa Owens 8) Adda Thomas 7) Jack Bradshaw 6) Mary Smith 5) Dave Thompson 4) Dave Thompson Press BACK (+) to return to the previous screen. BACK A sub-menu is available. Press M to open the sub-menu. Highlighted item VIEW Press VIEW (+031426o ) to view details of the highlighted item. If no details are available, STORE (+) and DELETE (+) appear.
Entering and Editing Text Some features require you to enter information. 5 S Press to scroll down to additional items. 9 Entry Details Name:John Smith Category:General No.:2125551212 Type:Work Store To:Phone Voice Name: Speed No.:2# DONE Highlighted item T CHANGE Press CANCEL (+) to exit without making changes. DONE (+) displays when you enter or edit information. Press 031426o CHANGE (+) to edit the information.
The message centre lets you compose and send text messages. A flashing cursor shows where text will appear. Text Case 5 9 Characters remaining Flashing cursor indicates insertion point. Üô 450 Msg: Press INSERT (+) to insert a picture or other object. CANCEL INSERT 031428o Press M Press CANCEL (+) to exit without making changes. to open the sub-menu. Using the Tap Method This is the standard entry method for entering text on your handset.
In a text entry screen, you can press # to switch entry methods. An indicator tells you which method is active (see page 25). If Tap Method (ï or õ) is not available, see page 41. When you enter text using the standard tap method, the flashing cursor changes to a block cursor, and the soft key functions change. 5 Block cursor indicates current highlighted character. Üô 449 9 Msg: Press OK (+) to accept and store the text.
When you enter 3 or more characters in a row, your handset may guess the rest of the word. For example, if you enter prog you might see: 5 Üô 446 9 Flashing cursor indicates insertion point. S In Tap, press right to accept the word, or press * to reject it and enter a space after prog. Msg: Prog ram DELETE OK 031428 If you want a different word, such as progress, continue pressing number keys to enter the remaining characters.
9 0 w x y z 9 ξ ψ + - 0 x * / \ [ ] = > < # § Note: This chart may not reflect the exact character set on your handset. In an email address or URL editor, 1 shows the common characters for that editor first. Tap Method Text Entry Rules • Press a number key repeatedly to cycle through its characters. See the character chart on page 34. • If you do not press a key for 2 seconds, the character in the block cursor is accepted, and the cursor moves to the next position.
For example, if you press 7 7 6 4 , letter combinations that match your key presses appear: 5 Üô 446 9 Msg: Prog ram Prog Proh Spoi Proi Pro4c DELETE SELECT Press DELETE (+) to clear the last letter entered. Flashing cursor indicates insertion point. S up to Press accept Program, or right to highlight another option. Press * to enter Prog and a space. 031428o Press SELECT (+) to insert the highlighted word.
Press 3 SELECT (+) To lock a highlighted combination You can press number keys to add more letters to the end of the combination. or * enter the highlighted combination when it spells a word A space appears after the word. If you enter a word your handset does not recognise, your handset stores it to use as one of your word options. When you fill memory space for unrecognised words, your handset deletes the oldest words as you add new words.
Press 3 SELECT (+) To lock a highlighted combination You can press number keys to add more symbols to the end of the combination or * enter the highlighted combination A space appears after the combination. Symbol Chart Use this chart as a guide for entering symbols in symbol method. 1 2 3 4 5 6 7 8 9 0 * # .
Using the Numeric Method In a text entry screen, press # to switch entry methods until you see the Numeric icon (á) in the status bar. Press keypad keys to enter the numbers you want. When you finish entering numbers, press # to switch to another entry method.
Note: Copy All Text also appears in the menu (press M) when you are viewing details for a Contacts entry, Calendar event, Browser page, Text Message, or Recent Calls entry.
Numeric (á) Symbol (å) Secondary Enter numbers only. Enter symbols only (see page 37). The secondary text entry method you set up (see the next section). Press 0 in any text entry screen to change your entry case. An icon in the status bar indicates when you select no capital letters (Ü), next letter capital only (Ñ), or all capital letters (Ö). Setting Up a Text Entry Method To set the primary or secondary text entry methods, press M > Entry Setup from any text entry screen.
Locking Your Handset Manually Find the Feature M > Settings > Security Press 1 keypad keys 2 OK (+) To enter your four-digit unlock code lock the handset > Phone Lock > Lock Now Setting Your Handset to Lock Automatically You can set your handset to lock every time you turn it off: Find the Feature M > Settings > Security Press 1 keypad keys 2 OK (+) To enter your four-digit unlock code set the handset to lock automatically > Phone Lock > Automatic Lock > On Unlocking Your Handset At the Enter Unlo
Changing Your Unlock Code Your handset’s four-digit unlock code is originally set to 1234, and the six-digit security code is originally set to 000000. We recommend that you change them to prevent other users from accessing your personal information or modifying your handset settings. The unlock code must contain four digits, and the security code must contain six digits. Be sure to note the new numbers. Notes: • Your service provider may retain your handset’s security code for customer service purposes.
Press 5 keypad keys 6 OK (+) 7 keypad keys 8 OK (+) To enter the new code assign the new code re-enter the new code confirm the new code If You Forget Your Unlock Code If you forget your security code (originally set to 000000), SIM PIN, SIM PIN2, or call barring password, contact 3. If you forget your unlock code, try entering 1234 or the last four digits of your phone number.
Taking and Viewing Pictures You can send pictures, sounds, shortcuts, bookmarks, events, and contacts to a connected computer. See page 132. Taking Pictures You can use your phone’s camera key to take pictures quickly and easily. Do This 1 Press the camera key Camera Key To display the camera’s image.
Downloading Pictures You can download pictures and animations to your handset and use them as wallpaper or a screen saver. To download a picture or animation from the micro-browser, see page 147. To download a picture or animation from a text message, see page 79.
Option Set as Wallpaper Set as Screen Saver Details Description Set the picture as your handset’s wallpaper image. Set the picture as your handset’s screen saver image. View picture information. To adjust your handset’s wallpaper and screen saver images, see page 54. Recording and Viewing Videos Recording Videos Find the Feature M > Multimedia > Videos > [New Video] The image in the camera’s viewfinder appears on your handset’s display.
Do This 3 Press CAPTURE (+) To start recording the scene in your handset’s display Tip: Press S to zoom in and out during the video.
The Video Player menu includes the following options: Option Details Setup Description View video information. Change the settings for Auto Repeat, which tells your handset to play a video repeatedly until you stop it, and Timer, which shows a timer in your handset display. Making Video Calls If you call someone else who has a video phone, you can see each other while you talk.
Press 5 CALL (+) or M To place the call display the preview menu This menu lets you turn your camera off, or to change camera images. Setting Up Video Calls To make video calls, your phone uses a video gateway number that you can enter. Note: 3 has already programmed the text message inbox settings for you. Find the Feature M > Settings > Initial Setup > VideoGateway Enter the number provided by 3.
Within the signal from each satellite there is a very accurate “time stamp” and information specifying exactly where in space each satellite is currently positioned. Using this time stamp the AGPS unit can then calculate how long each received signal took to reach the handset and consequently exactly how far away each satellite is from the handset. From these distances and the position of each satellite in space the AGPS unit can calculate the position of the handset.
Best AGPS Performance Usage Tips Use handset outdoors in open space • A field is better than a park • A park is better than a square • A square is better than a street • A street is better than in a building • A position calculation is not normally in a building Hold handset horizontal with hand away from internal aerial (top right beside camera) Use handset while stationary • Standing still is better than walking • Walking is better than using AGPS in a car or in a train When the handset is being charged f
Setting Up Your Handset Storing Your Name and Phone Number To store or edit user name and phone number information on your SIM card: Find the Feature M > Settings > Phone Status > My Tel. Numbers If you do not know your phone number, contact your service provider. To view your phone number from the idle display or during a call, see page 23. Setting the Time and Date You must set the time and date to use the calendar.
Each ring style contains settings for specific event alerts, ringer ID, and ringer and keypad volume. To change these settings, press M > Ring Styles > Style Detail. Note: Some ring tones vibrate automatically. If you use one of these tones, your phone vibrates even when it is not set to Vibrate or Vibe&Ring. To turn off these vibrations, see page 101. To turn off alerts for messages that arrive during a call.
The screen saver image is shrunk to fill the display, if necessary. An animation repeats for one minute, then the first frame of the animation is displayed.
Setting the Display Backlight You can set the amount of time that the display backlight remains on, or turn off the backlight to conserve battery power: Find the Feature M > Settings > Initial Setup > Backlight Setting Caller ID Lights for Calls You can tell your phone backlight to change when you receive incoming calls. Find the Feature M > Settings > Lights > Call-Light ID Note: If you set a Call-Light ID for a single contacts entry or category, your phone uses those patterns for those entries.
Conserving Battery Power Some networks and phones include a battery save setting to conserve battery power.
Calling Features For basic instructions on how to make and answer calls, see page 22. Changing the Active Line Change the active phone line to make and receive calls from your other phone number. Note: This feature is available only for dual-line enabled SIM cards. Find the Feature M > Settings > Phone Status > Active Line The active line indicator in the display shows the current active phone line. See page 25.
To turn automatic redial on or off: Find the Feature M > Settings > Initial Setup > Auto Redial When automatic redial is turned off, you can manually activate the feature to redial a phone number. When you hear a busy signal and see Call Failed: Press N or RETRY (+) To activate automatic redial Using Caller ID Incoming Calls Calling line identification (caller ID) displays the phone number for incoming calls.
Cancelling an Incoming Call While the handset is ringing or vibrating: Press O or IGNORE (+) To cancel the incoming call Depending on your handset settings and the type of subscription you have, the call may be forwarded to another number, or the caller may hear a busy signal. Turning Off a Call Alert You can turn off your handset’s incoming call alert before answering the call.
Press 2 N To call the emergency number Dialling International Numbers To dial the local international access code: Do This Press and hold 0 To insert the international access code (+) for the country from which you are dialling Viewing Recent Calls Your handset keeps lists of the calls you recently received and dialled, even if the calls did not connect. The lists are sorted from newest to oldest entries. The oldest entries are deleted as new ones are added.
Press 4 N To call the entry’s number Tip: Press and hold N for two seconds to send the entry number as DTMF tones. To activate DTMF tones, see page 117.
Option Delete Delete All Hide ID/Show ID Send Message Add Digits Attach Number Send Tones Description Delete the entry. (This option does not appear if DELETE appears above the + key.) Delete all entries in the current list. Hide (or show) your caller ID for the next call. Create a new text message, with the selected number in the Tel No. field. See page 75. Add digits to the end of the selected number. Attach another number from the contacts or recent calls list to the end of the selected number.
Press 2 S 3 N To select a call to return make the call Using the Notepad Your handset stores the most recent string of digits entered on the keypad in a temporary memory location called the notepad. This can be a phone number that you called, or a number that you entered but did not call.
Calling with Speed Dial Each entry you store in your contacts is assigned a unique speed dial number that identifies the location where the entry is stored in handset memory or on the SIM card. To speed dial a contacts entry: Press 1 keypad keys 2 # 3 N To enter the one-, two-, or three-digit speed dial number for the entry you want to dial submit the number call the entry Calling with 1-Touch Dial To call contacts entries 1 to 9, press and hold the one-digit speed dial number for one second.
Receiving a New Voicemail Message When you receive a voicemail message, your handset displays f (voice message waiting) and New VoiceMail. Press CALL (+) To listen to the message Listening to a Voicemail Message Find the Feature M > Messages > VoiceMail The handset calls your voicemail phone number. If no voicemail number is stored, the handset prompts you to store one. Using Call Waiting When you are on a call, an alert tone sounds to indicate that you have received a second call.
Putting a Call on Hold Do This Press HOLD (+) (if available) or Press M > Hold To put a call on hold Your handset displays a = (flashing handset) indicator to indicate that the call is on hold. Transferring a Call You can announce that you are transferring an active call to another party, or you can directly transfer the call.
Do Not Announce the Call Transfer Find the Feature M > Transfer Press 1 keypad keys To dial that number where you are transferring the call transfer the call 2 N 68 - Calling Features
Messages and Email Text, Email, Video, and MMS messages are brief messages that you can send and receive. Received messages appear on your display or in your message inbox. The total number of messages the inbox can hold depends on the length of the messages, and the number of other messages and drafts stored in your handset. Note: 3 has already programmed the text message inbox settings for you.
Setting Service Centre No.
Setting Expire After Reply Type Size Limit Server Info Description enter the expiration period—the number of days your network tries to resend unreceived messages select the default type of replies you want to send—Video Message or Multimedia set the maximum allowable size of an incoming message display the selected MMS Server Email Msg Setup Options Setting ISP Settings Email Provider Protocol User ID Password Description select a GPRS or CSD Email connection, and change connection settings select
Setting Sending Host Sending Port Receiving Host Receiving Port Return Address Name Cleanup Save On Server Email Notify Description IP or DNS server address for sending Email (such as mail.test.com) port number for the sending host IP or DNS server address for receiving Email (such as pop.test.
Setting Check New Msgs Hide Fields Auto Signature Unread Only (IMAP setting) Receive Date Range (IMAP setting) Attachments (IMAP setting) Size Restriction Description select how often your handset checks for Email If you select No, you can only check for email using Send/ Receive Mail (see page 79) or by opening your Email Messages inbox.
Brwsr Msg Setup Options These are the settings for the Browser messages sent by 3: Setting Expire After Cleanup Msg Notification Service Description enter the expiration period—the number of days your network tries to resend unreceived messages the period of time that your handset waits before it deletes a message select whether your phone notifies you when you receive high priority and medium priority browser messages.
Setting Languages Cleanup Description change the languages in which you accept messages Note: You cannot change Lang1. It is the language set in the Initial Setup menu. the period of time that your handset waits before it deletes a message Creating and Sending Messages Note: Your message inbox must be set up before you can send and receive messages. See page 69. You can send a text message to one or more recipients.
Press 1 S 2 SELECT (+) 3 keypad keys 4 DONE (+) 5 YES (+) or NO (+) To scroll to New Text Message, New Email, New Video Message, or New Multimedia select the type of message you want to send complete the message contents (see the table after this procedure) finish the message Your handset displays Send Message Now? send the message choose to Send Later, Save to Drafts, or Discard Message Send Later stores the message in your Outbox, to send at a later time.
Message Contents Note: You cannot send Email messages to phone numbers. Item To (all message types) Description one or more phone numbers or email addresses where you want to send the message Tip: Remember to press and hold 1 to add a space between numbers that you enter manually.
Item Msg (all message types) Description the text message you enter (to enter text, see page 31) or Multimedia you select To insert a picture or other object in Text, Email or Video messages, press: M > Insert > object type Subject (not for Text Messages) Priority (not for Text Messages) Receipt (not for Text or Email Messages) > object the subject line of the message the message priority indicate if you want to receive a Delivery Report when the message arrives.
Receiving Messages Note: You must set up the text message inbox before you can receive text messages. See page 69. When your text message inbox is full, you must delete old messages before you can open new ones. Your handset checks for new Email messages periodically, or whenever you select M > Messages M > Send/Receive Mail or else M > Messages > Email Msgs When you receive a new text message, your handset displays New Message g and gives an alert.
Reading, Locking, or Deleting Messages Messages in the inbox are sorted from newest to oldest. The following indicators show message status: i unread j read n unread with attachment l read with attachment k unread and urgent { read and locked m unread and urgent with o read and locked with attachment attachment Note: The files that you download or receive as attachments might have a lock that keeps you from forwarding them.
While reading a message, press M for these options: Option Voice Call Back Video Call Back Preview Video Call Go To Reply Forward Lock/Unlock Store Delete Delete All Delete Messages Create Message Description Make a voice call to the number in the message header or embedded in the message. Make a video call to the number in the message header or embedded in the message. Preview your phone’s camera image before making a video call to the selected number.
Option Setup Description Open the text message inbox setup menu. Note: To play attached sound files, press S to select the icon, then press PLAY (+).
Setting Up Your Contacts You can store a list of names and phone numbers or email addresses in your handset’s electronic phonebook. To see the names in your contacts, press M > Contacts from the idle display. Scroll to a name and press N to call the entry or VIEW (+) to view entry details as shown below. To show the entries in a category, see page 93.
Notes: • Email entries, Mailing List entries, and entries stored on the SIM card do not have Type, Voice Name, or Ringer ID information. • If the contacts entry is a mailing list, list members are listed after the entry’s name Creating a Contacts Entry You can store an entry on your handset or on the SIM card. Note: You can also use the following procedure to store a fixed dial entry by scrolling to and selecting Fixed Dial.
Contacts Item No., Email, or Members Type Store To Voice Name Speed No. Ringer ID Picture Call-Light ID Private More Description enter the phone number or email address, or select contacts entries to add as members of the mailing list scroll to the type of phone number (only for phone numbers not stored on the SIM) choose to store the entry on the handset or the SIM card. record a voice name for the entry. See page 87. Note: change the number you use to speed dial the entry.
Complete Contacts Entry When you are finished entering information for a contacts entry: Press To store the entry and return to the contacts list DONE (+) Storing a PIN Code with a Phone Number You can store a PIN code with the phone number for calls that require additional digits (for example, to make a calling card call, or to retrieve voicemail or answering machine messages).
• You cannot store numbers that contain a w or n character on the SIM card. Recording a Voice Name For a Contacts Entry You can record a voice name for a new or existing contacts entry. A voice name lets you call the contacts entry using voice dial (see page 88). Note: You cannot record a voice name for an entry stored on a SIM card. Tip: Make your voice recording in a quiet location.
Do This 7 Press RECORD (+) and repeat the name To confirm the voice name The handset displays Trained: Voice Name. 8 Press DONE (-) store the voice name Dialling a Contacts Entry Use one of the following procedures to call a number (or send a text message to an email address) stored in your contacts. To use speed dial or 1-touch dial, see pages 65 and 65.
Do This 2 Say the prerecorded contacts entry name To to select the entry to be dialled Video Dial Find the Feature M > Contacts Press 1 keypad key letter To jump to entries that begin with that letter (optional) scroll to the entry 2 S 3 M > Video Call make the call Editing a Contacts Entry You can also use the following procedure to edit a fixed dial entry by selecting M > Settings > Dialling Services > Fixed Dial.
Deleting a Contacts Entry To delete an entry: Find the Feature M > Contacts Press To scroll to the entry you want to delete open the Contacts Menu scroll to Delete 1 S 2 M 3 S 4 SELECT (+) 5 YES (+) select Delete confirm the deletion Using Contacts Categories Contacts categories let you use special ring tones and backlight colours for contacts entries you classify as “Business,” “Personal,” “General,” or other categories. Your phone and your UICC or SIM card both store each category you create.
Press 4 SELECT (+) 5 CHANGE (+) 6 keypad keys 7 OK (+) 8 CHANGE (+) 9 S 10 ADD (+) To select New or Edit select the category Name enter the category name (to enter text, see page 31) store the category name open the member list scroll to a contacts entry you want to add or remove Note: You cannot add entries stored on a SIM card.
Delete a Category Find the Feature M > Contacts M > Categories Press To scroll to the category 1 S 2 M 3 S 4 SELECT (+) 5 DONE (+) open the Categories menu scroll to Delete delete the category confirm the deletion Reorder Categories Find the Feature M > Contacts M > Categories M > Reorder List Press To scroll to the category you want to move grab the category you want to move move the category up or down the menu insert the category in the new location 1 S 2 GRAB (+) 3 S 4 INSERT (+) 92 -
View Category Entries You can select a category to show only its entries: Find the Feature M > Contacts M > Categories > the category you want to see Showing or Hiding Private Entries You can show or hide the contacts entries you mark as private. To mark an entry as private, see the Private item on page 85. Find the Feature M > Settings > Security > Show Private Entries or Hide Private Entries You can also press M > Setup in the contacts to change this setting.
Press 1 S 2 SELECT (+) To scroll to the order you want select the order you want If you select Speed No., Voice Name, or Email, the procedure is complete.
Press 1 S 2 M 3 S 4 SELECT (+) 5 S 6 SELECT (+) To scroll to the entry open the Contacts Menu scroll to Set Primary select Set Primary scroll to the number you want to set as the primary number set the primary number Depending on how the contacts list is sorted, the primary number is listed first, or is the only number that appears for a contacts entry. See page 93.
Press 4 SELECT (+) 5 keypad keys 6 OK (+) To select Copy Entry The handset displays the next available speed dial number.
Press 12 S 13 CHANGE (+) 14 keypad keys 15 OK (+) 16 DONE (+) To scroll to To (start) select To (start) Note: enter the low speed dial number for the entries’ new location store the number copy the entries Checking Contacts Capacity You can check contacts capacity to see how much space is left for storing contacts entries on your handset and on the SIM card.
Press 1 S 2 CHANGE (+) 3 S 4 SELECT (+) To scroll to 1-Touch Dial select 1-Touch Dial scroll to the list you want select the list Sending an Entry You can send pictures, sounds, bookmarks, events, and contacts to a connected computer. See page 132. Synchronising Your Contacts You can synchronise your contacts entries with an Internet server using a wireless connection. See page 131.
Personalising Your Handset Personalising a Ring Style You can change the alerts that notify you of the following events: incoming calls, text messages, voicemail messages, data calls, alarms, and reminders. Any changes you make are saved to the current ring style. Find the Feature M > Ring Styles > Alert Detail Alert represents the current ring style.
Find the Feature M > Ring Styles > Alert Detail > Ringer IDs Alert represents the current ring style. Press 1 To scroll to On or Off S 2 SELECT (+) select the option Setting Ringer or Keypad Volume M > Ring Styles > Alert Detail Find the Feature Alert represents the current ring style.
Turning Reminders On or Off Find the Feature M > Ring Styles > Alert Detail > Reminders Alert represents the current ring style. Press 1 S 2 OK (+) To scroll to Beep or Vibrate to set the reminder alert type, or Off to turn off all reminders select the reminder alert Activating Haptic Vibrations Some ring tones and games include vibrations. You can turn these vibrations on or off for your phone.
Press 1 CHANGE (+) 2 S 3 4 5 6 7 keypad keys OK (+) CHANGE (+) keypad keys OK (+) DONE (+) or To select Notes enter notes for the tone (see the following section) store the notes select Name enter the name for the tone store the name store the tone Entering Notes Press S up or down to select a note in octaves 0-8. Basic notes: c d e f g a b Sharp Notes: #c #d #f #g #a You can also enter note details and rests. For example, *2#g0r plays a second-octave G sharp whole note followed by a rest.
Key 2 3 4 5 6 7 8 0 * # Display a b c 2 d e f 3 g 4 5 6 r Description A note B note C note 1/2 note, as in *4c2 D note E note F note 1/8 note, as in *4c3 G note 1/16 note, as in *1c4 1/32 note, as in *4c5 sets octave six, as in *6 inserts a rest (you can add length modifiers, such as r1) sets octave seven, as in *7 7 sets octave eight, as in *8 8 whole note, as in *4c0 0 sets an octave when followed * by 0-8, as in *4c for a C note in octave four sharp note, as in *4#c # & flat note, as in *4&d move c
Example To create a simple tone, you can enter notes by pressing S up and down, and enter rests by pressing 7. For example: Press 1 S 2 S 3 S 4 7 5 S 6 M > Play All To scroll up to *4c , then wait for the highlight to disappear scroll up to *4d The handset adds a 2 after each note, to indicate it is a half note. To change the length, see page 102.
Press 3 S 4 CHANGE (+) 5 S To scroll to Name or Notes select the details to edit enter new text or notes or keypad keys 6 OK (+) store the details Deleting a Tone You cannot delete the standard alert tones included with your handset.
Personalising Display Text To change the greeting that appears when you turn on your handset: Find the Feature M > Settings > Personalise > Greeting You can set the banner graphic in the idle display to an analog clock or a status icon: Find the Feature M > Settings > Personalise > Banner Setting the Menu View You can set your handset to display the main menu as graphic icons (the default setting) or as a text-based list.
Press 2 GRAB (+) 3 S 4 INSERT (+) To grab the menu item you want to move move the item up or down the menu insert the item in the new location Personalising Soft Keys You can assign new main menu items to the soft keys (left and right +) and S in the idle display.
Setting Menu Scroll Behaviour You set the highlight bar to stop or wrap around when you reach the top or bottom of a menu list. Find the Feature M > Settings > Initial Setup > Scroll Setting Menu Animation Menu animation provides smooth scrolling of the highlight bar and menu items as you scroll through a menu list. Turn off menu animation to extend battery life.
information, it cannot be recovered. Master clear does not delete any information stored on the SIM card. Find the Feature M > Settings > Initial Setup > Master Clear Creating and Using Shortcuts Shortcuts let you quickly access your favourite menu features. Your handset is pre-programmed with several shortcuts, but you can add more. Standard Shortcuts The following shortcuts are pre-programmed in your handset. You cannot edit or delete them.
Do This 3 Press and hold To open the shortcut editor 4 Press YES (+) The handset displays: Assign Shortcut for: Item? where Item is the name of the item you selected.
Edit or Delete a Shortcut The shortcut list is sorted by key. If you change a shortcut’s key, you change its place in the list. Find the Feature M > Tools > Shortcuts Press To scroll to the shortcut 1 S 2 M > Shortcut Name open the Shortcut Menu below Shortcut Menu Option Edit Reorder List Delete Delete All Description Edit the shortcut. Change the shortcut list order. Delete the shortcut. Delete all shortcuts.
Getting More Out of Your Handset Making a Conference Call Link an active call and a call on hold together so that all parties can speak to each other. Press 1 keypad keys 2 N 3 HOLD (+) (if available) or M > Hold To dial the first person’s number call the number put the first call on hold Your handset displays a = (flashing handset) indicator next to the call on hold.
Diverting a Call Call diverting sends your handset’s incoming voice, and/or data calls directly to another phone number.
Press 6 SELECT (+) 7 S 8 CHANGE (+) 9 keypad keys To store the option scroll to To (same for If Busy, If No Answer, or If Unreachable) change the phone number enter the diverting phone number or BROWSE (+) 10 OK (+) browse through your contacts or other lists for the diverting phone number store the diverting phone number Note: Repeat this procedure to enter diverting information for other call types. Check Call Diverting Status Your network may store call diverting status for you.
Find the Feature M > Settings > Security Press To scroll to Outgoing or Incoming calls 1 S 2 CHANGE (+) 3 S 4 SELECT (+) 5 keypad keys 6 OK (+) > Call Barring select the option scroll to a restriction setting select the restriction setting enter your call barring password submit your password Using Fixed Dial When you turn on fixed dialling, users can only call numbers stored in the fixed dial list.
You must enter your SIM PIN2 code to edit fixed dial entries: Find the Feature M > Settings > Dialling Services > Fixed Dial You create and edit fixed dial entries just like contacts entries. Fixed dial list entries are stored on your SIM card and do not have Type, Voice Name, or Ringer ID fields. Service Dialling You can dial pre-programmed numbers stored on your SIM card, such as taxi companies, restaurants, and hospitals.
Using DTMF Tones You can send numbers to the network as dual tone multi-frequency (DTMF) tones during a call. Use DTMF tones to communicate with automated systems that require you to submit a PIN code or credit card number.
To view a call timer: Find the Feature M > Recent Calls > Call Times > the timer you want Select one of the following options: Last Call Dialled Calls Received Calls All Calls Lifetime Time spent on the last call dialled or received. You cannot reset this timer. Total time spent on dialled calls since the last time you reset this timer. Total time spent on calls received since the last time you reset this timer. Total time spent on dialled and received calls since the last time you reset this timer.
Display the approximate elapsed time for the current call. Total Cost Display the cost of all calls since the last time you reset the timer (if you subscribe to a call cost option or advice of charge). Credit Available Display how much credit you have left (if you subscribe to a call cost option or advice of charge). Off No in-call timer display.
Select one of the following options: Cost Tracker Credit Available Description Amount of your credit remaining. For GSM advice-of-charge, this is only available if you set a credit limit. Expiration Date Last Deposit Last Call Dialled Calls Received Calls All Calls Note: Your handset receives cost information from the advice-of-charge feature or third-party prepay software. Date that the available credit expires (available only with a subscription to a prepay option).
To reset the cost tracker: Press 1 RESET (+) 2 OK (+) To reset the cost (if available) enter your PIN2 code to confirm the reset Using Hands Free Features Your handset includes an integrated two-way speakerphone for all hands free applications. You also receive a hands-free stereo headset, and can purchase an optional Motorola Original™ Easy-Install or Pro-Install Hands-Free Kit for your car. These accessories provide alternative ways for you to use your handset without using your hands.
Ringer Setting When you have a headset plugged in, this lets you choose whether you hear handset alerts in the Speaker Only, Headset Only, or the Headset and Speaker. Find the Feature M > Settings > Headset > Ringer Options Automatic Hands Free You can set up your handset to automatically route calls to a car kit when it detects a connection.
Press 1 S 2 SELECT (+) To scroll to the time delay confirm your selection Charger Time When your handset is connected to a car kit, you can set it to charge itself for a specified time period after you switch off the ignition. This helps ensure that the handset battery gets fully charged while the vehicle is parked. Note: This feature may not work with all car ignition switches.
Changing Your Active Call Settings You can view and change the number of call and data/browser connections that your handset allows at one time: Find the Feature M > Connection > Active Calls The Active Calls list includes Option No. of Calls Subscription Network Description the number of active connections your handset allows, which you can increase to the number in the Subscription setting.
Attaching a Serial Cable Use the interchangeable head on the Motorola Multi-Connect Serial Cable to connect a computer, Palm III device, or Palm V device to your handset. Do This 1 Plug the serial cable into the detachable head. Make sure that the Motorola logo on the detachable head and the metal shielding on the serial cable plug are both facing you. 2 With the Motorola logo and the handset both facing you, plug the detachable head into your handset’s accessory connector port.
Attaching a USB Cable Do This 1 Plug the end of the cable with the Motorola logo into your handset’s accessory connector port. Make sure that the logo and the handset are both facing you. 2 Plug the other end—the USB connection—into the USB port on the external device. Setting Up an Infrared Connection Establish an infrared wireless data connection with an external device as follows. Notes: • This handset is classified as a Class 1 LED product and is considered safe under reasonable use.
If the handset does not find an infrared-capable device, it changes the right soft key (+) from STOP to START. Press START (+) To try another connection To break the infrared data connection, press STOP (+). You can also move the device away from the handset, turn off the device, or turn off the handset. If your handset moves away from a connected device while it is still on, it will try to re-connect for 30 seconds after the connection breaks.
You have 60 seconds to start the connection from your computer while your handset is available. Tip: After the first connection with a device, you do not need to select Find Me to re-connect. Connecting and Disconnecting a Headset To connect an available Bluetooth headset device: Find the Feature M > Connection > Bluetooth Link > Handsfree > a device name or [Look For Devices] Your handset returns to the idle display, where a Bluetooth status bar icon indicates that you have a connection.
Changing Your Handset’s Bluetooth Name You can assign a name to your handset, so that you can recognise it in the Bluetooth lists on other devices: Find the Feature M > Connection > Bluetooth Link Press 1 keypad keys 2 OK (+) To enter a handset name store the new name > Setup > Name Data Calls A Motorola Original™ data kit with a cable, a Bluetooth™ wireless connection, or an infrared wireless link lets you transfer data between your handset and a computer or other external device.
Connect your handset (see page 124) and do the following: Do This 1 Check the handset 2 Open the application on your computer To make sure that the handset is connected and powered on place the call through the application (such as dial-up-networking) 3 End the transfer on your computer Note: You cannot dial data numbers through your handset’s keypad. You must dial them through your computer.
End the Data Connection When the data transfer is complete: Do This End the call from the connected device To close the connection Using Sync This feature lets you quickly synchronise your events and contacts entries with an Internet server using a wireless connection.
Using an Internet Sync Partner To start synchronising with a Sync partner: Find the Feature M > Connection > Sync > partner name Your handset attempts a Sync connection with the URL, user name, and password you entered for the partner. This might take several minutes, if there are many entries to synchronise. Sending Files from Your Handset You can send pictures, sounds, bookmarks, events, and contacts entries to a connected computer.
Viewing Handset Specifications To view your handset’s feature specifications: Find the Feature M > Settings > Phone Status > Other Information Getting More Out of Your Handset - 133
Personal Organiser Features Calendar The calendar lets you schedule and organise events such as appointments and meetings. You can review your schedule of events for the month or by the day, and have your handset play a reminder alarm for specific events. Note: You must set the correct time and date in order to use the calendar (see page 53). To schedule or review events: Find the Feature M > Tools > Calendar Viewing by the Month Triangles next to each day indicate events.
Viewing by the Day Select a day in the month view and press VIEW (+) to see the day’s events. You can store, edit, view, copy, and delete any event from the day view.
Viewing by the Event Select an event in the day view and press VIEW (+) to open the detailed event view. You can edit, copy, and delete events from the event view. Day and time Alarm 5 Alarm time Repeat 9 w THU 8:00 am Duration Marie, mtg for status (1 hrs) A 10 min before None Return to previous screen DONE CHANGE Event details Edit event 031427o Press M to open the Calendar Menu Adding a New Event A title is required for a calendar event. All other information is optional.
Press 1 CHANGE (+) 2 keypad keys 3 OK (+) 4 S 5 DONE (+) To select Title enter a title for the event (to enter text, see page 31) store the event title scroll to other fields and enter information as necessary You can set start time, duration, date, repeating events, and reminder alarm.
Press 1 S 2 VIEW (+) 3 S 4 M 5 S 6 SELECT (+) 7 YES (+) 8 keypad keys 9 c (+) 10 DONE (+) 11 S 12 DONE (+) To scroll to the day display the day view scroll to the event to copy open the Menu scroll to Copy copy the event confirm the copy Your handset assumes that you want to change the date, and displays the Date field.
Press 3 To scroll to the event to delete S 4 M 5 S 6 SELECT (+) a S b SELECT (+) 7 YES (+) open the Menu scroll to Delete select Delete For non-repeating events, go to step 7. For repeating events, the handset displays a delete event menu: scroll to This Event Only or Repeat Events select the event(s) to delete confirm the deletion The handset briefly displays a Deleted: message and returns you to the day view.
If you have more than one event set up for the same time, the handset displays each event in sequence. As you view and dismiss each event reminder, the next one is displayed. Change the Calendar Setup You can change the calendar’s daily start time, and set the length of time that events are stored. Find the Feature M > Tools > Calendar M > Setup Sending an Event You can send pictures, sounds, bookmarks, events and contacts entries to a connected computer. See page 132.
Press M to open the Calculator Menu functions: Function MS MC MR % Convert Currency Description Store the displayed number in memory. Clear memory. Recall the value stored in memory. Divide the displayed value by 100. Multiply the displayed value by the Exchange Rate you stored. Exit the calculator. Exit Exchange Rate Store an exchange rate to use with the Convert Currency menu option.
Security Line Security If your handset displays Line Not Secure while you are on a call, your handset has detected another device monitoring the call. This message does not appear when caller ID, call cost, or other information fills the display. Locking the SIM Card Your PIN (Personal Identification Number) code protects the information stored on your SIM card. When the SIM PIN feature is activated, you must enter your SIM card PIN code each time you turn on the handset or insert a SIM card.
Unblock the SIM Card PIN Code If you enter an incorrect SIM card PIN code three times in a row, your SIM card is disabled and your handset displays the message SIM Blocked. You need to enter a PIN unblocking key (PUK) code, which you can obtain from 3. Note: In the following key sequence, each key press must occur within two seconds of the previous keypress.
Press 1 keypad keys 2 OK (+) 3 S 4 CHANGE (+) 5 S 6 SELECT (+) 144 - Security To enter your four-digit unlock code open the lock applications menu scroll to the application you want to lock or unlock select the application scroll to Locked or Unlocked select Locked or Unlocked
News and Entertainment Mobile Internet 3 provides services for you to use over the Internet. Select Browser or press J to open a menu of the services. To get back to this menu when you are in a service, just press J. To stop browsing, press O. Note: Your handset may be configured to use a high-speed packet data network connection. This type of connection can be identified by a packet data status indicator at the top of your display.
Interacting With Web Pages Do This To Press S up or down scroll through a page Press M Press and hold M Press M * open the Browser Menu store the current Web page as a Web Shortcut lock your handset’s keypad while downloading a file The Browser Menu can include the following: Option Home Reload Go to URL Web Shortcuts Store Send History Swap View URL Description Goes to the current Web Sessions home page. Reloads the current page. Lets you enter a Web page address.
Web Page Security Your handset can provide secure Web pages connections for purchases or other transactions. Your handset uses three types of certificates to provide this security. It uses Client certificates to identify itself to Web pages. Your handset downloads Server certificates from servers and checks them against the Root certificate.
Storing a Picture or Animation File Press 1 STORE (+) 2 S 3 SELECT (+) To view storage options scroll to Store Only, Set As Wallpaper, or Set as Screen Saver select the option Note: When you set an animation as a wallpaper image, only the first frame of the animation is displayed. Storing a Sound File Press 1 STORE (+) 2 S 3 SELECT (+) To view storage options scroll to Store Only or Set As Ring Tone select the option If you select Store Only, the procedure is complete.
Java Applications You can install and run Java applications on your handset. These applications add new features and services to your handset. New games and applications are available from 3 and can be accessed by pressing J. Contact 3 for more details. Note: Java applications can use your phone’s Assisted Global Positioning Service (AGPS) to tell where you are physically located. To turn AGPS on or off, see page 52.
Problem Application Already Exists Resolution The same version of this application is already installed. If an older version is installed, the message Different Version Exists appears, and you can update the application. Failed: Invalid File The application file does not or work on your handset. Contact Failed: File Corrupt the Web site host for details. Note: Some games make your phone vibrate.
Approving a Network Connection When a Java application tries to establish a network connection, your handset prompts you to approve the connection. To automatically approve connections for Java applications: Find the Feature M > Settings > Java Settings Press To scroll to Always Ask, Ask Once Per App, or Never Ask select the highlighted setting 1 S 2 SELECT (+) > Network Access Use Control Keys Your handset’s keys perform the following functions in a Java application.
Press 2 M 3 To open the application manager menu scroll to a menu option S 4 SELECT (+) select the option to perform procedures as described in the following list The application manager menu includes the following options: Option View Details Delete Show Memory or Hide Memory Description Display the suite name, vendor, version, number of apps, flash usage, and memory requirements. Delete the suite. Show or hide the application’s memory size in the application list view.
Option CLDC Version MIDP Version Data Space Program Space Heap Size Flash Space Displays The connected limited device configuration version on your handset. The mobile information device profile version on your handset. Memory available for application data (such as contacts entries or game scores). Amount of free memory available for Java applications. Amount of runtime memory available for Java applications. Available space for Java applications, including free memory and used memory.
To open a game that is on your handset: Find the Feature M > Games & Apps Press To scroll to the game of your choice 1 S 2 SELECT (+) start the game When the game is over: Press BACK (+—left) To return to the games menu or NO (+—left) NEW (+—right) or start another session of the game you just played YES (+—right) SIM Applications You can access information and applications stored on your SIM card. To access the available applications: Find the Feature Contact 3 for more details.
Troubleshooting Check these questions first if you have problems with your handset: Question Is your battery charged? Do you see 6 in the display? Do you have a valid SIM card inserted in your handset? Does the handset have a signal? Do you see j in the display? Is the earpiece volume too low? Is the other party unable to hear you? Answer The battery level indicator should have at least one segment showing (7). If it does not, recharge your battery. See pages 19 and 19.
Question Has the handset been damaged, dropped, or gotten wet? Was a non-Motorola battery charger used? Answer Dropping your handset, getting it wet, or using a non-Motorola battery charger can damage the handset. The handset’s limited warranty does not cover liquid damage or damage caused from using non-Motorola accessories. The following refer to specific problems: Problem My handset was stolen. To whom should I report this? I forgot my password. I pressed the end/power key, but nothing happened.
Problem The display says: SIM Blocked. How do I unblock my SIM card? The display says: Enter Unlock Code. How do I unlock my handset? My handset asks for an unlock code when I try to open a feature. My handset does not ring. My handset rings even though I selected the Silent (or Vibrate) alert profile. I tried to place a call and heard an alternating high/low tone. Solution Call 3 to obtain the PIN unblocking key (PUK) code. See page 143.
Problem I cannot make/ answer calls. My handset has poor reception and drops calls. The display says: Data Calls Only. I cannot hear others on my handset. I cannot open my inbox. 158 - Troubleshooting Solution Make sure that you have a handset signal (see the “Signal Strength Indicator” item on page 25). Avoid electrical or radio interference, and obstructions such as bridges, parking garages, or tall buildings. Your handset also may have the Call Barring feature turned on.
Problem How do I see the calls I sent or received? Solution To see the most recent calls you dialled or received, open the “Recent Calls” lists: M > Recent Calls > Received Calls or My handset will not dial voicemail commands, passwords, or other codes. > Dialled Calls Your handset sends commands and passwords as DTMF tones. You can set your handset’s DTMF tones to be Long, Short, or Off. If you have trouble sending numbers, check your DTMF setting.
Problem I plugged the data cable into my handset but my handset did not beep. How do I know if the data cable is ready to go? My handset beeped when I attached the data cable, but my data applications don’t work. When sending data with the data cable, why does the computer show a connection rate of 19200 Kbps? Solution The beep indicates that you are set up correctly.
Problem I can’t end my data call by closing the application on my computer. What can I do? I launched the micro-browser but the display says: Service Not Available. I launched the micro-browser but the display says: Data Server Unavailable. Solution Try pressing O on your handset. Also try disconnecting the cable or turning off the handset. If possible, always close the connection through your computer. These alternative methods may disrupt the application on your computer.
Specific Absorption Rate Data This model handset meets international standards for exposure to radio waves Your mobile handset is a radio transmitter and receiver. It is designed and manufactured not to exceed limits for exposure to radio frequency (RF) energy. These limits are part of comprehensive guidelines and establish permitted levels of RF energy for the general population.
While there may be differences between the SAR levels of various handsets and at various positions, they all meet the governmental requirements for safe exposure. Please note that modifications to this product model could cause differences in the SAR value for later products; in all cases, products are designed to be within the guidelines. * The SAR limit recommended by international guidelines (ICNIRP) for mobile handsets used by the public is 2.0 watts/kilogram (W/kg) averaged over ten grams of tissue.
Warranty Information Motorola guarantees you, the original purchaser, the Personal handset and accessories which you have purchased from an authorised Motorola dealer (the “Products”), to be in conformance with the applicable Motorola specifications current at the time of manufacture for a term of [1] year from date of purchase of the Product(s) (Warranty Term).
In no event shall Motorola be liable for damages nor loss of data in excess of the purchase price nor for any incidental special or consequential damages* arising out of the use or inability to use the Product, to the full extent such may be disclaimed by law.
Conditions This warranty will not apply if the type or serial numbers on the Product has been altered, deleted, duplicated, removed, or made illegible. Motorola reserves the right to refuse free-of-charge warranty service if the requested documentation can not be presented or if the information is incomplete, illegible or incompatible with the factory records.
What is not covered by the warranty This warranty is not valid if the defects are due to damage, misuse, tampering, neglect or lack of care and in case of alterations or repair carried out by unauthorised persons. 1 Defects or damage resulting from use of the Product in other than its normal and customary manner. 2 Defects or damage from misuse, access to incompatible sources, accident or neglect.
Note: The talk-time, stand-by time and total life cycle of a Motorola rechargeable battery for your Personal handset will depend on usage conditions and network configurations. As a consumable product, the specifications indicate that you should be able to obtain optimum performance for your Motorola Personal handset within the first six months from date of purchase and up-to (200) charges.
Index A B accessories connector ports 1 optional 16, 121, 129 standard 16 Add Digits feature 63 AGPS 50 alert creating 101 defined 53 indicators 27, 53 muting 22 reminders 100 setting 148 turning off 54, 60 animation 108 screen saver, setting 47, 148 storing 147 using 46 wallpaper 54 wallpaper, setting 47, 148 application, locking and unlocking 143 appointments.
call adding digits after phone number 63 alert profile, setting 53 alert, creating 101 alert, muting 22 alert, turning off 60 answering 23 barring 114 call waiting 66 calling card 86 cancelling 60 costs 119 deleting 61 dialled calls list 61 dialling 22 dialling a recent call 61 emergency number 60 ending 22, 23 hold 67 ignoring 60 making 22 placing 22 prefix digits, inserting 64 received calls list 61 receiving 23 recent calls 61 storing 61 terminating 60 timing 117 transferring 67 170 - Index unanswered c
deleting an entry 90 details 83 dialling a number 88 editing an entry 89 email address 83 entry name 83 number type indicator 83 1-touch dial 65 phone number 83 prefix digits, inserting 64 primary number, setting 94 private entries 93 sorting entries 93 speed dial number 65, 83, 85 speed dial, using 65 storing an entry 84 voice name entry 87 voice name indicator 83 copy text 39 cost trackers 119 credit information 120 cursor 32 customer service, calling 116 customising the menu 106 cut text 39 D data call
external device connecting to handset 124, 129 F fixed dial defined 115 described 115 dialling numbers 115 editing an entry 89, 115 storing an entry 84 turning on/off 115 using 115 flashing cursor, defined 32 frequency, changing 132 G games 153 H hands free mode automatic answer 121 automatic call routing 122 charger time 123 power-off delay 122 handset accessories, optional 16 accessories, standard 16 alert, turning off 60 172 - Index connecting to external device 124, 129 credit available 120 date, s
indicators alert setting 27, 53 battery level 19, 27 menu 24 message 26 missed call 63 packet data 145 ring alert 27 service 26 signal strength 25 silent alert 27 text entry 26 vibrate alert 27 voice name 83 infrared connection setting 126 IrDA link 124, 126 iTAP software deleting text 39 entering words 36 right soft key 1, 28, 107 send 1, 22, 23, 28, 61 video 49 volume control 22 L language, setting 107 Last Calls Menu opening 62 options 62 left soft key customising 107 functions 1, 28 lights 55 location
indicator 24 language, setting 107 Last Calls Menu 62 lists 30 My Tones Menu 105 navigating 27, 29 Picture Viewer 46, 49 rearranging features 106 scroll feature 108 Shortcuts 109 Text Msg Menu 82 menu key 1, 28 message alerts during calls 54 deleting 80 deleting, text 82 download setting 70 inbox setup 69 lights 56 locking 80 locking, text 82 outbox 78 reading 80 reading, text 82 receipts 78 receiving 79 reminders, text message 79, 100 reminders, voicemail 100 sending 75 status 78 174 - Index voicemail 65
using 65 optional accessory, defined 16 optional feature, defined 16 outbox 78 P packet data 145 passwords changing 43 default 43 paste text 39 pause character 86 phone speed dial, using 65 text entry indicator 26 phone number adding digits after 63 attaching to prefix digits 64 attaching two numbers 63 redialling 58 sending text message to 75 storing in contacts 84 picture contacts entry, storing 85 screen saver, setting 47, 148 storing 147 using 46 wallpaper, setting 47, 54, 148 PIN code activating/deac
right soft key customising 107 functions 1, 28 ring alert creating 101 indicators 27 muting 22 setting 53 turning off 60 ring and vibrate alert indicator 27 muting 22 turning off 60 ringer setting 53 volume, adjusting 22 roam. See service indicator S screen saver 47, 148 scroll feature 108 security code 44 send key 1, 22, 23, 28, 61 sending a call. See making a call service dial 116 service indicator 26 short message service.
storing 147 speakerphone 22 speed dial changing number 85 number, defined 65 sorting contacts by 93 using 65 storing a call 61 symbol text method 39 symbol text mode 37 symbols, entering 37, 39 T tap method text entry 32 text block cursor 33 character chart 34 copy 39 cut 39 entering from keypad 31 entry method, setup 41 entry mode, changing 40 flashing cursor 32 iTAP software predictive text entry 35 numeric entry method 41 paste 39 symbol chart 38 symbol method 39 symbol mode 37 tap method 32 undo 39 te
turning off 60, 101 video 49 video call key 49 voice dial dialling a number 88 recording voice name 87 voice name contacts indicator 83 defined 87 recording 87 voicemail 65 volume earpiece 22 keys 22 ringer 22 speakerphone 22 W wait character 86 wallpaper 47, 54, 148 Web pages 145, 146 6809472A07 178 - Index