
Installation guide


Basic Configuration
37
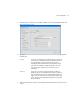
Refer to the Number of Responses value to assess the number of responses from the
target MU versus the number of pings transmitted by the access point. Use the ratio of
packets sent versus packets received to assess the link quality between MU and the access
point.
Click the Ok button to exit the Echo Test screen and return to the MU Stats Summary screen.
With basic access point and associated MU connectivity verified, the access point is now
ready to operate as defined within this guide or have its more advanced features configured.
3.3 Where to Go From Here?
Once basic connectivity has been verified, the access point can be fully configured to meet the needs
of the network and the users it supports. The sections referenced below are located within the
AP-7131 Series Product Reference Guide. The guide is available on the Motorola Web site, at
http://support.symbol.com/support/product/manuals.do
.
• Refer to Chapter 4 to define System Settings (beyond the scope of the Quick Setup screen),
configure access point device access, set SNMP values, log system events, set the access
point system time and import device firmware and configuration files.
• See Chapter 5 for information on configuring the access point LAN and WAN ports, define
up to 16 individual WLANs and their QoS policies and configure access point router settings.
• Refer to Chapter 6 for detailed information on configuring specific encryption (WEP,
KeyGuard, WPA/TKIP and WPA2/CCMP) and authentication (Kerberos and 802.1x EAP)
security schemes.
• See Chapter 7 for information on accessing statistics helpful in monitoring the connection
between the access point and its connected devices.
• Refer to Chapter 8 for information on using the access point Command Line Interface (CLI),
as accessed through the serial port or Telnet.
• See Appendix A for device specifications for both the AP-7131 and AP-7131N models.