MC68HC11 Laboratory Manual N. Natarajan Department of Electrical and Computer Engineering University of Michigan-Dearborn 4901 Evergreen Road Dearborn-48128 nnarasim@umich.
Contents 1 Introduction to HC11 1.1 Objective . . . . . . . . . . . . . . . . . . . . . . . . . . . 1.2 Tasks . . . . . . . . . . . . . . . . . . . . . . . . . . . . . . 1.2.1 Getting started with HC11 . . . . . . . . . . . . . . 1.2.2 Looking at memory . . . . . . . . . . . . . . . . . . 1.2.3 Modifying memory . . . . . . . . . . . . . . . . . . 1.2.4 Writing and entering your first program: Using MM 1.2.5 Running your first command . . . . . . . . . . . . . 1.2.6 Entering your program: Using ASM . . . . .
CONTENTS 3.4 Writing your first function . . . . . 3.4.1 On random sequences . . . . 3.5 Your second function . . . . . . . . 3.5.1 Test your function . . . . . 3.6 Setting bits . . . . . . . . . . . . . 3.7 Clearing bits . . . . . . . . . . . . . 3.8 Toggling bits . . . . . . . . . . . . 3.9 Testing bits . . . . . . . . . . . . . 3.10 Hardware Interfacing . . . . . . . . 3.10.1 PORTA at location $1000 . . 3.10.2 Controlling the LED . . . . 3.10.3 Reading an external switch . 4 Tables 4.1 Objective . .
CONTENTS 7.5 7.6 5 Variable frequency generator . . . . . . . . . . . . . . . . . . . . . Exercises . . . . . . . . . . . . . . . . . . . . . . . . . . . . . . . . 8 Analog to Digital Conversion 8.1 Objective . . . . . . . . . . . . . . . . . . . . 8.2 Background . . . . . . . . . . . . . . . . . . . 8.3 Electrical Connections . . . . . . . . . . . . . 8.4 Decisions, decisions ... . . . . . . . . . . . . . 8.4.1 Multiplexing . . . . . . . . . . . . . . . 8.4.2 Scanning . . . . . . . . . . . . . . . . .
CONTENTS
Chapter 1 Introduction to HC11 1.1 Objective To become familiar with HC11 and using BUFFALO utilities, interacting using the terminal program, transferring files, editing-assembling-loading programs and executing them. 1.2 1.2.1 Tasks Getting started with HC11 1. Disconnect power from the 68HC11 2. Connect 68HC11 to your computer using the serial cable that came with the machine. 3. Start the terminal program Hyperterm. The program is already configured to communicate with the 68HC11. 4.
CHAPTER 1. INTRODUCTION TO HC11 CTRL-A Quit. BF [] Block fill. BR [-][] Set up breakpoint table. ... ... 1.2.2 Looking at memory To see what is stored in the HC11 memory, we use the memory dump command. The instruction for dumping memory is MD. Let us look at what is present in locations E000 to E3FF. At the prompt, enter the command MD E000 E3FF.
1.2. TASKS 9 modify the memory, the command will first echo the value already in memory. If you don’t want to change it, press the space bar, command will move on to the next memory location. If you want to change the value, just type the value (in HEX). If you make a mistake, do not press the backspace key. Continue typing. MM will only look at the last two characters you typed. So if you type AB872B, you have in effect typed 2B. Once you have entered the correct value, press the space bar.
CHAPTER 1. INTRODUCTION TO HC11 1.2.4 Writing and entering your first program: Using MM Let us write a short program that will add three numbers stored in locations D000, D001 and D002. This will be done in five steps 1. First we will load the register A with the value stored in location D000 2. Next we will add to the register A the value stored in location D001 3. Next we will add to the register A the value stored in location D002 4.
1.2. TASKS 11 call C100 Note you can abbreviate any command by entering enough characters to identify it. Since no other command starts with the letter c, you could also have typed c C1003 . When the control is returned to BUFFALO, it prints the contents of all the registers and you should see something like: >CALL C100 P-C10C Y-AAAA X-AAAA A-EA B-AA C-D8 S-004A > Do a memory dump of locations D000-D00F.
CHAPTER 1. INTRODUCTION TO HC11 >ASM C200 C200 STX $FFFF >LDAA D000 B6 D0 00 C203 STX $FFFF >ADDA D001 BB D0 01 C206 STX $FFFF >ADDA D002 BB D0 02 C209 STX $FFFF >STAA D003 B7 D0 03 C20C STX $FFFF >SWI 3F C20D STX $FFFF > CTRL-A Note that to get out of the ASM command you need to type the control-A character. Exerecises 1. Enter the program shown above and verify that the program is entered correctly. 2. Search through the memory starting at location $E000 to find the string User Fast Friend.
1.2. TASKS 13 (b) Find out the ascii codes for the letters in the phrase THIS CLASS IS FUN. To get you started, here are some codes: code for ’T’ is 54, code for ’H’ is 48 and code for I is 49. (c) Enter the ASCII codes starting from location D200. After you enter the last ASCII code, enter the special code 04. (d) Run the program and write down what output you get. (e) To see why you need the special code, do memory modify and change it to 0A. Rerun the program and write down what you observe. 1.2.
CHAPTER 1. INTRODUCTION TO HC11 LOAD T In Hyperterm, use the ASCII file transfer command (use the Transfer menu item to get to it) to transfer the PROG1.S19 file. When the transfer is complete, you should see the program in locations starting from C000. Exercises: 1. Write the above code, assemble it (i.e. create the S19 file), transfer the S19 file to HC11 and run the program. Verify that the program works correctly. 2. Copy the file LAB1.ASM. The file has three errors in it.
Chapter 2 Introduction to Looping 2.1 Objective To become familiar with elementary loops and simple input/outputs functions. 2.2 Simple Input/Output One of the basic functionality provided by any operating system is input/output routines. BUFFALO provides several useful functions for performing input/output. In this lab, we will look at two output functions provided by BUFFALO. Unlike in high level languages, functions in machine language are known by their addresses.
CHAPTER 2. INTRODUCTION TO LOOPING 2.2.1 The function OUTA The function OUTA will transmit whatever is in register A over the serial communication line that is connected to the PC. What the PC does with this value depends on the terminal program that is used to communicate with the HC11. Under normal circumstances, the terminal program will interpret the value as an ASCII code and display the corresponding character on the screen.
2.3. BRANCHING 17 Exercise: 1. Using the MM command (memory modify) enter the following values in memory locations D000, D001, · · ·: 30 31 32 33 41 42 43 44. Verify the values using the memory dump, MD, command. 2. Using RM, the register modify command, change the value in the X register to D000 3. Execute the command CALL FFBB and write down what the output was and also the value in the X register after the command is executed. 4.
CHAPTER 2. INTRODUCTION TO LOOPING Exercise: 1. Using the HC11 reference book, identify 5 instructions that do not affect the C flag, but affects some other flag. 2. Using the HC11 reference book, can you identify any instruction that does not affect the V flag, but affects some other flag? 3. Using the HC11 reference book, identify 5 instructions that always clears the C flag. 4. Using the HC11 reference book, identify an instruction that always sets the C flag. 2.4 2.4.
2.4. LOOPING 19 Exercises: 1. Assemble the following code in your PC, transfer the S19 file to HC11, run the program and write down the output of the program. ;Name: ;email: ;date: ; OUTA FOO EQU $FFB8 ORG $C100 LDAB #$9 ; USING REGISTER B AS A COUNTER LDAA #$31 ; OTHER INITIALIZATION TSTB ; SUBTRACT ZERO FROM B BEQ BAR ; QUIT IF THE Z FLAG IS SET, I.E. B=0 JSR OUTA ; DO THE TASK INCA ; RE-INITIALIZE DECB ; DECREMENT THE COUNTER BRA FOO ; GO BACK BAR SWI 2.
CHAPTER 2. INTRODUCTION TO LOOPING SWI Verify that CALL C100 and CALL C200 produces the same output. Explain why this is so, and how and why the loop terminates. 2.4.2 One, two! One, two! And through and through ... Marching through memory Often loops are combined with marching through memory and operating on consecutive memory location. In this case, the X (and/or Y) register is initialized to a starting memory address. Inside the loop, memory is accessed using IND,X addressing mode.
2.4. LOOPING 21 ORG $D000 FCB $55, $6F, $66, $4D, $2D, $44, $62, $72, $6E Run the above program using CALL C3004 . Modify the above program as shown below and explain what the program does. Do you see why we do the DEX before we access memory? SNICKER ORG $C400 LDAB LDX ABX #$09 #$D000 TSTB BEQ SNACK DEX SNACK LDAA JSR 0,X OUTA DECB BRA SNICKER SWI ORG $D000 FCB $55, $6F, $66, $4D, $2D, $44, $62, $72, $6E Now for some other useful examples. Explain what each of them does.
CHAPTER 2. INTRODUCTION TO LOOPING LDAA ADDA STAA 0,X $10,X $20,X INX DECB BRA CALLOOH CALLAY SWI ORG FCB FCB FCB ; ; ; ; $D000 $55, $6F, $66, $4D, $44, $62, $72, $6E $41, $42, $43, $44, $45, $46, $47, $48 1,2,3,4,5,6,7,8,9,10,11,12,13,14,15,16 NOTE: YOU CAN ENTER NUMBERS EITHER IN DECIMAL OR HEX! AFTER YOU RUN THE PROGRAM, DO MD D000 D02F TO SEE WHAT THE PROGRAM DOES The following program prints the sixteen values stored in the consecutive location starting from $D020.
2.5. OTHER CONDITIONAL BRANCHES DECB BRA KINGS LDAA JSR JSR #$0A OUTA OUTA 23 CABBAGES SWI 2.5 2.5.1 Other Conditional Branches Signed and unsigned numbers So far we have only considered comparing two values and branching if they are equal (BEQ) or not equal (BNE). Designers of HC11 have provided several other branches. When comparing two numbers, it is important to distinguish between signed and unsigned quantities.
CHAPTER 2. INTRODUCTION TO LOOPING compared are of opposite sign) and one for unsigned comparison where no special cases need be considered. 2.5.2 compare and branch instructions: Unsigned The following is based on the section named Branches in the M68HC11E Series Programming Reference Guide commonly referred to as the little pink book. In each case, the instruction compares a value in register r with a value in memory M.
2.5. OTHER CONDITIONAL BRANCHES 25 Branch to LOCif A >= MEM CMPA MEM BGE LOC *Branch if Greater or Equal Branch to LOCif A < MEM CMPA MEM BLT LOC 2.5.4 *Branch if Less Than An example: HEX2BCD Consider the problem of converting a number represented in binary to its equivalent representation in BCD. Without going into too much detail, the rule for numbers between 0 and 99 (two digit numbers) is as follows: 1. For numbers between 0 and 9 (inclusive), no change. 2.
CHAPTER 2. INTRODUCTION TO LOOPING ; IT USES CODE REUSE IN THIS SIMPLE FORM. TO ADD 54, IT ; IT ADDS 6 AND THEN FALLS DOWN TO THE CASE OF ADDING 48. ; TO ADD 48, IT ADDS 6 AND THEN FALLS DOWN TO ADDING 42, ETC. ORG $C000 LDAA $D000 CMPA #10 BLO DONE CMPA #20 BLO ADD6 CMPA #30 BLO ADD12 CMPA #40 BLO ADD18 CMPA #50 BLO ADD24 CMPA #60 BLO ADD30 CMPA #70 BLO ADD36 CMPA #80 BLO ADD42 CMPA #90 BLO ADD48 CMPA #100 BLO ADD54 BRA DONE *NUMBER TOO BIG.
2.5. OTHER CONDITIONAL BRANCHES ADD54 ADDA ADD48 ADDA ADD42 ADDA ADD36 ADDA ADD30 ADDA ADD24 ADDA ADD18 ADDA ADD12 ADDA ADD6 ADDA 27 #6 #6 #6 #6 #6 #6 #6 #6 #6 DONE STAA $D001 ; NOW PRINT THE VALUES LDX #$D000 JSR OUT1BSP *SAME AS OUT1BYT EXCEPT PRINTS A SPACE AFTER THE NUMBER JSR OUT1BYT SWI ;;;;;;;;;;;;;;;;;;;;;;;;; END OF HEX2BCD ;;;;;;;;;;;;;;; Here are some sample runs. Note that the value $23 is converted to $35.the value $29 is converted to $41.
CHAPTER 2. INTRODUCTION TO LOOPING >MM D000 D000 23 29 >C C000 29 41 P-C04B Y-AAAA X-D002 A-20 B-AA C-D9 S-004A > Using Loops Here is a version using loops. We first copy A to B. Then in a loop check if B is greater than or equal to 10. If so, we subtract 10 from B and add 6 to A. If not, we are done.
2.5.
CHAPTER 2.
Chapter 3 Functions and bit manipulations 3.1 Objective To become familiar with bit level operations and writing functions. This lab also illustrates the use of random numbers for testing functions. Bit level operations are used to control light emitting diodes connected to PORTA as well as for monitoring external circuitry. 3.2 What you should do You will be writing several functions in this laboratory exercise.
CHAPTER 3. FUNCTIONS AND BIT MANIPULATIONS most often used sentinels are zero (also known as ASCII-Z string), 26 (also known as CONTROL-Z string, or old DOS string), 4 (EOT string). The programmers of BUFFALO use EOT string and you have one of two choices: rewrite BUFFALO routine and use some other sentinel, or use 4 as the sentinel and remember to place it after each string. The rest of the lab assumes that you will use the EOT string.
3.4. WRITING YOUR FIRST FUNCTION 33 next and then the program section, though it is easier to follow the code if the program section precedes the data section as in the previous example. The program section should start with the main code, i.e. the code you want to execute. The main code should be followed by various functions. The order is not important. What is a function? A function, also known as a subroutine is a self contained code that implements a well defined functionality.
CHAPTER 3. FUNCTIONS AND BIT MANIPULATIONS the registers the way they were before the functions used them1 . Here are the basic rules for writing functions 1. Decide on its functionality. Don’t try to create a Swiss army knife that has multiple functionalities built in. Your function must do only one thing, and it must do it well. Your documentation for the function must clearly state the functionality 2. Decide on its name. Pick a meaningful name but keep the name to 8 characters or less 3.
3.4. WRITING YOUR FIRST FUNCTION 35 You use FCB to initialize consecutive memory loication (when you transfer the code from the PC). The label associated with the instruction is needed to determine the address where the instruction forms the constant. The assembler will automatically EQUate the label with the address associated with the FCB directive. Type the following code, assemble it, transfer the S19 file to the HC11, and test your program by CALL $C100.
CHAPTER 3. FUNCTIONS AND BIT MANIPULATIONS ADCA #20 STAA SEED ;don’t forget to save it back RTS ;;;;;;;;;;;;;;;;;;;;;;;;End: RAND ;;;;;;;;;;;;;;;;;;;; ; ; DATA SECTION ; SEED ORG $D000 FCB 0 ;;;;;;;;;;;;;;;;;;;;;;;end of code ;;;;;;;;;;;;;;;;;;;;;;;; 3.4.1 On random sequences When you are done running the program a few times, you reload the s19 file and try again.
3.5. YOUR SECOND FUNCTION 37 code for 0 or the code for 1 depending on whether the carry is cleared or set5 . Note the function involves a counting loop. We now have to decide register usage: We will use the A register to pass the value to the function. Internally, this value will be moved to B as A is needed in all the calls to BUFFALO routines. We need a counter, and we will use the X register to keep count. As a good programming practice, we will store and restore all registers we will use.
CHAPTER 3. FUNCTIONS AND BIT MANIPULATIONS ; the function destroys the value in a, ; so re load it! then print second digit TBA JSR OUTRHLF ; now print a colon and some spaces LDAA #’:’ JSR OUTA LDAA #’ ’ JSR OUTA JSR OUTA JSR OUTA ; ; ; ; ; ; ; ; ; ; ; now print it in binary b has the value to be printed (recall the old tab) shift b to the left by one bit and print ’0’ or ’1’ depending on what is in the carry flag repeat 8 times.
3.5. YOUR SECOND FUNCTION 39 ; restore the registers PULX PULB PULA RTS ;;;;;;;;;;;;;;;;;;;;;;;End: PRBINARY;;;;;;;;;;;;;;;;;;;; 3.5.1 Test your function We can test the function by loading different values in the A register. The random number generator we wrote first comes in useful here! Write the following program, and test it by repeating the call to $C100 from the BUFFALO prompt.
CHAPTER 3. FUNCTIONS AND BIT MANIPULATIONS JSR RAND JSR PRBINARY SWI ;;; INSERT YOUR CODE FOR PRBINARY HERE ;;; INSERT YOUR CODE FOR RAND HERE ORG $D000 ;;; INSERT ALL YOUR DATA (FCB, FCC, RMB etc.) here ABOUTME FCC / INFORMATION ABOUT YOU / FCB 4 SEED FCB 0 ;;;;;;;;;;;;;;;;;;;;;;;end of code ;;;;;;;;;;;;;;;;;;;;;;;; 3.6 Setting bits We will now write a function that will set a particular bit in some memory location.
3.7. CLEARING BITS 41 SETBIT4 PSHA LDAA $00 ORAA #%00010000 STAA $00 PULA RTS ;; INSERT THE CODE FOR FUNCTIONS RAND AND PRBINARY HERE ORG $D000 ;; ALL THE DATA ITEMS GO HERE. ;;;;;;;;;;;;;;;;;;;;;;;end of code ;;;;;;;;;;;;;;;;;;;;;;;; 3.7 Clearing bits We will now write a function that will clear a particular bit in some memory location. The function should modify the value in the memory in such a way that it only affects the specific bit without changing any other bit.
CHAPTER 3. FUNCTIONS AND BIT MANIPULATIONS JSR LDAA JSR CLRBIT4 $00 PRBINARY *PRINT AFTER CLEAR SWI ;;;;;;;;;;;;;;;;;;;;;;;;;;;;;;;;;;;;;;;;;;;;;;;;;;;;; ; Function: CLRBIT4 ; Purpose: Clears bit #4 in memory location $00 ; Registers modified none ; CLRBIT4 PSHA LDAA $00 ANDA #%11101111 STAA $00 PULA RTS ;; INSERT THE CODE FOR FUNCTIONS SETBIT4 RAND AND PRBINARY HERE ORG $D000 ;; ALL THE DATA ITEMS GO HERE.$ ;;;;;;;;;;;;;;;;;;;;;;;end of code ;;;;;;;;;;;;;;;;;;;;;;;; 3.
3.8.
CHAPTER 3. FUNCTIONS AND BIT MANIPULATIONS ORG $D000 ;; ALL THE DATA ITEMS GO HERE.$ ;;;;;;;;;;;;;;;;;;;;;;;end of code ;;;;;;;;;;;;;;;;;;;;;;;; 3.9 Testing bits Often we have to take a decision based on whether a bit is set or not in memory. To test if one or more bits are set, we clear all other bits and see if the result is zero. If so, none of these bits are set. If not, at least one of them was set. The following program will print YES if bit #4 in memory location $00 is set.
3.10. HARDWARE INTERFACING 45 NOSTR FCC /NO/ FCB 4 ;;;;;;;;;;;;;;;;;;;;;;;end of code ;;;;;;;;;;;;;;;;;;;;;;;; 3.10 Hardware Interfacing Working with random numbers is fine, but we want to do something useful. In HC11, there area special memory locations called PORTS. The special nature of these locations allows us to have direct access to the individual bits using external circuitry. Each bit in the port has an I/O line associated with it. This line provides access to the bit.
CHAPTER 3. FUNCTIONS AND BIT MANIPULATIONS drive devices from these pins (as long as you do not supply more than 5 mA). PA7 is bidirectional and you, as the programmer, can configure the pin as either input or output. WARNING: You may have wired the port as input and either by accident or oversight, may set the pin as an output pin. This can seriously damage the pin if the pin carries currents in excess of 5 mA or so. To prevent the damage, make sure there is a current limiting resistor (4.
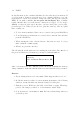
3.10. HARDWARE INTERFACING 47 3 3.3K To test point PA5 for example LED To ground Figure 3.1: Test Probe. Make sure that the resistor is connected to the anode of the light emitting diode. The longer lead of the light emitting diode is the anode. To test a pin, connect the cathode to ground and the resistor to the pin. 5V (pin 9 or 10) PA0 (pin 1) Switch 4.7K Ground (pin 11 or 12) 22K Figure 3.2: Typical input connection 6. Connect a (RIGHT) test probe between pin 6 and pin 12.
CHAPTER 3. FUNCTIONS AND BIT MANIPULATIONS 2. Connect the input circuit as shown in figure 3.2. 3.10.2 Controlling the LED Use memory modify, MM $1000, command to modify PORTA. Change the value in the location to 00, 10, 20, and 30. (Note: When you communicate directly with the HC11 using BUFFALO commands, you do not type the $.) After each change, look at the state of the light emitting diodes and write down what you see. Provide a brief explanation of what you see.
Chapter 4 Programs 4.1 Objective To become familiar with writing programs. This lab also illustrates the use of assembler directives. 4.2 What you should do You will have to turn in your LST files for the programs you write for this lab. Check with the TA for additional instructions. 4.3 Programs When you write programs in a high level language such as C, C++, Java, the compiler facilitates modular program development using function.
CHAPTER 4. PROGRAMS 5. Compiler keeps track of the life and scope of the variable so that the variable is available only when it is in the scope of the instruction (the simplest case is the distinction between global and local variables. In assembly code, you are pretty much on your own. First of all, variables are known by their address. Some variables require more than one location.
4.4. YOUR FIRST PROGRAM 51 3. If the instruction is a RMB instruction, then add the value after the mnemonic to the location counter. 4. If the instruction is a FCB command, then a sequence of comma-separated values following mnemonic are stored in consecutive locations starting from the address given in the location counter. The location counter is incremented by the amount of memory needed to store these bytes. FCC is a convenient way to specify a sequence of ASCII characters.
CHAPTER 4. PROGRAMS pseudo language, I will use a C like syntax1 . The program we want to write should be similar to the following C program (since HC11 is essentially an 8-bit micro, all variables will be unsigned chars to keep things simple). #include
4.5. ON YOUR OWN! 53 ;v4 = 044; ldaa #@44 staa v4 ;total = v1+v2+v3+v4; ldaa v1 adda v2 adda v3 adda v4 staa total ;print total as 2 digit hex number ldaa total jsr outlhlf ldaa total jsr outrhlf swi org $3000 v1 rmb 1 v2 rmb 1 v3 rmb 1 v4 rmb 1 total rmb 1 opt s Modify the C program so that v3 = ’A’; is replaced by v3=getchar();. Run the C program and type the upper case letter A and press enter. You should see the same output as before.
CHAPTER 4. PROGRAMS char v; char total; main() { v = 0; total = 0; v = v+1; total = total + v; v = v+1; total = total + v; v = v+1; total = total + v; v = v+1; total = total + v; v = v+1; total = total + v; printf("%02X", (unsigned) total); return 0; } 2. Modify the program so that the initialization v = 0 is replaced by a call to getchar(). Run your C program and try different inputs at the keyboard. Make corresponding changes to the assembly language program and verify your results. 3.
4.5. ON YOUR OWN! 55 anda #$0F ; in C, use: getchar() & 0X0F Use the above sequence to let the user specify the count. When expecting the user to enter a value, it is a good idea to prompt the user. Your code may look something like:... ;; various equates and comments... ; ; org $2000 ldx #prompt jsr outstrg jsr inchar anda #$ff staa count ; ; rest of the code goes here org $3000 ; various RMB count RMB 1 v RMB 1 total RMB 1 prompt fcc /How many times please? / fcb 4 6.
CHAPTER 4. PROGRAMS (f) Modify the program so that the output reads some thing like: v1 v2 v3 v4 = = = = 07 1C 23 46 7. Write a function that will be passed a value in A register. The function should return 10 times the value passed to it. Use the above function to write a program that does the following: The program should get a digit from the user, multiply it by 10 and store the value in a variable called tens.
4.5. ON YOUR OWN! 57 goto foo; bar: return 0; } 10. Type the following C program, run it to see what the output is. Rewrite the program in assembly language and run it on the HC11. Verify that output of the assembly program matches the C program. /* I decided to use fprintf(stderr instead of printf( as printf( and getche don’t mix well.
CHAPTER 4. PROGRAMS if (c == ’1’) goto one; if (c == ’2’) goto two; fprintf(stderr,"\n\nNot a valid choice!\n"); goto foo; one: fprintf(stderr,"Good choice.
Chapter 5 Tables 5.1 Objective To become familiar with table driven code. 5.2 What you should do You will have to turn in your LST files for the programs you write for this lab. Check with the TA for additional instructions. In most of the examples, the name is left blank as _____________. Make sure you enter your name in its place. 5.3 Tables What is a table? Technically, table is same as an array except we use the term table to refer to arrays whose elements are constants.
CHAPTER 5. TABLES ORG $3000 *data section ... ... primes fcb 2,3,5, 7, 11, 13, 17, 19, 23, 29 *table of some primes nprimes equ 10 *number of entries in the table If you want to set up a table of ascii code for digits, you would write ... ORG $3000 *data section ... ... digits1 fcb $30, $31, $32, $33, $34, $35, $36, $37, $38, $39 ndigits1 equ 10 *number of entries in the table A better way to do the same is to write ... ORG $3000 *data section ..$ ... ...
5.5. WORKING WITH TABLES 61 a Yes/No value. A convenient way to return a Yes/No value is to use a hardware flag. Let us use the Carry flag. The function will set the flag if the answer is yes; or else it will clear the carry.
CHAPTER 5. TABLES init input output outlhlf outrhlf outa out1byt out1bsp out2bsp outcrlf outstrg outstrgo inchar vecinit equ equ equ equ equ equ equ equ equ equ equ equ equ equ $ffa9 $ffac $ffaf $ffb2 $ffb5 $ffb8 $ffbb $ffbe $ffc1 $ffc4 $ffc7 $ffca $ffcd $ffd0 org $3000 ; setup some strings ...
5.5.
CHAPTER 5. TABLES Exercise: Type the above program, assemble it, transfer the S19 file to the 68HC11, and run the program with CALL 2100. When the program starts, type the following text Pack my box with five dozen liquor jugs. Exercise: The lookup program affects the X and B registers. Modify the function so that the function initially stores these two registers in the stack, and restores them before returning. Verify that the program works correctly.
5.5. WORKING WITH TABLES 65 that we accept only digits and ignore non-digits (the user may be in the habit of typing spaces, dashes etc. You want to silently ignore these). So it will be useful to write a function, called rddigit that will accept only digits. The following program shows a typical usage: ;Name: ;email: ;date: ; ; Standard buffalo equates ; Make sure you have ALL the equates in the file.
CHAPTER 5.
5.5. WORKING WITH TABLES 67 ;;; Add the code for lookup function here Exercise: Type the above program and run it. Enter the following input and explain what you see: Exercise: Type the above program and run it. Enter the following input and explain what you see: 123-34-1879. Exercise: Modify the above program so that it accepts exactly 10 digits and stops with an SWI after reading 10 characters. In other words, convert the main loop into a counting loop. You should keep the count in the B register.
CHAPTER 5. TABLES hexchars fcc /0123456789AaBbCcDdEeFf/ hextrans fcb 0,1,2,3,4 fcb 5,6,7,8,9 fcb 10,10, 11,11, 12,12, 13,13, 14,14, 15,15 nhexchars equ 22 To illustrate the use of the translation table, let us write a function that will translate telephone numbers. For example, if the input to the program is a mixture of numbers and letters as in 1-800-CALLATT the program should translate it to 1-800-2255288.
5.5. WORKING WITH TABLES out2bsp outcrlf outstrg outstrgo inchar vecinit equ equ equ equ equ equ $ffc1 $ffc4 $ffc7 $ffca $ffcd $ffd0 org $3000 ; setup some strings ...
CHAPTER 5. TABLES ; print 2 spaces so the output looks neat ldaa #’ ’ jsr outa jsr outa pula ; get it back jsr outa jsr outcrlf bra mainloop ;;;;;;;;;;;;;;;;;;;;;;;;;;;;;;;;;;;;;;;;;;;;;;;;;;;;;;;;;;; ;translate: Translates telephone codes. ;Entry: Register A has the value to be translated ;Exit: If A has an upper case letter, then its content is replaced ; by the the translation given on the phone is performed ; ABC -> 2, DEF ->3, etc. ; If A has any other character, it is left alone.
5.5. WORKING WITH TABLES 71 lkploop tstb beq cmpa beq inx decb bra notthere *this is the basic counting loop 0,x foundit lkploop notthere clc rts foundit sec rts Exercise: Type the above program and enter the input: 1-800-UMD-ALUM. You should see the following output. Clearly explain how the translation gets done.
L U M CHAPTER 5.
Chapter 6 Timing using Polling 6.1 Objective Introduces polling timer overflow flag to create a simple clock and to generate ON-OFF output signals. 6.2 Getting started Make sure you have made the external connections show in figures 3.1 and 3.2 before proceeding further. 6.3 Timing In this part of the lab, we will monitor the TOF flag. This flag is controlled by the free running counter. The free running counter is a 16 bit counter that counts the clock ticks. It is set to $0000 on power up.
CHAPTER 6. TIMING USING POLLING We can use this to create a 30.52 Hz square wave by toggling an output pin every 2 time counter rolls over. Here is the code (you have to fill in the details!) ; Various defines go here ... ORG $D000 don’t forget the $ ME FCC /Your name/ FCB 10 FCC /ECE 372/ FCB 10 FCC /Date the program was last changed/ FCB 10, 10, 4 ORG $C000 DONT FORGET THE $ LDX #ME JSR OUTSTRG ; MAKE SURE YOU HAVE EQU FOR OUTSTRG LOOP1 ; CLEAR THE FLAG.
6.3. TIMING 6.3.1 75 Slowing it down In the last experiment, we toggle the pin so fast that chances are you did not notice the LED’s blink. We can slow it down by toggling only every so many TOF overflows (say 31 overflows). All we need to do is introduce a counting loop as shown below. Note that the program structure is not changed at all. ; Various defines go here ...
;NOW TOGGLE PA4 LDAA #%00010000 EORA PORTA STAA PORTA ;DO IT ALL OVER AGAIN BRA LOOP1 CHAPTER 6.
Chapter 7 Interrupt Processing 7.1 Objective To become familiar with interrupt processing. 7.2 Background In an earlier lab, you had to generate a 30.52 Hz square wave signal on PA4 pin. The code for generating the square wave is given below for your reference. Make sure that you run the program and verify that you get the square wave before proceeding further. Also, to understand this lab, you must connect the PA4 pin to a oscilloscope and see the square waves. ; Various defines go here ...
CHAPTER 7. INTERRUPT PROCESSING ; CLEAR THE FLAG. NO HARM IS DONE IF IT IS ALREADY CLEARED LDAA #%10000000 STAA TFLAG2 ;WAIT FOR THE FLAG TO BE SET LOOP2 LDAA TFLAG2 ANDA #%10000000 BEQ LOOP2 ;NOW TOGGLE PA4 LDAA #%00010000 EORA PORTA STAA PORTA ;DO IT ALL OVER AGAIN BRA LOOP1 7.3 Interrupts If you study the above code, most of the time is spent waiting for the clock to rollover (the loop at LOOP2). This is a lot like sitting in front of the clock and watching and waiting for the clock to rollover.
7.3. INTERRUPTS 79 (b) However, if the mask is set, then request for service is generated. i. The I bit in the CCR is a master disable switch. If this is set (by using the command SEI), then the request for service does not interrupt the computer and is hence ignored. ii. However if I bit is cleared (by using the command CLI), then the CPU is interrupted.
CHAPTER 7. INTERRUPT PROCESSING 2. Write the service routine. As part of the service make sure you turn off the flag that generated the interrupt. 3. Let HC11 know where to find the service. In other words, Link the service to the request. With this background, we will modify the square wave generator to use the interrupt. Here is the complete code with some of the standard equates left out (you need to have them at the top of the file!). You should compare this code with the earlier one.
7.4. THE REAL TIME INTERRUPT 81 ; INTERRUPT SERVICE SERVICE ; TOGGLE PA4 LDAA #%00010000 EORA PORTA STAA PORTA ; TURN OFF THE FLAG! LDAA #%10000000 STAA TFLG2 ; END WITH AN RTI RTI ;;;;;;;;;;;;;;;;;;;;;;;;;;;;;;;;;;;;;;;;; ; Connect the service to the interrupt ; ORG $00D0 ; $00D0 WHERE THE SERVICE STARTS JMP SERVICE ; JUMP TO WHERE THE SERVICE CODE ACTUALLY IS How does this code differ from the previous one? We don’t wait for the clock to rollover.
CHAPTER 7. INTERRUPT PROCESSING Last two bits of PACTL 00 01 10 11 Time between interrupts 4.096 ms (244.1 Hz) 8.192 ms (122 Hz) 16.384 ms (61 Hz) 32.768 ms (30.5 Hz) Thus if we want to use the RTI interrupt, we have to change the above code as shown below. Note the crucial differences: ; Various defines go here ...
7.4. THE REAL TIME INTERRUPT 83 ;;;;;;;;;;;;;;;;;;;;;;;;;;;;;;;;;;;; ; INTERRUPT SERVICE SERVICE ; TOGGLE PA4 LDAA #%00010000 EORA PORTA STAA PORTA ; TURN OFF THE FLAG! LDAA #%01000000 <= This is different STAA TFLG2 ; END WITH AN RTI RTI ;;;;;;;;;;;;;;;;;;;;;;;;;;;;;;;;;;;;;;;;; ; Connect the service to the interrupt ; ORG $00EB ; $00EB0 WHERE THE SERVICE STARTS JMP SERVICE ; JUMP TO WHERE THE SERVICE CODE ACTUALLY IS 7.4.1 Exercises 1.
7.5 CHAPTER 7. INTERRUPT PROCESSING The output compare interrupt The HC11 has 5 OCx interrupts. These are like alarm clocks. You set a desired ’alarm’ time and when the clock matches the alarm setting, the OCxF flag will be turned on and could then generate a request for service. Note that if you do not change the alarm setting, you will still get an interrupt every 32.768 ms. However, having the alarm gives you greater flexibility.
7.5. THE OUTPUT COMPARE INTERRUPT 85 SERVICE ; TOGGLE PA4 LDAA #%00010000 EORA PORTA STAA PORTA ; TURN OFF THE FLAG! LDAA #%01000000 <= This is different STAA TFLG1 ; END WITH AN RTI RTI ;;;;;;;;;;;;;;;;;;;;;;;;;;;;;;;;;;;;;;;;; ; Connect the service to the interrupt ; ORG $00DC ; $00DC WHERE THE SERVICE STARTS JMP SERVICE ; JUMP TO WHERE THE SERVICE CODE ACTUALLY IS Verify that the above code also generates a 30.5 Hz square wave. Now we can reset the alarm to get a different frequency.
CHAPTER 7.
Chapter 8 Signal Generation 8.1 Objective To become familiar with generating square waves. 8.2 Background In an earlier lab, you had to generate a square wave signal using various interrupts. This lab builds on this. For a general square wave signal, we define the on-time, Ton , the off-time, Toff , and the period T as shown in the figure 7.1. The goal of T the lab is to generate such square waves. The ratio on is called the duty cycle T and is expressed as a percentage.
CHAPTER 8. SIGNAL GENERATION 8.3 Variable frequency signal generator In this experiment, we will generate a square wave with frequency selected by the user. We will fix the duty cycle at 25%. To get started, we will first write the code for generating a single tone. 8.
8.4. 500 HZ TONE GENERATOR SEI LDD STD LDD STD #1000 ONTIME #3000 OFFTIME LDAA #%01000000 STAA TMSK1 CLI ; Now go about your business of printing Z’s LDAA #’Z’ LOOP JSR OUTA BRA LOOP ; End of main program ;;;;;;;;;;;;;;;;;;;;;;;;;;;;;;;;;;;; ; INTERRUPT SERVICE SERVICE ; TOGGLE PA4 LDAA #%00010000 EORA PORTA STAA PORTA ; TEST TO SEE IF THE PIN WENT HIGH ANDA #%00010000 BNE WENTHIGH ; NO, PIN WENT LOW. LOAD D WITH OFFTIME LDD OFFTIME BRA REST WENTHIGH ; PIN WENT HIGH.
CHAPTER 8. SIGNAL GENERATION REST ADDD TOC2 STD TOC2 ; BUMP ALARM SETTING ; TURN OFF THE FLAG! LDAA #%01000000 STAA TFLG1 RTI ; Connect the service to the interrupt ; ORG $00DC ; $00DC WHERE THE SERVICE STARTS JMP SERVICE ; JUMP TO WHERE THE SERVICE CODE ACTUALLY IS Assemble and run the above program. Connect PA4 to an oscilloscope and verify that the duty cycle and the frequency are correct. 8.5 Variable frequency generator We now modify the above code to create a variable frequency generator.
8.5. VARIABLE FREQUENCY GENERATOR 91 FDB 851, 804, 759, 716, 676 OFFTIMETBL FDB 3409, 3217, 3037, 2866, 2706 FDB 2554, 2410, 2275, 2147, 2027 Note that it makes sense to enter numbers in decimal notation. Each entry in the table requires two bytes (we use 16 bit numbers to measure time since the HC11 clock is a 16 bit quantity). Hence we use FDB instead of FCB. Note that this also means that we have to index through memory in steps of two bytes.
CHAPTER 8. SIGNAL GENERATION Before LOOP LDAA #’Z’ JSR OUTA BRA LOOP After LOOP JSR INPUT TSTA BEQ LOOP ANDA #$0F TAB ; B HAS INDEX LDX #ONTIMETBL ABX ABX LDY #OFFTIMETBL ABY ABY LDD 0,X STD ONTIME LDD 0,Y STD OFFTIME BRA LOOP 8.6 Exercises 1. Make the changes shown above and run the program. Connect PA4 to an oscilloscope. Press any of the keys 0 to 9 and verify that the frequency changes. 2.
Chapter 9 Analog to Digital Conversion 9.1 Objective To become familiar with Analog to Digital Conversion. 9.2 Background In this lab you will learn how to use the built in analog to digital converter. In an earlier lab you learnt how to read a digital input on one of the port A pins. The input was either a 1 or a 0 depending on whether the pin voltage was above or below 2.5 volts. In this lab you will learn how to measure a voltage more precisely.
CHAPTER 9. ANALOG TO DIGITAL CONVERSION where D The converted digital value V Measured voltage V RL Lower limit voltage V RH Upper limit voltage b· · ·c rounded down value Note: If the input voltage is below the lower limit, then the converted value would be zero and if the input voltage is above the upper limit, the converted value would be 255. Again, it is not a good idea to go outside the two limits. 9.3 Electrical Connections 1.
9.5. PROCESS OF TAKING A MEASUREMENT 95 pins PE0-PE3 or the pins PE4-PE7. If you chose the first the group of pins then the voltage in PE0 will be converted and stored in ADR1, the voltage in PE1 will be converted and stored in ADR2, etc. If you chose the second group of pins then the voltage in PE4 will be converted and stored in ADR1, the voltage in PE5 will be converted and stored in ADR2, etc.
CHAPTER 9. ANALOG TO DIGITAL CONVERSION this to 1 if you want scanning; or else, set it to zero. Bit #4 is the MULT bit. Set this to 1 if you want multiplexing; or else, set it to zero. Bits #3-#0 specify which PORT E pin you want to measure. In the multiplexed mode, you can specify any of the four pins that are part of the multiplexed group. 9.5.3 Making sure you have valid data Once you have initiated the conversion, you have to make sure you that you have valid data.
9.7. A SIMPLE DIGITAL VOLTMETER 97 scanning mode, there is no need to issue any new commands. Measure the input voltage, V and compute 255V . Also note down the values in locations 5 $1031-$1034. Fill in the following table for different input voltages and verify your results. j ³ ´k j ³ ´k Measured 255 V5 255 V5 Memory dump Voltage (V) In Decimal In Hex $1031 $1032 $103 $1034 9.7 A simple digital voltmeter We can write a simple voltmeter program to measure voltages in the zero to 5 volts range.
CHAPTER 9. ANALOG TO DIGITAL CONVERSION 4. Take a reading (this is easy!) LDAA ADR1 5. Convert it to decivolts by multiplying by 50 and then dividing by 255 LDAB #50 MUL LDX #255 IDIV The quotient as a result of division is in the X register. This is an awkward destination as most of the functions expect the value on the A register. We transfer from X to A in two steps.. first from X to D.
9.7. A SIMPLE DIGITAL VOLTMETER 99 TAB *COPY A TO B H2B.LT CMPB #10 *IS B < 10 BLO H2B.DONE *IF SO WE ARE DONE SUBB #10 ADDA #6 BRA H2B.LT *B <- B-10 *A <- A+6 H2B.DONE PULB RTS 7. We can go back and repeat the steps (the first need not be performed more than once). It is convenient to check the keyboard and go back only if the user has not pressed the ESC key (code 27).
CHAPTER 9.
9.7. A SIMPLE DIGITAL VOLTMETER JSR OUTLHLF LDAA #’. JSR OUTA PULA *GET THE SAVED VALUE JSR OUTRHLF JSR OUTCRLF ; BACK FOR MORE UNLESS USER TYPES AN ESCAPE JSR INPUT CMPA #27 BNE LOOP SWI ;FUNCTION TO CONVERT HEX TO BCD ; HEX2BCD PSHB TAB *COPY A TO B H2B.LT CMPB #10 *IS B < 10 BLO H2B.DONE *IF SO WE ARE DONE SUBB #10 ADDA #6 BRA H2B.LT *B <- B-10 *A <- A+6 H2B.