Motorola D1010 series Digital Cordless Phone with Answer Machine Warning Use only rechargeable batteries.
Welcome... to your new Motorola D1011 Digital Cordless Phone! • All handsets fully cordless for locating anywhere within range. • 100 Name and number phonebook. • Copy phonebook entries between other handsets. • Answer machine with 12 minutes digital recording time. • Caller Display shows you who’s calling and see details of the last 50 callers in a Calls list.1 • Register up to 5 handsets to a single base and register each handset with up to 4 different bases.
This User Guide provides you with all the information you need to get the most from your phone. Before you make your first call you will need to set up your phone. Follow the simple instructions in ‘Getting Started’, on the next few pages. IMPORTANT Only use the telephone line cord supplied. This equipment is not designed for making emergency telephone calls when the power fails. Alternative arrangements should be made for access to emergency services.
1. Getting started................................................................................ 6 Location............................................................................................ 6 Setting up ......................................................................................... 6 Connecting up the base ................................................................... 6 Connecting the handset and charger (Multi-pack only).................... 6 Set date and time manually...........
Auto hang up.................................................................................. 21 Display language ........................................................................... 21 Room Monitor on/off ...................................................................... 21 Room Monitor ................................................................................ 21 Backlight on/off .............................................................................. 21 Keypad lock ................
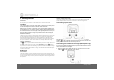
1. Getting started WARNING Do not place your D1011 in the bathroom or other humid areas. Location WHICH POWER ADAPTOR? The power adaptor with a clear connector is for the base unit and the power adaptor with a red colour connector is for the charger unit. Connecting up the base You need to place your D1011 base within 2 metres of the mains power socket and telephone socket so that the cables will reach. Make sure it is at least 1 metre away from other electrical appliances to avoid interference.
2. Insert the 2 x AAA NiMH batteries supplied into the handset. Then slide the compartment cover into place. 3. Place the handset on the charger to charge for at least 24 hours. When the handset is fully charged the icon will indicate that it is fully charged. 4. When the handset is fully charged after 24 hours, plug the telephone line cord from the large base into the telephone wall socket. Date and time IMPORTANT Warning! Use only rechargeable batteries.
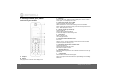
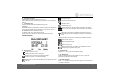
2. Getting to know your phone Overview of your handset C Menu key Enter the main menu. Select the option displayed on screen. Confirm menu option – OK is displayed on screen. D Redial / Scroll right / Clear / Mute Open the redial list. Scroll to the right. Delete characters on screen when entering names and numbers. Mute / unmute the microphone during a call. Go back to previous menu level – BACK displayed on screen. E Call log / Scroll Up / Volume up Open the calls log.
K # / Ringer off / Pause Press and hold to switch handset ringer on or off. When dialling or storing a number, press and hold to enter a pause (P). Dial a #. L Loudspeaker key Activate and deactivate the loudspeaker during a call. WARNING Handsfree activation can suddenly increase the volume in the earpiece to a very high level. Make sure the handset is not too close to your ear. M Intercom (at least 2 handsets needed) In standby mode, use to make an internal call.
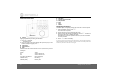
Overview of the base E F G H I J Skip back Answer machine On/Off Skip forward Stop Play Delete Navigating the menus The basic steps of navigating through the menu and on-screen options. A Paging key Paging is a useful way of finding lost handsets. 1. Press p on the base. - All handsets ring. 2. Press p again to cancel the paging call or press any key on the handset to stop the paging call. B Volume Up C Volume Down D LED Indicates when the answer machine is on or off, and when you have messages.
Menu map PHONEBOOK CLOCK/ALARM PERSONAL SET ADVANCED SET ANSW MACHINE NEW ENTRY DATE & TIME HANDSET TONE RECALL TIME PLAY LIST ENTRY SET ALARM RING VOLUME DIAL MODE DELETE ALL ALARM TONE RING MELODY CALL BARRING RECORD MEMO EDIT ENTRY GROUP MELODY EASY CALL ANSWER MODE DELETE ENTRY KEY TONE REGISTRATION ANSW ON/OFF DELETE ALL FIRST RING SELECT BASE ANSW SETTING REGIST. BASE RING DELAY DIRECT MEM HANDSET NAME PB TRANSFER* AUTO PICK-UP UNREGISTER REMOTE ACC.
3. Using the phone Calls Make a call 1. Press <. 2. Dial the telephone number. Pre-dial 1. Enter the phone number (maximum 24 digits). If you make a mistake press e. 2. Press < to dial the phone number entered. Dial one touch numbers 1 to 9 1. Press and hold a key from 1 to 9 until the number is displayed and dialled. - If no number is stored, you hear a beep. Call from the phonebook 1. Press d. The first entry in the phonebook is displayed. 2. Scroll u or d to the entry you want. 3.
End a call 1. Press >. After you hang up, the duration the phone is off-hook is displayed for 5 seconds. • If more than two handsets are registered to the base, their numbers are displayed, e.g. 2345*. Enter the number of the handset you want to call or press * to ring all handsets. NOTE If auto hang-up is on (see page 21) simply replace the handset on the base to end the call. The default setting is ON. 2. Press > to hang up.
NOTE The voicemail number is pre-stored only if the country where the phone was purchased offers a voicemail service. If the voicemail number is not pre-stored you can add a number, or overwrite the existing stored number. See page 16. Dial your network voicemail service 1. Press and hold 1. - The number is displayed and dialled. Follow the voice prompts to play, save and delete your messages. Or If is displayed in a call list, press < to dial the network voicemail number. NOTE You can turn off the icon.
NOTE Cancel storing an entry by pressing > at any time during the process. Entering names Use the alphanumeric keypad to enter names in the phonebook. For instance to enter the name Paul P A U L Press 7 once Press 2 once In standby: Press 5 three times Press e to delete a character or press and hold e to delete all characters. Character map Use the keypad to enter names and characters. Space A B D E G H J K M N P Q T U W X 0 - Phonebook 1 C F I L O R V Y / 2 3 4 5 6 S 8 Z \ < 1.
5. Press m to confirm. 6. Scroll u or d to select NO GROUP, GROUP A, B or C and press m to confirm. 7. Press > to return to standby. Delete an entry 1. 2. 3. 4. 5. Press d. Scroll to the entry you want to delete and press m. Scroll d to DELETE ENTRY and press m. Display shows CONFIRM?. Press m. Press > to return to standby. Delete all entries 1. 2. 3. 4. Press m twice. Scroll d to DELETE ALL and press m. Display shows CONFIRM?. Press m. Press > to return to standby.
5. Caller display and Calls list If you have subscribed to Caller Line Identification (CLI), and provided the identity of the caller is not withheld, the number of the caller will be displayed together with the date and time of the call (if provided by the network). NOTE • If the caller’s number is stored in your phonebook along with a name, the name will also be displayed. • If the telephone number is not available for incoming calls, the handset will display UNAVAILABLE.
Delete entire calls list 1. Press u then m. The most recent call is displayed. 2. Scroll d to DELETE ALL and press m. 3. Display shows CONFIRM?. Press m to confirm. Press > to return to standby. Delete entire redial list 1. Press e then press m. 2. Scroll d to DELETE ALL and press m. 3. Display shows CONFIRM?. Press m to confirm. Press > to return to standby. Redial The D1011 lets you redial any of the last 10 numbers called. Numbers can be up to 24 digits long. Redial the last number 1. Press e.
6. Clock & Alarm Set alarm melody If you subscribe to your network’s Caller Identification service, the time on your D1011 may be set automatically each time you receive a call, depending on your network provider. 1. Press m and scroll d to CLOCK/ALARM. Press m. 2. Scroll d to ALARM TONE and press m. - Melodies are played. 3. Scroll u or dand press m. You can also set or adjust the time using the Clock & Alarm menu. Set date and time There are three alarm ringtones. 1.
7. Personal settings Handset tones WARNING When the phone is ringing, avoid holding the earpiece too close to your ear as it may damage your hearing. Ring volume 1. Press m, scroll d to PERSONAL SET and press m. 2. HANDSET TONE is displayed. Press m and scroll d to GROUP MELODY. Press m. 3. Scroll u or d to select: GROUP A, B or C, then press m. 4. Press u or d to select the ringtone you want for the group and press m. 5. Press > to return to standby.
4. Enter the name you want – maximum 10 characters and press m to save. 5. Press > to return to standby. Auto pick up With Auto pick up switched on, you can answer a call just by lifting the handset off the base or charger. If switched off, you will have to press < to answer a call. The default setting is On. 1. 2. 3. 4. 5. Press m, scroll d to PERSONAL SET and press m. Scroll d to AUTO PICK UP. Press m. Scroll u or d to select ON or OFF. Press m to confirm. Press > to return to standby.
8. Advanced settings This setting is useful to access certain network and PABX/switchboard services. Recall time The default D1011 recall time is suitable for your country and network operator. It is unlikely that you should need to change this setting unless advised to do so. 1. 2. 3. 4. 5. Press m, scroll d to ADVANCED SET and press m. RECALL TIME is displayed. Press m. Press u or d to select the setting you want: SHORT, MEDIUM, LONG. Press m to confirm. Press > to return to standby.
NOTE If you switch Easy call on, EASY CALL ON will be displayed on your screen in standby mode. To switch Easy call off again: 1. Press >. 2. OFF? is displayed. Press m to confirm. Set the easy call number 1. Press m, scroll d to ADVANCED SET and press m. 2. Scroll d to EASY CALL. Press m. 3. 4. 5. 6. Enter the master PIN (Default setting 0000) and press m. Scroll d to NUMBER. Press m. Enter the number. Press m to confirm Press > to return to standby.
3. Enter the 4 digit master PIN and press m. - Display shows the registered handset numbers. 4. Scroll u or d to select the handset you want to delete and press m. - UNREGISTERED is displayed on the handset screen. Default settings Handset name Handset Key tone On First ring On PIN Auto pick up On The 4-digit master PIN is used when registering or unregistering a handset and when changing some settings on your D1011. The default setting is 0000. You can change this PIN for more security.
Auto prefix ECO mode You can set the D1011 to detect a dialling number and replace it with another number. The number to be detected can be up to 5 digits long. It can be replaced with a number up to 10 digits. To reduce the level of power emissions, you can select low power or ECO mode. When the ECO mode is set to ON, the base transmission power will be reduced. To turn ECO Mode to ON or OFF: 1. Press m, scroll d to ADVANCED SET and press m. 2. Scroll d to ECO MODE and press m. 3.
9. Using your Answer machine Your D1011 answer machine records unanswered calls when it is activated. It can store up to 59 messages within the maximum recording time of 12 minutes. Each message can be up to 3 minutes long. Your personal outgoing messages can be up to 1 minute long.
Delete all messages 1. Press m scroll to d ANSW MACHINE and press m. 2. Scroll d to DELETE ALL and press m. 3. Display shows CONFIRM?. Press m to confirm. Record a memo You can record a memo which is stored on your answer machine and played back like a normal message. 1. Press m scroll u or d to ANSW MACHINE and press m. 2. Scroll d to RECORD MEMO and press m. Display shows RECORDING. 3. Speak your message. Press m to end recording.
Remote access At the handset: Remote access allows you to operate your answer machine and listen to your messages by calling your D1011 from another phone. 1. If you want to interrupt and take the call press < or v The default setting is on. 1. When a caller is leaving a message, press + or - to adjust the volume to listen to your caller. 2. To interrupt and take the call on the handset, press < or v. 1. Call your D1011. When you hear your outgoing message, press #. 2. Enter your 4 digit PIN.
3. Press m, PLAY is displayed. 4. Press m, the handset will start the new message playback. Once all messages are played, the handset will return to standby. 10. Help NOTE During message playback, press > anytime to return to standby.
Display No display • Try recharging or replacing the batteries. • Try disconnecting and connecting the base power supply. • If LED is not lit up, then try disconnecting and connecting the base power supply. Registration Unable to register another handset • Maximum number of 5 handsets has been reached. • The display shows SEARCHING. You must unregister a handset in order to register a new one. Interference Noise interference on your radio or television Your base or charger may be too close.
• Medical Devices • Pacemakers: The Advanced Medical Technology Association (AdvaMed) recommends that a minimum separation of 15 cms (6 inches) be maintained between a handheld wireless device and a pacemaker. These recommendations are consistent with those of the U.S. Food and Drug Administration. • Persons with pacemakers should: - ALWAYS keep the handheld wireless device more than 15 cms from their pacemaker when the handheld wireless device is turned ON.
Product disposal instructions for business users Technical Information Warranty Information How many telephones can I have? All items of telephone equipment have a Ringer Equivalence Number (REN), which is used to calculate the number of items which may be connected to any one telephone line. Your D1011 has a REN of 1. A total REN of 4 is allowed. If the total REN of 4 is exceeded, the telephones may not ring.
Press and hold # to insert a pause (P) before entering the telephone number. 12. Wall mounting You may also need to enter a pause when storing international numbers or charge card numbers. IMPORTANT Before you wall-mount your D1011, check that you are not drilling into any hidden wiring or pipes. Recall Before you drill, make sure the power and telephone line cables will reach the sockets.
2. Insert the wall plugs if necessary, then insert the screws leaving about 5mm protruding from the wall on which to hang the phone. 3. Pull the base/charger out of the stand and slot the holes on the back of the base over the screw heads and gently pull the base/charger down to make sure it is securely in place.
, the Stylized M Logo and all other trademarks indicated as such herein are trademarks of Motorola, Inc. ® Reg. U.S. Pat. & Tm. Off. © Motorola, Inc. 2008 Printed in P.R.