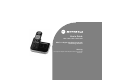
User’s Guide L801 / L802 / L803 / L804 / L805 DECT 6.0 Digital Cordless Phone with Answering machine Warning Use only the adapter and telephone line cord provided in the box.
Welcome... to your new Motorola Phone! Please retain your original dated sales receipt for your records. For warranty service of your Motorola product, you will need to provide a copy of your dated sales receipt to confirm warranty status. Registration is not required for warranty coverage. For product-related questions, please call: US and Canada: 1-888-331-3383 On the Web: www.motorola.com • • • • • 30 name and number phonebook. Answering machine with up to 15 minutes digital recording time.
This User's Guide provides you with all the information you need to get the most from your phone. Before you make your first call you will need to set up your phone. Follow the simple instructions in 'Getting Started', on the next few pages. IMPORTANT Only use the telephone line cord supplied. This equipment is not designed to make emergency telephone calls during power failures. Alternative arrangements should be made for access to emergency services.
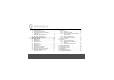
1. Getting started ................................................6 1.1 Connecting the base........................................... 7 1.2 Wall mounting on the base ................................. 7 1.3 Installing and charging the handset battery pack ........................................................ 8 1.4 Setting the display language .............................. 8 1.5 Setting the date and time.................................... 9 2. Getting to know your phone ..........................9 3.
3.21 Using your answering machine .........................22 3.21.1 Playing messages ................................22 3.21.2 Turning on or off the answering machine ................................................22 3.21.3 Setting the announcement mode .........23 3.21.4 Setting the number of rings ..................23 3.21.5 Announcement .....................................23 3.21.6 Recording a memo ...............................24 3.21.7 Call screening on/off ............................24 3.21.
1. Getting started WARNING Do not place your phone in the bathroom or other humid areas. Location When choosing a location for your new phone, here are some important guidelines you should consider: • Avoid sources of noise and heat, such as motors, fluorescent lighting, microwave ovens, heating appliances and direct sunlight. • Avoid areas of excessive dust, moisture and low temperature. • Avoid other cordless telephones or personal computers. • Never install telephone wiring during a lightning storm.
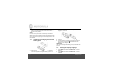
1.1 Connecting the base 1. Plug the power adapter and the telephone line cord into the base. The power adapter with the bigger pin is for the charger (only in multi- handset packs). 2. Plug the other end of the power adapter into a power outlet and the telephone line cord into a telephone wall jack. 3. Use only the provided power adapter. Getting started 1.2 Wall mounting on the base This phone can be mounted on any standard wall plate. 1.
4. Align the mounting slots on the base with the mounting posts on the wall. Then push in and down until the phone is firmly seated. NOTE DO NOT use a power outlet controlled by a wall switch. Make sure the wall is capable of supporting the weight of the phone, and use the proper type of anchoring device for the wall material. 1.3 Installing and charging the handset battery pack battery compartment, with the battery connector plugged in, as shown. 2. Install the battery compartment cover back on. 3.
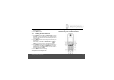
3. Press MENU then VOL+ or REDIAL/VOL- to select the desired language. 4. Press MENU to save. 1.5 2. Getting to know your phone Overview of your cordless handset Setting the date and time 1. Press MENU and then VOL+ or REDIAL/VOL- to select DATE&TIME. If you're a subscriber to your network's Caller ID service, the date and time is automatically set when a call is received. 2.
1 2 SCROLL UP / VOLUME UP a) In menu mode: Press to scroll up. b) In editing mode: Press to move cursor to the left. c) During a call: Press to increase volume. d) Calls list / phonebook / redial list entry: Press to scroll up the list. e) In answering machine mode: Press to increase volume. MENU / SELECT a) In idle mode: Press to access menu list. b) In menu / editing mode: Press to confirm and save the settings. c) During a call: Press to transfer the call to another handset.
10 MICROPHONE 11 SPEAKER a) In idle / menu / pre-dial mode / during a call: Press to turn on / off the speakerphone. b) Calls List / phonebook / redial list entry: Press to make a call with speakerphone. c) During ringing: Press to answer a call with speakerphone. d) In answering machine mode: Press to toggle the message playback via earpiece / speakerphone. 12 * / TONE a) In idle / pre-dial / editing mode: Press to insert a *.
Cordless Handset LCD display On when ringer volume is turned off. On when there is new voice mail not yet listened to. Off when new voice mail has been listened to. On when a call is muted. Full battery power level. 2/3 battery power level. 1/3 battery power level. Flashes when low battery level is detected, needs charging. Display Icons On when speakerphone is turned on. On when answering machine is turned on. Flashes when new answering machine message is received. Indicates when new call is received.
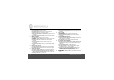
Overview of the base Base LED Indicators -00 09 1 CHARGING LED - GREEN 2 IN USE LED - RED 3 FIND There is no voice message in the answering machine. Flash in idle: Indicates the number of new answering machine messages. (e.g. there are 9 answering machine messages in total, with a capacity for 59.) Flash during message playing: The selected new answering machine message is being played. a) On when the handset is put into base cradle for charging.
LA Flashing: Indicates the line remote access is in progress. 3. Using the Phone 3.1 Making a call 1. Enter the phone number then press /FLASH or SPEAKER to dial the phone number. 3.2 / Speed dialing 1. In idle mode, press and hold a key from /1 to WXYZ/9 until the number is displayed and dialed. 3.3 Answering a call 1. Press /FLASH or incoming call. 3.4 Ending a call 1. During a call, press the base. 3.5 /SPEAKER to answer the /BACK or put the handset on Adjusting volume 1.
3.6 Muting a call 1. During a call, press MUTE to mute the microphone, so that you can talk to someone else in the room without your caller hearing you. 2. Press MUTE again to unmute. 4. Press MENU and then enter the number. 5. Press MENU to save. NOTE Numbers can be up to 24 digits long and names up to 15 characters long. Entries are stored in alphabetical order. 3.7 3.10 Dialing from the redial list 1. In idle mode, press REDIAL/VOL- then VOL+ or REDIAL/VOL- to select an entry you want to dial. 2.
TIPS Instead of scrolling to browse the phonebook entries, press the numeric key corresponding to the first letter of the entry you wish to locate. For example, pressing 2 will show the entries starting with A. Pressing 2 again will show the entries starting with B, etc. 3.12 Caller ID If you have subscribed to Caller ID service, and provided the identity of the caller is not withheld, the number of the caller will be displayed together with the date and time of the call (if provided by the network).
NOTE • When reviewing an entry from the calls list, press #/ / PAUSE/FORMAT repeatedly to display the number in different format. For example, if a caller number is displayed as 888-331-3383, the various formats will be: 331-3383 1-331-3383 888-331-3383 1-888-331-3383 You may choose the desired number format for local and long distance numbers before dialing or saving it into the phonebook. • The icon is removed once the new call has been viewed. 3.12.
3.
1. Press MENU. 2. Press VOL+ or REDIAL/VOL- to scroll through the menu. 3. Press MENU for opening sub-menus and/or saving. Press /BACK to go back to the previous menu level or cancel an action. If you do not press any button on the handset for 30 seconds, the display will automatically return to standby. It will also return to standby when the handset is placed on the base or charger. 3.14 Intercom This feature is only available when there are at least two registered handsets.
3.14.3 Three-party conference call 1. During an external call, press INT. - Your caller is put on hold. 2. Press VOL+ or REDIAL/VOL- to select the handset you want to call. 3. Press MENU to call the handset. 4. When the other handset answers the intercom call, press MENU on the calling handset to set up the conference call. 5. Press /BACK on any handset to end a three-party conference call and leave the other handset engaged with the caller.
3.17 Setting the area code 1. Press MENU and then VOL+ or REDIAL/VOL- to select SETUP BS. 2. Press MENU and then VOL+ or REDIAL/VOL- to select AREA CODE. 3. Press MENU and then enter the area code. 4. Press MENU to save. 3.18 Registration Up to 5 handsets can be registered to one base. The original handset is pre-registered to use. Additional handsets must be registered to the base before you can use them. To register an additional handset, 1. Press MENU and then VOL+ or REDIAL/VOL- to select SETUP HS.
3.20 Paging/Finding a handset Press FIND on the base. All handsets registered to the base will ring. To stop the paging, press FIND again, or press any key on the handset, or place the handset on the base. 3.21 Using your answering machine 3.21.1 Playing messages 1. Press on the handset from idle mode. New messages will be played followed by any older messages. 2.
3.21.3 Setting the announcement mode 1. Press MENU and then VOL+ or REDIAL/VOL- to select ANSWER MACHINE. 2. Press MENU and then VOL+ or REDIAL/VOL- to select ANSWERER MODE. 3. Press MENU and then VOL+ or REDIAL/VOL- to select the announcement modes: • ANNC & RECORD invites your callers to leave a message. • ANNOUNCE ONLY lets callers hear your announcement but they cannot leave a message. 4. Press MENU to save. 3.21.4 Setting the number of rings 1.
NOTE When playing the message, pressing MUTE will delete it and the pre-recorded message will be played automatically. 3.21.5.2 Playing the announcement 1. Press MENU and then VOL+ or REDIAL/VOL- to select ANSWER MACHINE. 2. Press MENU and then VOL+ or REDIAL/VOL- to select ANNOUNCEMENT. 3. Press MENU and then VOL+ or REDIAL/VOL- to select PLAY. 4. Press MENU and then VOL+ or REDIAL/VOL- to select the answer mode ANNC & RECORD or ANNOUNCE ONLY. 5. Press MENU and the message is played. 3.21.
3.21.8 Deleting all old messages 1. Press MENU and then VOL+ or REDIAL/VOL- to select ANSWER MACHINE. 2. Press MENU and then VOL+ or REDIAL/VOL- to select DEL ALL OLD. 3. Press MENU. DELETE ALL OLD MESSAGES? is displayed. 4. Press MENU to confirm. NOTE When the answering machine is full, will flash if there are new messages. ERASE SOME ANSWERER MSG will toggle within 2 seconds with MEMORY FULL. At this point, delete some messages to free up memory. 2.
After entering the remote access mode, press the following keys to carry out your desired function. Press... 1 2 3 4 5 7 To... Repeat the message Play/Stop the current message playback Skip forward to the next message Toggle Answer Off/Announce Only/Announce and Record modes Delete the message Listen to the Main Menu (for full voice prompts only) 3.21.10 Setting the security code This is used to change the remote access PIN if necessary. 1. Press MENU and then VOL+ or REDIAL/VOL- to select ANSWER MACHINE.
No ring tone • The ringer may be off. • The volume may need to be increased. Caller ID does not work • Check your subscription with your network operator. • If you subscribe to high-speed internet service (Digital Subscriber Line - DSL) through your telephone lines, you must install a DSL filter between the telephone base and the telephone wall jack. The filter will prevent noise and caller ID problems caused by DSL interference.
5. General information If your product is not working properly... 1. Read this User's Guide. 2. Visit our website: www.motorola.com 3. Contact Customer Service in the US and Canada at 1-888-331-3383. To order a replacement battery pack contact customer service or visit our website. Important safety instructions Follow these safety precautions when using your phone to reduce the risk of fire, electric shock, and injury to persons or property: 1. Keep all vents and openings of the phone unblocked.
Unplug this cordless phone immediately from an outlet if: • The power cord or plug is damaged or frayed. • Liquid has been spilled on the product. • The product has been exposed to rain or water. Do not retrieve the handset or base until after you have unplugged the power and phone from the wall. Then retrieve the unit by the unplugged cords. • The product has been dropped or the cabinet has been damaged. • The product exhibits a distinct change in performance. Installation Guidelines 1.
Battery Safety Instructions • Do not burn, disassemble, mutilate, or puncture the battery. The battery contains toxic materials that could be released, resulting in injury. CAUTION There is a risk of explosion if you replace the battery with an incorrect battery type. Use only the battery pack that came with your phone or an authorized replacement recommended by the manufacturer. • Keep battery packs out of the reach of children. • Remove battery packs if storing over 30 days.
What will BINATONE do? BINATONE or its authorized distributor at its option and within a commercially reasonable time, will at no charge repair or replace any Products or Accessories that does not conform to this Warranty. We may use functionally equivalent reconditioned/ refurbished/ pre-owned or new Products, Accessories or parts.
Products Covered Length of Coverage Consumer Products One (1) year from the date of the products original purchase by the first consumer purchaser of the product. Consumer Accessories Ninety (90) days from the date of the accessories original purchase by the first consumer purchaser of the product. Consumer Products and The balance of the original Accessories that are warranty or for ninety (90) days Repaired or Replaced from the date returned to the consumer, whichever is longer.
Altered Products. Products or Accessories with (a) serial numbers or date tags that have been removed, altered or obliterated; (b) broken seals or that show evidence of tampering; (c) mismatched board serial numbers; or (d) nonconforming or non-Motorola branded housings, or parts, are excluded from coverage. Communication Services.
radio frequency energy and, if not installed and used in accordance with the instructions, may cause harmful interference to radio communications. However, there is no guarantee that interference will not occur in a particular installation.
things, a product identifier in the format US: AAAEQ##TXXXX. This identifier must be provided to your local telephone company upon request. The plug and jack used to connect this equipment to premises wiring and the telephone network must comply with applicable Part 68 rules and technical requirements adopted by ACTA. A compliant telephone cord and modular plug is provided with this product. It is designed to be connected to a compatible modular jack that is also compliant.
procedures that could affect the proper functioning of this product. The telephone company is required to notify you if such changes are planned. If this product is equipped with a corded or cordless handset, it is hearing aid compatible. If this product has memory dialing locations, you may choose to store emergency telephone numbers (e.g., police, fire, medical) in these locations.
Technical Specifications RF frequency band 1921.536 MHz -1928.448 MHz Channels 5 Operating temperature 5ºC to 45ºC Telephone base 96 — 130 Vms Voltage (AV voltage, 60Hz) Telephone base voltage(Adapter output) 6VDC, 400 mA Handset voltage 2.
Manufactured, distributed or sold by Binatone Electronics International LTD., official licensee for this product. MOTOROLA and the Stylized M Logo are trademarks or registered trademarks of Motorola Trademark Holdings, LLC. and are used under license. All other trademarks are the property of their respective owners. © 2011 Motorola Mobility, Inc. All rights reserved. Version 3.