
Instruction manual

16
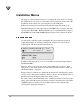
Installation Menus
The purpose of the installation menus is to configure the ports and choose settings
that remain fixed over a period of time. This section describes in detail each of the
installation menus, fields, and options displayed on the LCD panel.
Return to the main top-level menu and then select the applicable menu group.
With the blinking cursor at the upper left, press ENTER button to return to the main
top-level menu. Press the buttons until the cursor is at the Install label, and press
the ENTER button. The DSR-4410MD displays the previously selected sub-menu.
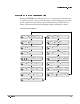
Use this menu to initially acquire a DigiCipher II system signal and download
virtual channel tables by selecting a transponder frequency for each of the two
L-Band inputs, which are labeled Port 0 and Port 1.
In addition, this menu allows a user to select ASI In as the desired signal input to
the DSR-4410MD.
However, when a port is selected, the user must additionally specify a C-band
transponder or an L-band frequency and modulation format. For more details, see
"Modulation Menu" on page 19.
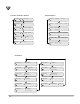
Because many broadcasters use standard North American C-band frequency plans,
you may select a transponder number for these broadcasts. Use the Xpndr option in
the Mode field and the Xpndr (transponder) fields for these.
For offset C-band, a fractional transponder, or Ku-band satellite broadcast, use the
LFreq option in the Mode field and directly enter the L-band frequency. The DSR-
4410MD requires no distinction between Ku-band and C-band signals when
selecting the L-band carrier frequency.
E Port 1 Xpndr 01 1430.00
MANUAL TUNE Input Mode Xpnr LFreq