USER’S GUIDE Wi-Fi® Home Video Camera Models: FOCUS86, FOCUS86-2, FOCUS86-B, FOCUS86-B2, FOCUS86-W, FOCUS86-W2 The features described in this user’s guide are subject to modifications without prior notice.
Welcome... to your new Motorola Wi-Fi® Home Video Camera! Thank you for purchasing your new Motorola Wi-Fi® Home Video Camera. If you have always wondered what happens when you are away, wonder no more. Now you can monitor your children, pets or property with this easy to use system. You can install the Camera only from your iPhone®/iPad® or Android™ devices and view the Camera video from your PC or Notebook, as well as from your iPhone®/iPad® or Android™ devices.
Overview of your Camera 6 1 2 8 3 9 10 4 11 7 5 1. 2. 3. 4. 5. 6. Light Sensor (for night mode detection) Camera Lens Microphone Infrared LEDs (for night vision) Temperature Sensor Power / Status indicator Speaker Micro SD Card Slot 9. ON/OFF Switch 10. Micro USB socket 11. PAIR Button 7. 8. Important guidelines for installing your Wi-Fi® Camera Unit • Use of other 2.4 GHz products, such as other wireless networks, Bluetooth® systems or microwave ovens may cause interference with this product.
Table of contents 1. 2. 3. Safety Instructions ..................................................................................... 5 System Requirements ............................................................................... 7 Getting Started - Connecting Devices ..................................................... 8 3.1 3.2 3.3 4. 5. 6. 7. 8. 9. 4 Setup............................................................................................................
ENGLISH 1. Safety Instructions WARNING: STRANGULATION HAZARD - In case this unit is being used to monitor infants or children, keep the unit and adapter cord more than 1 metre away from the cot and out of their reach. Never place the Camera or cords within a cot or near a bed. Secure the cord away from children's reach. Never use extension cords with AC Adapters. Only use the AC Adapters provided.
WARNING This Wi-Fi® Camera Unit is compliant with all relevant electromagnetic field standards and is, when handled as described in the User’s Guide, safe to use. Therefore, always read the instructions in this User’s Guide carefully before using the device. • Adult assembly is required due to small parts. Keep all small parts away from children. • This product is not a toy. Do not allow children to play with it. • This Wi-Fi® Camera Unit is not a substitute for responsible adult supervision.
ENGLISH 2. System Requirements Web Portal • Windows® 7 • Mac OS® 10.7 • Chrome™ 24 • Internet Explorer® 9 • Safari® 6 • Java™ 7 • Firefox® 18.0 • Adobe® Flash® Player 15.0 Android™ System • Version 4.2 or above iPhone®/iPad® iOS • Version 7.0 or above High Speed (Wi-Fi®) Internet • At least 0.6 Mbps upload bandwidth per camera (you can test your internet speed on this site: http://www.speedtest.
3. Getting Started - Connecting Devices How does it work? Access your Camera locally Wi-Fi Router FOCUS86 Camera View your Camera from any compatible device remotely Hubble Service When a user tries to access the Camera, our Hubble server authenticates the user’s identity and permits access to the Camera. 3.1 Setup Connect the Camera to the Power Adapter, then plug into a suitable mains power socket and make sure the ON/OFF Switch is in the ON position.
ENGLISH User Account and Camera Setup on Android™ Devices What you need • FOCUS86 Camera • Power adapter for the Camera • Device with AndroidTM system version 4.2 and above 3.2.1 Power ON and Connect the Camera • Connect the power adapter to a suitable mains power socket and insert the plug into the micro USB socket on the back of the Camera Unit. • Make sure that the ON/OFF switch is in the ON position. • The Camera’s Red LED flashes after the Camera has finished booting.
3.2.4 • Tap Add the Camera to your account on the top right corner of the screen to add camera. (Picture A2) A2 • The following setup instructions will appear on the screen. (Picture A3) A3 • Plug in and switch on the camera, and wait for a couple of minutes for it to warm up. • Tap Continue when the Camera LED starts to blink.
Android™ ENGLISH • The following setup instructions will appear on the screen. (Picture A4) A4 • Press and hold the PAIR button on the bottom left edge of the Camera Unit for 3 seconds. You will then hear a beep tone, followed by a voice prompt indicating that the Camera is ready for pairing. • Tap Continue. • The App will automatically search for and connect to your Camera as shown in the pictures below. (Pictures A5, A6) • The blue/red colour LED on the Camera Unit will flash.
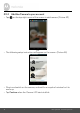
• Select your Wi-Fi® Network, enter your password and then tap Connect. (Pictures A7, A8) A8 A7 • It will take a few minutes for the Camera to connect to the Wi-Fi® network before showing the connection status. (Pictures A9, A10) • If connection fails, please tap Retry and repeat the steps starting from 3.2.4. A9 A10 • Tap View Camera to view the video captured by the Camera Unit. The LED indicator on the Camera Unit will light up in blue.
ENGLISH User Account and Camera Setup on iPhone®/iPad® What you need • FOCUS86 Camera • Power adapter for the Camera • iPhone® / iPad® with iOS version 7.0 and above 3.3.1 Power ON and Connect the Camera • Connect the power adapter to a suitable mains power socket and insert the plug into the micro USB socket at the back of the Camera. • Make sure that the ON/OFF switch is in the ON position. • The Camera's red LED flashes after the Camera has finished booting.
3.3.4 • Tap Add the Camera to your account on the top right corner of the screen to add camera. (Picture i2) i2 • The following Bluetooth setup instructions will appear on the screen.
iOS ENGLISH • Tap Settings and activate Bluetooth on your iPhone®/iPad® (Pictures i4,i5). i5 i4 • Press the HOME key to return to the home screen, then tap on "Hubble for Motorola Monitors" App to resume setup. • The following setup instructions will appear on the screen. (Picture i6) Note that if Bluetooth is on, you will be brought to this step directly. i6 • Wait for a couple of minutes for the Camera Unit to warm up and tap Continue when the Camera LED indicator starts to blink.
• The following will appear on g ppthe screen. (Pictures i7, i8) i7 i8 • Name the location of your Camera Unit and tap Continue.
ENGLISH iOS • The Camera Unit will search for the Wi-Fi® network (Picture i11) and display a list of available networks. (Picture i12) i12 i11 • Select your Wi-Fi® network and tap Continue. (Picture i13) • Enter your Wi-Fi® password and tap Next. (Picture i14) i13 i14 • It will take a few minutes for the Camera Unit to connect to the Wi-Fi® network before showing the connection status.
• If connection fails, tap Retry and repeat the steps starting from 3.3.4. i15 i16 • Tap View Live Camera to view the video captured by the Camera Unit. The LED indicator on the Camera Unit will light up in blue.
4.1 Connecting the Camera Unit to power • Connect the power adapter to a suitable mains power socket and insert the plug into the micro USB socket on the back of the Camera Unit. • Slide the ON/OFF switch to the ON position. The power indicator LED will light up in blue. (Note: To switch off the device, slide the ON/OFF switch to OFF.) • Run the Hubble App on your Android™ or iOS® device. • The Camera view appears on the screen. 4.
HD 20 Lullaby Tap to access the Melody menu and select one of the 5 pre-set melodies you wish to play on your Camera Unit. Temperature Measure The temperature reading from the temperature sensor at the back of the Camera Unit will display on the screen of your Android™ or iOS® device. The readings will turn RED if the temperature goes beyond the High/Low temperature that was set in your Account. Two-way communication Tap to activate the function.
You can change the Camera settings by tapping on the Settings icon. • Tap Details to review Camera Name, Cloud Subscription, Change Image, Timezone, Camera Model, Firmware Version and Delete All Events. • Tap Notifications to set the sensitivity of Sound Detection, Motion Detection and to set Alerts for High temperature (Up to 33 oC or 91 oF) / Low temperature (down to 10o C or 50 oF). • Tap Settings to set Ceiling mount, Brightness and Volume. Add Camera Enter Add Camera procedures.
4.3 Free Motion Recording with 24-Hour Video History Motion triggered videos with 24-Hour Video History can be stored on the preinstalled SD Memory Card. 1. 2. 3. 4. 5. 22 Tap Camera Setting icon . Tap Notifications, then Motion Detection. Activate Detect motion by tapping on the round button on the right hand side of the screen. Select SD card under Record motion. You can also select recording Off or store recording on Cloud.
• Go to URL: https://app.hubbleconnected.com/#login • Enter your User Name and Password and then click Login if you have already created an account. • Click on the Camera list paired in your account via Android™ device or iPhone®/iPad®, and the Camera view will appear on screen. You can easily stay connected with your favorite people, places and pets with live video streaming. • On the website, you can change the settings by following the menu instructions. 6.
7. Help Noise interference To avoid background noise or echoes, ensure that there is enough distance between your device and the Wi-Fi® Camera Unit. Use of other 2.4 GHz products, such as Bluetooth® systems or microwave ovens, may cause interference with this product. Keep the Wi-Fi® Camera Unit at least 1.5m away from these types of products, or turn them off if they appear to be causing interference. Lost connection Check your Wi-Fi® settings. If necessary reconnect your Wi-Fi®.
The e-mail might have been sent to your Junk Mail Folder. Please check your Junk Mail Folder. There might be a delay in getting your e-mail. Please wait a few minutes and refresh your e-mail account. 1. Connectivity I get a message: We Issues are having problems accessing your Camera. This could be 2. due to the lack of an internet connection. Please wait and try 3. again later. Please try again in a few minutes. This could be because of any issue with your internet connection.
Setting Up While I am adding a new Camera to my account, I am not able to find any Cameras to add. If you are trying to add a Camera which has previously been added into your account or another account, you will first have to reset the Camera. This can be done by pressing and holding the PAIR button at the bottom of the Camera for 5 seconds. General What are the supported browsers for accessing from my PC/ Mac? We recommend using Google Chrome 24 or above.
Please reset the Camera to setup mode and try again. Press and hold the PAIR button on the bottom of the Camera untill you hear a beep. Wait for a minute for the Camera to restart. When the Camera LED is flashing, this indicates that it is in setup mode. Now restart the setup from your smartphone again. Connectivity Even though I am Issues accessing my Camera from the same Wi-Fi® network, I still find my Camera is shown as remote. I can only access it for 5 minutes at a time.
General I do not hear any sound You can tap on the speaker icon in the when I am accessing a video stream screen to hear audio. By default the audio is not ON when you remote Camera. are accessing a remote Camera. General What is the meaning of When you are accessing your Camera from the same wireless network (Home) "Local Camera" and in which it is configured, "Remote Camera"? it is a Local Camera. When you are accessing your Camera away from your home it is a Remote Camera.
When the video is cut You will need to turn off the Auto Lock function of your device to ensure off, the application attempts to reconnect continuous video/audio streaming. and this results in lost sound and choppy video. Features How many users can access the Camera at one time? Connectivity I found interference issues caused by my other webcam devices. Help If you are accessing in Local Mode, two users are supported, after two users all streaming will go through the remote server.
8. General Information If your product is not working properly.... 1. 2. 3. Read this User's Guide or the Quick Start Guide. Visit our website: www.motorolahome.com/support Contact Customer Service at +49 (0) 1805 938 802 (Europe) E-mail: motorola-mbp@tdm.de Consumer Products and Accessories Limited Warranty ("Warranty") Thank you for purchasing this Motorola branded product manufactured under license by Binatone Electronics International Ltd ("BINATONE").
ANY IMPLIED WARRANTIES, INCLUDING WITHOUT LIMITATION THE IMPLIED WARRANTIES OF MERCHANTABILITY AND FITNESS FOR A PARTICULAR PURPOSE, SHALL BE LIMITED TO THE DURATION OF THIS LIMITED WARRANTY, OTHERWISE THE REPAIR OR REPLACEMENT PROVIDED UNDER THIS EXPRESS LIMITED WARRANTY IS THE EXCLUSIVE REMEDY OF THE CONSUMER, AND IS PROVIDED IN LIEU OF ALL OTHER WARRANTIES, EXPRESS OR IMPLIED.
Products Covered Consumer Products Length of Coverage Two (2) years from the date of the Products, original purchase by the first consumer purchaser of the product. Consumer Accessories Ninety (90) days from the date of the Accessories, original purchase by the first consumer purchaser of the product. Consumer Products and Accessories The balance of the original warranty or that are Repaired or Replaced for Ninety (90) days from the date returned to the consumer, whichever is longer.
Communication Services. Defects, damages, or the failure of Products or Accessories due to any communication service or signal you may subscribe to or use with the Products or Accessories is excluded from coverage. How to Obtain Warranty Service or Other Information? To obtain service or information, please call: +49 (0) 1805 938 802 (Europe) E-mail: motorola-mbp@tdm.de You will receive instructions on how to ship the Products or Accessories at your expense and risk, to a BINATONE Authorised Repair Centre.
BINATONE TELECOM PLC 1 Apsley Way London NW2 7HF,United Kingdom. Tel: +44(0) 20 8955 2700 Fax: +44(0) 20 8344 8877 e-mail: binatoneuk@binatonetelecom.co.uk ________________________________________ . EC Declaration of Conformity We the manufacturer / Importer : Binatone Telecom Plc 1 Apsley Way London NW2 7HF, United Kingdom.
ENGLISH 9. Technical Specifications Camera Unit Wi-Fi® 802.11 b/g/n Image sensor Colour CMOS 1M Pixels Lens f = 2.3 mm, F = 2.4 IR LED 7 pcs Power Adapter Ten Pao International Ltd.
Manufactured, distributed or sold by Binatone Electronics International LTD., official licensee for this product. MOTOROLA and the Stylised M logo are trademarks or registered trademarks of Motorola Trademark Holdings, LLC. and are used under license. Apple logo and Safari are trademarks of Apple Inc., registered in the U.S. and other countries. App Store is a service mark of Apple Inc. Google Play, Android, and Chrome are trademarks of Google Inc. Wi-Fi is a trademark of the Wi-Fi Alliance.