Mini Hi-Fi System C155 FW- 1
Important notes for users in the U.K. DICHIARAZIONE DI CONFORMITA’ Mains plug This apparatus is fitted with an approved 13 Amp plug. To change a fuse in this type of plug proceed as follows: Si dichiara che l’apparecchio FW-C155 Philips risponde alle prescrizioni dell’art. 2 comma 1 del D.M. 28 Agosto 1995 n. 548. 1 2 Remove fuse cover and fuse. Fatto a Eindhoven 3 Refit the fuse cover. Fix new fuse which should be a BS1362 5 Amp, A.S.T.A. or BSI approved type.
2 4 ( ) 2 CD 1/2/3 TUNER REPEAT TAPE 1/2 DIM SHUFFLE SLEEP % VOL ë í ^ Å É Ç á á 5 8 2 £ # ™ DSC DBB MUTE MUTE ¡ NEWS/TA * FW- 3CD MINI HIFI SYSTEM CHANGER CD / CD-R / CD-RW COMPATIBLE 1 2 3 ECO POWER TAPE 1 • 2 BAND DIGITAL SOUND CONTROL MASTER VOLUME TUNER CD 1 OPTIMAL TAPE CD 2 ^ CD 3 DSC VOLUME SEARCH •TUNING ROCK PREV/PRESET DISC CHANGE ▲ OPEN/ CLOSE TECHNO CD JAZZ 4 5 6 7 8 & STANDBY ON PLAY• PAUSE STOP• CLEAR / DEMO STOP SEARCH •TUNING NEXT/ PRES
DK SF Advarsel: Usynlig laserstråling ved åbning når sikkerhedsafbrydere er ude af funktion. Undgå utsættelse for stråling. Luokan 1 laserlaite Varoitus! Laitteen käyttäminen muulla kuin tässä käyttöohjeessa mainitulla tavalla saattaa altistaa käyttäjän turvallisuusluokan 1 ylittävälle näkymättömälle lasersäteilylle. Oikeus muutoksiin varataan. Laite ei saa olla alttiina tippu-ja roiskevedelle. Bemærk: Netafbryderen er sekundært indkoblet og ofbryder ikke strømmen fra nettet.
English Index Français English ------------------------------------------------ 6 Español Français -------------------------------------------- 28 Deutsch Español --------------------------------------------- 50 Nederlands Deutsch --------------------------------------------- 73 Italiano Nederlands ---------------------------------------- 95 Svenska Italiano -------------------------------------------- 117 Dansk Svenska ------------------------------------------- 140 Suomi Dansk -----------
Contents English General Information Supplied accessories ............................................ Acknowledgement ............................................... Environmental information ................................ Safety information ................................................ Radio Reception 7 7 7 7 Preparations Rear connections .............................................
This product complies with the radio interference requirements of the European Community. Supplied accessories – – – – 2 speaker boxes remote control AM loop antenna FM wire antenna Acknowledgement Energy Star As an ENERGY STARR Partner, Philips has determined that this product meets the ENERGY STARR guidelines for energy efficiency. Environmental information All unnecessary packaging has been omitted.
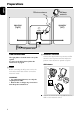
Preparations English FM wire antenna speaker (right) 220V240V speaker (left) C VOLTAGE SELECTOR 110V127V + R – AM loop antenna – L + B A AC power cord Rear connections The type plate is located at the rear of the system. For users in the U.K.: please follow the instructions on page 2. B Antennas Connection Connect the supplied AM loop antenna and FM antenna to the respective terminals. Adjust the position of the antenna for optimal reception.
FM Antenna English Preparations Inserting batteries into the remote control Insert two batteries type R03 or AAA (not supplied) into the remote control with the correct polarity as indicated by the "+" and "-" symbols inside the battery compartment. ● For better FM stereo reception, connect an outdoor FM antenna to the FM ANTENNA terminal.
Controls (illustrations on page 3) English Controls on the system and remote control ! Tape deck 2 operation É .......................... to start playback. à / á ............... to rewind or fast forward. 70 ........................ to stop playback or to open the tape door. Å .......................... to interrupt playback. 1 STANDBY ON y – to switch the system on or to standby mode. 2 TUNER (BAND) – to select waveband : FM or MW. – TAPE (TAPE 1•2) to select tape mode.
English Controls PREV í / PRESET 4 NEXT ë / PRESET3 for CD ................. to skip to the beginning of the current, previous, or next track. for Tuner ............. to select a preset radio station. for Clock ............ (on the system only) to set the minute. & Display screen – to view the current status of the system. * Disc tray ( REPEAT – to playback track(s)/disc(s)/programme repeatedly. ) SHUFFLE – to playback all available discs and their tracks/ programme in random order.
Basic Functions English 2 STANDBY ON CD 1/2/3 TUNER REPEAT ECO POWER DIM SHUFFLE SLEEP TAPE 1 • 2 BAND DIGITAL SOUND CONTROL TAPE 1/2 MASTER VOLUME TUNER TAPE VOL CD 1 OPTIMAL CD 2 CD 3 HNO T EC VOLUME SEARCH •TUNING ROCK PREV/PRESET DISC CHANGE ▲ JAZZ OPEN/ CLOSE DSC PLAY• PAUSE STOP• CLEAR / DEMO STOP NEXT/ PRESET▲ Å É Ç SEARCH •TUNING á á DYNAMIC BASS BOOST PROGRAM CLOCK•TIMER DIM MODE DSC DBB MUTE IMPORTANT! Before you operate the system, complete the preparation p
Demonstration mode The system has a demonstration mode that shows the various features offered by the system. To activate the demonstration ● In standby mode, press and holdÇon the system until " WELCOME" is displayed. ➜ The demonstration will begin. To deactivate the demonstration ● Press and holdÇon the system until "DEMO OFF" is displayed. ➜ The system will switch to standby mode.
Basic Functions English Volume control Press MASTER VOLUME v or w (VOL + or - on the remote control) to increase or decrease the volume level. To listen through the headphones ● Connect the headphones plug to the n socket at the front of the system. ➜ The speakers will be muted. To switch off the volume temporarily ● Press MUTE on the remote control. ➜ Playback will continue without sound and "MUTE" is displayed. ● To restore the volume, press MUTE again or increase the volume level.
English CD Operation 3CD MINI HIFI SYSTEM FW- CHANGER CD / CD-R / CD-RW COMPATIBLE 2 STANDBY ON CD 1/2/3 TUNER REPEAT ECO POWER DIM SHUFFLE SLEEP TAPE 1 • 2 BAND DIGITAL SOUND CONTROL TAPE 1/2 MASTER VOLUME TUNER TAPE VOL CD 1 OPTIMAL CD 2 CD 3 HNO T EC VOLUME SEARCH •TUNING ROCK PREV/PRESET DISC CHANGE ▲ JAZZ OPEN/ CLOSE DSC ë í CD PLAY• PAUSE STOP• CLEAR / DEMO STOP Å É Ç SEARCH •TUNING á á NEXT/ PRESET▲ DYNAMIC BASS BOOST DSC PROGRAM CLOCK•TIMER DIM MODE DBB
CD Operation English Playing discs Replacing discs during playback 1 Press DISC CHANGE. ➜ The disc tray will open without interrupting current playback. 2 To change the inner disc, press DISC CHANGE again. ➜ "DISC CHANGE" is displayed and the disc will stop playing. ➜ The disc tray will close to retrieve the inner disc, then reopen with the inner disc accessible.
Programming the disc tracks Programming tracks is possible when playback is stopped. Up to 40 tracks can be stored in the memory in any order. 1 Load the desired discs on the disc tray (refer to “Loading discs”). 2 Press PROGRAM to start programming. ➜ PROG starts flashing. 3 4 Press CD 1/2/3 to select a disc. Erasing the programme ● Press Ç once when playback is stopped or twice during playback. ➜ PROG disappears and "PROGRAM CLEARED" is displayed.
Radio Reception English 2 STANDBY ON CD 1/2/3 TUNER REPEAT ECO POWER DIM SHUFFLE SLEEP TAPE 1 • 2 BAND DIGITAL SOUND CONTROL TAPE 1/2 MASTER VOLUME TUNER TAPE VOL CD 1 OPTIMAL CD 2 CD 3 HNO T EC VOLUME SEARCH •TUNING ROCK PREV/PRESET DISC CHANGE ▲ JAZZ OPEN/ CLOSE DSC PLAY• PAUSE STOP• CLEAR / DEMO STOP á á NEXT/ PRESET▲ DYNAMIC BASS BOOST DSC DBB MUTE Tuning to radio stations Press TUNER to select TUNER mode. ➜ "TUNER" is displayed.
To stop storing the automatic preset ● Press PROGRAM or Ç on the system. Note: – If no preset number is selected, automatic preset will begin from preset (1) and all your former presets will be overridden. Manual Preset Programming 1 Tune to your desired radio station (refer to “Tuning to radio stations”). 2 Press PROGRAM. ➜ PROG starts flashing. ➜ The next available preset number is displayed for selection.
Tape Operation/Recording English 2 STANDBY ON CD 1/2/3 TUNER REPEAT ECO POWER DIM SHUFFLE SLEEP TAPE 1 • 2 BAND DIGITAL SOUND CONTROL TAPE 1/2 MASTER VOLUME TUNER TAPE VOL CD 1 OPTIMAL CD 2 CD 3 HNO T EC VOLUME SEARCH •TUNING ROCK PREV/PRESET DISC CHANGE ▲ JAZZ OPEN/ CLOSE DSC ë í CD PLAY• PAUSE STOP• CLEAR / DEMO STOP Å É Ç SEARCH •TUNING á á NEXT/ PRESET▲ DYNAMIC BASS BOOST DSC PROGRAM CLOCK•TIMER DIM MODE DBB MUTE MUTE NEWS/TA PLAY / REC IMPORTANT! – Before pl
IMPORTANT! – Recording is permissible if copyright or other rights of third parties are not infringed upon. – Recording is possible only on tape deck 1. Rewinding / Fast forwarding 1 Stop playback, press à or á. ➜ The tape will stop automatically at the end of rewinding or fast forwarding. 2 Press 70 to stop rewinding or fast forwarding. Preparation for recording Note: – During rewinding or fast forwarding of a tape, it is also possible to select another source (CD or TUNER, for example).
Tape Operation/Recording English CD Synchronised start recording 1 Press CD 1/2/3 to select the disc. ● You can programme the tracks in the order you want them to be recorded (refer to “CD Operation - Programming the disc tracks”). 2 Press ● on tape deck 1 to start recording. ➜ The disc will start playback automatically. To stop recording ● Press 70 on tape deck 1, then press Ç to stop disc playback. Note: – During CD synchronised start recording, do not fast forward/rewind the tape in tape deck 2.
English Clock/Timer 2 STANDBY ON CD 1/2/3 TUNER REPEAT ECO POWER DIM SHUFFLE SLEEP TAPE 1 • 2 BAND DIGITAL SOUND CONTROL TAPE 1/2 MASTER VOLUME TUNER TAPE VOL CD 1 OPTIMAL CD 2 CD 3 HNO T EC VOLUME SEARCH •TUNING ROCK PREV/PRESET DISC CHANGE ▲ JAZZ OPEN/ CLOSE DSC ë í CD PLAY• PAUSE STOP• CLEAR / DEMO STOP Å É Ç SEARCH •TUNING á á NEXT/ PRESET▲ DYNAMIC BASS BOOST DSC PROGRAM CLOCK•TIMER DIM MODE DBB MUTE IMPORTANT! When in Eco Power standby mode, it is not possible
Clock/Timer English 1 2 Press and hold CLOCK•TIMER for more than two seconds to select timer mode. ➜ "12:00 AM" or "00:00" or the last timer setting starts flashing. ➜ starts flashing. Press CD 1/2/3, TUNER or PROGRAM to select the desired source. ➜ “CD1 [or 2, 3] XX:XX" indicates the CD mode is selected. ➜ “TU XX:XX” indicates the Tuner mode is selected. ➜ “PROG XX:XX" indicates the CD programme mode is selected.
AMPLIFIER Output power ...................................... 2 x 10 W MPO ...................................................................... 2 x 5 W RMS(1) Signal-to-noise ratio .......................... ≥ 67 dBA (IEC) Frequency response .......................... 50 – 15000 Hz Impedance loudspeakers ......................................... 3 Ω Impedance headphones ................. 32 Ω – 1000 Ω (1) (3 Ω, 1 kHz, 10% THD) CD PLAYER Number of programmable tracks .........................
Maintenance English Cleaning the Cabinet ● Use a soft cloth slightly moistened with a mild detergent solution. Do not use a solution containing alcohol, spirits, ammonia or abrasives. Cleaning Discs ● When a disc becomes dirty, clean it with a cleaning cloth. Wipe the disc from the centre out. Do not wipe in circular motion. ● Do not use solvents such as benzene, thinner, commercially available cleaners, or antistatic spray intended for analogue records.
RADIO RECEPTION Radio reception is poor. TAPE OPERATION/RECORDING Recording or playback cannot be made. GENERAL The system does not react when buttons are pressed. Sound cannot be heard or is of poor quality. The left and right sound outputs are reversed. The remote control does not function properly. The timer is not working. Not all lighted buttons are showing light. The Clock/Timer setting is erased. The system displays features automatically.