EN DE FR ES IT PR DA GP680 SV NL RU CZ HU PL RO TU and Motorola are registered trademarks of Motorola Inc. Professional Radio and GP are trademarks of Motorola Inc. © 2003 Motorola, Inc. All rights reserved. Printed in the European Union.
10B19_Inside Cover.
10B19B_EN.fm Page 1 Friday, May 23, 2003 11:00 AM CONTENTS General Information . . . . . . . . . . . . . . . . . 2 Accessory Information . . . . . . . . . . . . . .14 Operation and Control Functions. . . . . . 3 Attaching/Removing the Battery . . . . . . . .14 Attaching/Removing the Belt Clip . . . . . . .14 Radio Controls . . . . . . . . . . . . . . . . . . . . . . 3 Audio Signal Tones . . . . . . . . . . . . . . . . . . 4 Programmable Buttons . . . . . . . . . . . . . . . 6 Menu Keys . . . . . . . .
10B19B_EN.fm Page 2 Friday, May 23, 2003 11:00 AM BASIC USER GUIDE GENERAL INFORMATION This user guide covers the basic operation of the GP680 Portable Radio. Please consult your dealer for further, more detailed information which is contained in a full feature user guide 68P64110B29_. ! Caution Before using this product, read the operating instructions for safe usage contained in the Product Safety and RF Exposure booklet 68P64117B25_ enclosed with your radio.
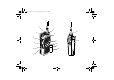
10B19B_EN.fm Page 3 Friday, May 23, 2003 11:00 AM 8. LED Indicator Green: Flashes to indicate NO SERVICE. Red: On when radio is transmitting. Red Flashing: When transmitting - battery low. Red Flashing: When receiving - channel busy (Conventional Mode). 9. Microphone Radio Controls The numbers below refer to the illustrations on the inside front cover. 1. 2. Rotary Knob Used as a channel selector and for multifunction scrolling.
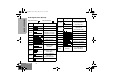
10B19B_EN.fm Page 4 Friday, May 23, 2003 11:00 AM BASIC USER GUIDE Audio Signal Tones (Normal) High pitched tone Tone Signal Self test Tone Signal Low pitched tone Description Description Key click Confidence tone when any key pressed or Call ending alert. Fail tone Hardware error or Call timed out (conventional mode). Power up. Tone A Call clear indication. Tone B Traffic channel allocated or PTT/ Mic/ Loudspeaker enabled. Tone I Low battery warning. Tone K1 Voice Storage recording.
10B19B_EN.fm Page 5 Friday, May 23, 2003 11:00 AM High to Low pitched tones Tone Signal Key click Confidence tone when any key pressed or Speech limitation alert. Fail tone Hardware error or Call timed out (conventional mode). Tone I Low battery warning. System busy. Tone K1 Voice Storage recording. Unavailable. Tone K2 Voice Storage warning. Tone K3 Voice Storage full. Tone M1 Talkgroup Confirmation. Tone M2 Talkgroup unavailable. Tone N1 Out of range alert.
10B19B_EN.fm Page 6 Friday, May 23, 2003 11:00 AM BASIC USER GUIDE Programmable Buttons Several of your radio’s keys and buttons can be programmed byyour dealer as short-cut buttons for many of the radio’s features. Programmable buttons include: • The top button, side buttons 2 and 3. Check with your dealer for a complete list of the functions your radio supports. Menu Keys Menu/Select Key c Used to enter the Menu Mode. When you are in the Menu Mode, this key is also used to make menu selections.
10B19B_EN.fm Page 7 Friday, May 23, 2003 11:00 AM (Refer to Menu Navigation guidelines lower, left-hand corner of this page) +e Missed Calls Contact List select/ ID status/ voice/ voice playback select/ enter ID Status select/ enter ID c Data Calls User Absent select/ enter ID +e Add Contact Delete Contact Personality Voice Storage select/ 1,2....
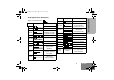
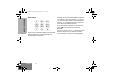
B19B_EN.fm Page 8 Friday, May 23, 2003 11:00 AM BASIC USER GUIDE Keypad Keys 1 4 7 * 2 5 8 0 3 6 9 # These keys are used when dialling a phone number, making a radio call or entering information for programming the radio’s lists. English 8 Each key can generate several different characters. For example, to enter the character “C”, press the 2 key three times. Refer to the following table. Pressing # will toggle between the upper and lower case of the selected character.
10B19B_EN.fm Page 9 Friday, May 23, 2003 11:00 AM Number of Times Key is Pressed Key 1 2 3 4 5 6 7 8 9 10 0 + - 0 x * / = > < # 1 .
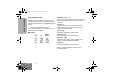
10B19B_EN.fm Page 10 Friday, May 23, 2003 11:00 AM BASIC USER GUIDE LCD Display and Icons Symbol L Displays channel, menu, and radio status information. The top two screen rows show radio status indicator symbols, explained in the table below: Symbol A B Name and Description XPAND™ Indicator Indicates that you have activated the companding feature. Power Level Indicator “R” lights when your radio is configured to transmit in Low Power.
10B19B_EN.fm Page 11 Friday, May 23, 2003 11:00 AM Radio On-Off/Volume Control To turn the radio on, turn the On-Off/Volume Control knob clockwise. To turn the radio off, turn the On-Off/Volume Control knob counterclockwise until you hear a click. Radio Operation When the self test is complete the radio will display: Freetext After this text has been displayed, the radio will scan for system access with the LED on the top of the radio flashing GREEN and the scanning icon G lit.
10B19B_EN.fm Page 12 Friday, May 23, 2003 11:00 AM BASIC USER GUIDE Cancelling a Call At any time while setting up a call it may be cancelled by pressing the clear button, the x key or by dialling *#. The call timer can also cancel a call. • The battery should be at about 25°C/77°F (room temperature) whenever possible. Charging a cold battery (below 10°C/50° F) may result in leakage of electrolyte and ultimately, in failure of the battery.
10B19B_EN.fm Page 13 Friday, May 23, 2003 11:00 AM At the end of its useful life, the NiCd battery can be recycled. However, recycling facilities may not be available in all areas. Charger LED NiCd Motorola endorses and encourages the recycling of all re-chargeable batteries. Contact your dealer for further information. Charging the Battery If a battery is new, or its charge level is very low, you will need to charge the battery before you can use it in your radio.
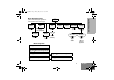
BASIC USER GUIDE 10B19B_EN.fm Page 14 Friday, May 23, 2003 11:00 AM ACCESSORY INFORMATION Attaching the Belt Clip Attaching the Battery 1. Align the grooves of the belt clip with those of the battery. 2. Press the belt clip downwards until a click is heard. 1. 2. Fit the extensions at the bottom of the battery into the slots at the bottom of the radio’s body. 2 Press the top part of the battery towards the radio until you hear a click.
10B19_Inside Cover.
EN DE FR ES IT PR DA GP680 SV NL RU CZ HU PL RO TU and Motorola are registered trademarks of Motorola Inc. Professional Radio and GP are trademarks of Motorola Inc. © 2003 Motorola, Inc. All rights reserved. Printed in the European Union.