
Portable Radio User Manual


30
General Since this product disassembles and reassembles without the use of
any screws, it is important for the technician to pay particular
attention to the snaps and tabs, and how parts align with each other.
NOTE: In the disassembly/reassembly procedure, the
numbers in parentheses refer to call-out
numbers in the referenced figures.
Disassembly to Board
Level
1. Turn off the radio.
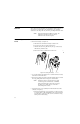
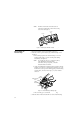
2. Remove the battery (see Figure 4).
a. Hold the radio such that the battery is tilted down.
b. Press down on the two battery-release levers.
c. With the release levers pulled down, the top of the battery
will fall away from the radio.
d. Remove the battery completely from the radio.
3. Loosen the antenna by turning it in a counterclockwise direction,
and remove it from the radio.
4. Remove the volume on/off knob and the channel selector switch
knob by pulling them off their respective switch shafts.
NOTE: Both knobs slide on and off but fit very snug
on their respective switch shafts. A small flat
blade screwdriver may be necessary to help pry
the knobs loose. Take care not to mar the
surrounding radio surface.
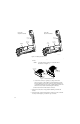
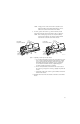
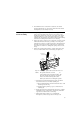
5. Separate the front cover assembly from the internal electronics
(chassis) (see Figure 5).
a. Insert the chassis/front cover separation tool (Motorola part
no. 6680334E07) or like instrument in the slotted area at the
bottom center of the radio. Take care not to mar the O-ring
sealing area on the housing.
MAEPF-22524-A
A
Figure 4 Removing the Battery