
User`s guide


47
About Phonebook Entries
6
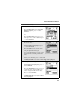
If you want to assign a voice name to the
number:
With the Vo ice N am e field highlighted,
press B under RECORD.
As directed by the screen prompts, say and
repeat the name you want to assign to the
number. Speak clearly into the
microphone.
An ) icon appears in the Voice Name
field indicating that the voice name has been recorded.
USER TIP: For best results, record in a quiet environment.
7
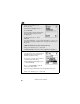
If you want to store more phone numbers
to the name associated with this
Phonebook entry:
Press R to scroll to the bottom of the
Type field and then press B under
CHANGE.
AnewType field appears for the
additional number.
Enter the information for the additional
phone number using step 3 through step 7.
NOTE:Each name in your Phonebook may have up to seven phone
numbers and one Private ID associated with it.
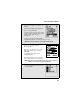
8
When you have entered all the information
you wanted in this Phonebook entry, press
A under DONE.
M
b
T
N