User’s Guide For LS720D 7” Dual Digital Photo Frames with Slideshow Warning Use only the power adapter supplied with your product.
Welcome... to your new Motorola Digital Photo Frame! Please retain your original dated sales receipt for your records. For warranty service of your Motorola product, you will need to provide a copy of your dated sales receipt to confirm warranty status. Registration is not required for warranty coverage. For product-related questions, please call: 1-888-331-3383 in US and Canada 0845 218 0890 in UK (65) 68412668 in Singapore On the Web: www.motorola.
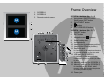
Frame Overview 1. SCREEN 1 2. SCREEN 2 3. Remote control sensor SCREEN 2 buttons (No. 1 ~ 4) 1. Long press: ON/OFF button Short press: EXIT button 2. RIGHT/NEXT button 3. button 4. LEFT/PREVIOUS button SCREEN 1 buttons (No. 5 ~ 7) 5. ON/OFF button 6. EXIT button 7. 8. 9. 10. 11. 12. Navigation and buttons Stand locking slot Loudspeakers Hanging slot (Landscape position) Hanging slot (Portrait position) Earphone jack for connecting to an earphone/headset or external speaker to play the audio. 13.
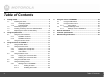
Table of Contents 1. 2. 3. 4 Getting started ................................................................................5 1.1 Installing the stand ..........................................................6 1.1.1 Landscape position ..............................................6 1.1.2 Portrait position ....................................................7 1.2 Connecting to power .......................................................9 1.3 Inserting a memory card or a USB flash drive ...............
1. Getting started WARNING Do not place your digital photo frame in the bathroom or other humid areas. Do not place your digital photo frame near sources of heat and extreme temperatures, such as fluorescent lighting, microwave ovens, heating appliances and direct sunlight. Do not disassemble your digital photo frame; there are no user-serviceable parts inside. If the LCD screen breaks, do not touch the glass or liquid. Contact Motorola customer support for assistance.
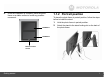
1.1 Installing the stand 3. Insert the stand into the stand locking slot as illustrated, until the stand is secured to the photo frame. 1.1.1 Landscape position To place the photo frame in landscape position, follow the steps below to install the stand. 1. 2. Hold the photo frame in landscape position. Attach the stand to the stand locking slot on the back of the photo frame. WARNING Do not rotate the stand during the installation. Otherwise, the photo frame will be damaged.
4. Once the installation is complete, place the photo frame on a stable surface to avoid any possible movement. 1.1.2 Portrait position To place the photo frame in portrait position, follow the steps below to install the stand. 1. 2. SCREEN 1 Hold the photo frame in portrait position. Attach the stand to the stand locking slot on the back of the photo frame.
3. Insert the stand into the stand locking slot as illustrated, until the stand is secured to the photo frame. 4. Once the installation is complete, place the photo frame on a stable surface to avoid any possible movement. Remote control sensor SCREEN 2 SCREEN 1 WARNING Do not rotate the stand during the installation. Otherwise, the photo frame will be damaged.
1.2 Connecting to power Follow the steps below to connect the photo frame to a power outlet to turn on the power. 1. Plug one end of the AC power adapter to the power jack on the back of the photo frame. 2. Plug the other end into a power outlet. The power of the photo frame will be turned on. 1.3 Inserting a memory card or a USB flash drive The photo frame is preloaded with some photos in the internal memory.
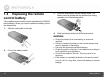
1.4 Replacing the remote control battery 3. Insert the new battery into the battery holder. The battery must be placed with the positive pole facing upwards in the illustrated position. 4. Slide the battery holder into the remote control. The supplied remote control comes installed with a CR2025 lithium battery. When you need to replace the battery, follow the steps below. 1. Slide the locking tab to the right. WARNING 2. 10 Pull out the battery holder.
2. Using the photo frame 2.1 Using the control buttons To operate the photo frame, you can: Use the control buttons on the back of the photo frame Or Use the supplied remote control NOTE There are two sets of control buttons on the back, “SCREEN 1 buttons” and “SCREEN 2 buttons”. You can use “SCREEN 1 buttons” to operate SCREEN 1, and use “SCREEN 2 buttons” to operate SCREEN 2. To operate and set up full functions of the photo frame, use the “SCREEN 1 buttons”.
No. Description No. Description Control buttons for SCREEN 2 Control buttons for SCREEN 1 3 7 4 button Enters/confirms the selection. Starts/pauses the slideshow. Navigation and buttons LEFT/PREVIOUS button Moves left. Moves to the previous item. Control buttons for SCREEN 1 5 ON/OFF button Turns on the screen backlight for SCREEN 1. Turns off the screen backlight for SCREEN 1 to enter Standby mode. 6 EXIT button Returns to the Main Menu. Goes back to the previous page. Stops the playback.
2.1.1 SCREEN 1 buttons When using the Main Menu Button UP/VOL DOWN/VOL! LEFT RIGHT Function Selects Internal Memory, USB or Memory Card. Selects Internal Memory, USB or Memory Card. Selects Photo, Music, Calendar or Settings menu. Selects Photo, Music, Calendar or Settings menu. Enters sub-pages of Photo, Music, Calendar or Settings menu. When browsing photos in thumbnail view Button UP/VOL DOWN/VOL! LEFT RIGHT EXIT Function Moves up. Moves down. Moves left. Moves right.
When using the Calendar menu Button LEFT RIGHT EXIT Function Selects Photo, Music, Calendar or Settings menu. Selects Photo, Music, Calendar or Settings menu. Enters Calendar full screen mode when the Calendar menu is selected. Goes back to the previous page. 2.1.2 SCREEN 2 buttons When playing a slideshow Button ON/OFF and EXIT When using the Settings menu Button UP/VOL DOWN/VOL! LEFT RIGHT EXIT 14 Function Moves up to the previous sub-menu in Settings. Moves down to the next sub-menu in Settings.
2.2 Using the remote control The following table describes the buttons and their functions that are available on the supplied remote control. SCREEN 1 buttons No. Description 1 ON/OFF Turns on the screen backlight for SCREEN 1 Turns off the screen backlight for SCREEN 1 to enter Standby mode. MENU You can press this button to activate or deactivate Copy One, Copy All, Delete One or Delete All options in Thumbnail mode and Music Player. UP/VOL Moves up or increases the volume.
SCREEN 1 buttons SCREEN 2 buttons No. Description No. Description 7 SETUP You can press this button to access the Settings menu. EXIT Goes back to the previous page. RIGHT/NEXT Moves right or selects the next item. 12 LEFT/PREVIOUS Displays the previous photo. ON/OFF Turns on the screen backlight for SCREEN 2 Turns off the screen backlight for SCREEN 2 to enter Standby mode. RIGHT/NEXT Displays the next photo.
3. Using the menus in SCREEN 1 3.1 Using the Main Menu After turning on the power of the photo frame, photos will play in slideshow mode automatically. If a memory card has been inserted, photos in the card will play in slideshow mode automatically. To exit slideshow mode and return to the Main Menu, press the EXIT button on the back of the photo frame.
3.2 Using the Photo menu NOTE The photo frame only supports JPEG (*.jpg) image file format. 1. In the Main Menu, press the LEFT or RIGHT button to select the Photo menu. 2. Press the UP/VOL select a device. 3. Press the button to enter Photo Viewer, which displays your photos in thumbnail view. In Photo Viewer, both photos and folders may display, depending on the content stored in your device. or DOWN/VOL! button to To browse or select a photo, use the UP/VOL DOWN/VOL!, LEFT and RIGHT buttons.
3.2.1 Copying one or all photos 3. NOTE then press the To copy photos from your memory card or USB to the internal memory, please insert your memory card or USB flash drive first. Use the supplied remote control for this operation. 1. Press the LEFT or RIGHT button to select Yes, and In Photo Viewer, press the MENU button on the remote control. Copy One, Copy All, Delete One and Delete All options will appear on the screen. 4. button.
3.2.3 Auto rotation The photo frame has a built-in tilt sensor that allows the photo frame to determine its own orientation relative to gravity and thereby automatically switch from displaying photos in landscape position to displaying photos in portrait position.
3.3 NOTE The photo frame only supports MP3 (*.mp3) audio file format. 1. 2. 3. During music playing, volume bar shows on top right corner. To increase or decrease the volume, press the UP/VOL or DOWN/VOL! button. Using the Music menu In the Main Menu, press the LEFT or RIGHT button to select the Music menu. Press the UP/VOL or DOWN/VOL! button to select a device. Press the 3.3.
2. Press the LEFT or RIGHT button to select Copy One or Copy All, and then press the 3. button. Press the LEFT or RIGHT button to select Yes, and 3.3.2 Deleting one or all music files NOTE Use the supplied remote control for this operation. then press the 4. button. 1. In Music Player, press the MENU button on the remote control. Copy One, Copy All, Delete One and Delete All options will appear on the screen. 2.
3.4 1. 2. Using the Calendar menu In the Main Menu, press the LEFT or RIGHT button to select the Calendar menu. Press the button to enter the Calendar preview screen, and then press the button again to enter full screen mode in the Calendar menu. The slideshow automatically starts. Using the menus in SCREEN 1 3. In full screen calendar mode, you can press the button to display one specific still photo or enter slideshow mode. To switch to next or previous photo, press the RIGHT or LEFT button.
3.5 Using the Settings menu 1. In the Main Menu, press the LEFT or RIGHT button to select the Settings menu. 2. Press the 3.5.1 Settings menu in SCREEN 1 You can control all function settings of the photo frame from the Settings menu in SCREEN 1. button to enter the Settings menu. To move among sub-menus under Settings, press the UP/VOL or DOWN/VOL! button. To apply the settings you have selected, press the button. To go back to the previous page, press the EXIT button.
Sub-menu Option Description/Function Transition effect No effect Random Fade out Fade in Left to Right Horizontal open Horizontal close Year Month Day Hour Minute Time Format Selects the transition effect to be applied in slideshow. Date & Time setting Using the menus in SCREEN 1 Alarm setting Alarm on/off Alarm hour Alarm minute Volume Tone Day Allows you to set up the date and time. Activates/deactivates the alarm clock function. Sets the alarm hour. Sets the alarm minute.
Sub-menu Option Description/Function Languages English Français Deutsch Italiano Español Português Nederlands P !!"#$ Svenska Dansk Suomi Norsk Polski Magyar %&'() Türkçe *++,-./0 Selects an OSD (On-screen display) language. On/Off schedule Display Photo view options Music slideshow Auto On/Off Auto on hour Auto on minute Auto off hour Auto off minute Brightness Contrast Original Fit to screen On Off Enables/disables the Auto power on/power off options.
Sub-menu Option Description/Function Copy option Original size Use the original file size when copying photos or music. Use the reduced file size when copying photos or music. Cancels the task. Resets to system default settings. Cancels the task. Formats the internal memory. WARNING: This option will delete all the photo and music files stored on the internal memory. Reduce size Default settings EXIT OK Clear internal memory EXIT OK 3.5.1.1 Setting an alarm 1.
3.5.1.2 Enabling auto on/off The photo frame comes with the Programmable On/Off Time feature, making it possible to automatically power on and off SCREEN 1 and SCREEN 2 in sync according to the time you set. 1. In the Main Menu, press the LEFT or RIGHT button to select the Settings menu. 2. Press the 3. Press the DOWN/VOL! button to select On/Off button to enter the Settings menu. schedule, and then press the button. 4. Press the LEFT or RIGHT button to select On for the Auto On/Off option. 5.
4. Using the menus in SCREEN 2 4.1 Using the Main Menu If a memory card has been inserted, photos in the card will play in slideshow mode automatically. If no memory card is inserted, the screen shows the Main Menu. 4.2 Using the Photo menu To display photos in SCREEN 2, you need to insert a photo-loaded SD card to the “Memory card slot (for SCREEN 2)” first. Then, slideshow starts automatically. 1. 2. 3. Press the EXIT button to return to the Main Menu.
To browse or select a photo, use the UP/VOL DOWN/VOL!, LEFT and RIGHT buttons. , To play photos in slideshow mode, press the button. To switch to the previous or next photo in slideshow mode, press the LEFT or RIGHT button. 4.2.1 Auto rotation The photo frame has a built-in tilt sensor that allows the photo frame to determine its own orientation relative to gravity and thereby automatically switch from displaying photos in landscape position to displaying photos in portrait position.
4.3 Using the Settings menu 1. In the Main Menu, press the LEFT or RIGHT button to select the Settings menu. 2. Press the 4.3.1 Settings menu in SCREEN 2 Refer to the table below for more information about the Settings menu in SCREEN 2. button to enter the Settings menu. To move among sub-menus under Settings, press the LEFT or RIGHT button. To apply the settings you have selected, press the button. To go back to the previous page, press the EXIT button.
Sub-menu Option Description/Function Transition effect No effect Random Fade out Fade in Left to Right Horizontal open Horizontal close English French Spanish Brightness Contrast Original Selects the transition effect to be applied in slideshow. Languages Display Photo view options Default settings 32 Fit to screen EXIT OK Selects an OSD (On-screen display) language. Sets the level of brightness. Sets the level of contrast. Displays photos in their original aspect ratio.
5. General information Consumer Products and Accessories purchased in the United States, Canada, UK and Singapore. If your product is not working properly... 1. Read this User’s Guide or the Quick Start Guide. 2. Visit our website: www.motorola.com 3. Contact Customer Service: • 1-888-331-3383 in US and Canada • 0845 218 0890 in UK • (65) 68412668 in Singapore What Does this Warranty Cover? Subject to the exclusions and limitations contained below, Binatone Electronics International LTD.
What will BINATONE ELECTRONICS INTERNATIONAL LTD. do? BINATONE ELECTRONICS INTERNATIONAL LTD., at its sole option, will at no charge repair, replace or refund the purchase price of any Products or Accessories that does not conform to this warranty. Binatone Electronics International LTD.
Products or Accessories Covered Consumer Products Consumer Accessories Consumer Products and Accessories that are Repaired or Replaced Length of Coverage One (1) year from the date of purchase by the first consumer purchaser of the product. Ninety (90) days from the date of purchase by the first consumer purchaser of the accessory. The balance of the original warranty or for ninety (90) days from the date returned to the consumer, whichever is longer. Exclusions Normal Wear and Tear.
Altered Products. Products or Accessories with (a) serial numbers or date tags that have been removed, altered or obliterated; (b) broken seals or that show evidence of tampering; (c) mismatched board serial numbers; or (d) nonconforming or non-Motorola branded housings, or parts, are excluded from coverage. Communication Services.
Compliance Information Declaration of Conformity This product is in compliance with the essential requirements and other relevant provisions of Directive 2004/108/EC: European Standard EN55022:2006 Class B, EN61000-3-2:2006, EN61000-3-3:1995/A1:2001/A2:2005 and EN55024:1998/A1:2001/A2:2003 (IEC 61000-4-2:Edition 1.2:2001-04, IEC 61000-4-3:Edition 2.1:2002-09, IEC 61000-4-4:Second edition:2004-07, IEC 61000-4-5:Edition 1.1:2001-04, IEC 61000-4-6:Edition 2.1:2004-11, IEC 61000-4-8:Edition 1.
WARNING You are cautioned that changes or modifications not expressly approved by the party responsible for compliance could void your authority to operate the equipment. FCC and Industry Canada This device complies with Industry Canada and FCC Rules. Operation is subject to the following two conditions: (1) this device may not cause harmful interference, and (2) this device must accept any interference received, including interference that may cause undesired operation.
6. Technical specifications Screen size 7” diagonal x 2 screens Aspect ratio 16:9 Panel resolution 800 (H) x 480 (V) pixels Internal memory size 512MB Brightness 200 cd/m Contrast ratio 300:1 Viewing angle in landscape and portrait positions (Top/Bottom/Left/Right) 50° / 65° / 65° / 65° Response time 18 ms Supported memory card types SD, SDHC, MMC USB Host Supported Loudspeakers 0.
Technical specifications
7. Wall mounting instructions 2. Insert 8mm and 9.5mm head screws (to be purchased separately) into the holes and tighten the screws. Then, align your photo frame with the screws. 3. Mount your photo frame in portrait position on the wall. Portrait wall mounting 1. Cut the illustration below and drill holes in the wall exactly as illustrated.
Wall mounting instructions
Landscape wall mounting 1. Drill a hole in the wall and insert an 8mm head screw (to be purchased separately) into the hole. 2. Align your photo frame with the screw. Wall mounting instructions 3. Mount your photo frame in landscape position on the wall.
Wall mounting instructions
Manufactured, distributed or sold by Binatone Electronics International LTD., official licensee for this product. MOTOROLA and the Stylized M Logo, and other Motorola trademarks and trade dress are owned by Motorola, Inc. and are used under license from Motorola, Inc. MOTOROLA and the Stylized M Logo are registered in the US Patent & Trademark Office. All other product or service names are the property of their respective owners. © Motorola, Inc. 2009. All rights reserved. Version 1.