User’s Guide for MF800 8" Digital Photo Frame with Slideshow Warning Use only the power adapter supplied with your product.
Welcome... to your new Motorola Digital Photo Frame! Please retain your original dated sales receipt for your records. For warranty service of your Motorola product, you will need to provide a copy of your dated sales receipt to confirm warranty status. Registration is not required for warranty coverage.
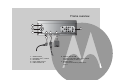
Frame overview 1 7 2 3 1. 2. 3. 4. 5. 4 ON/OFF button Navigation and buttons EXIT button Power supply jack q USB connector n O 5 6 6. Memory card slot m for inserting an SD, SDHC, MMC memory card that contains the photos you want to play. 7. Remote control for remote control functions, please refer to page 11.
Table of Contents 1. Getting started .................................................................... 5 1.1 1.2 1.3 1.4 1.5 Connecting to power .............................................................. 6 Inserting a memory card......................................................... 6 Removing a memory card ...................................................... 7 Connecting a USB device ...................................................... 7 Replacing the remote control battery .................
1. Getting started WARNING • Do not place your Digital Photo Frame in the bathroom or other humid areas. • Do not place your Digital Photo Frame near sources of heat and extreme temperatures, such as fluorescent lighting, microwave ovens, heating appliances and direct sunlight. • Do not disassemble your Digital Photo Frame; there are no user-serviceable parts inside. • If the LCD screen breaks, do not touch the glass or liquid. Contact Motorola customer support for assistance.
1.1 Connecting to power 1.2 Inserting a memory card Follow the steps below to connect the photo frame to a power outlet to turn on the power. 1. Plug one end of the AC power adapter to the power jack on the back of the photo frame. 2. Plug the other end into a power outlet. The power of the photo frame will be turned on. The photo frame is preloaded with some photos in the internal memory.
1.3 Removing a memory card NOTE Please use the USB converter cable provided. Simply pull the card out of the slot gently. IMPORTANT Do not insert a micro or mini memory card without an adapter. 1.4 Connecting a USB device Your Digital Photo Frame supports USB flash drive and card reader. Getting started NOTE • After you insert a photo-loaded memory card or USB flash drive and connect the photo frame to power, the photo frame will automatically start to display photos in slideshow mode.
1.5 Replacing the remote control battery 3. Insert the new battery into the battery holder. The battery must be placed with the positive pole facing upwards in the illustrated position. The supplied remote control comes installed with a CR2032 lithium battery. When you need to replace the battery, follow the steps below. 1. Slide the locking tab to the right. 4. Slide the battery holder into the remote control. WARNING 2. Pull out the battery holder.
2. Using the photo frame To operate the photo frame, you can: • Use the control buttons on the back of the photo frame Or • Use the supplied remote control 2.1 No. Description 1 EXIT button • Returns to the Main Menu. • Goes back to the previous page. • Stops the playback. 2 Navigation and O buttons Using the control buttons a. b. c. d. e. 3 Using the photo frame UP: moves up. DOWN: moves down. LEFT: moves left. RIGHT: moves right. : enters/confirms the selection, or starts/ pauses the playback.
When using the Main Menu When playing a slideshow Button Function Button Function UP Selects Internal Memory, USB or Memory Card . Starts/pauses the playback. DOWN Selects Internal Memory, USB or Memory Card . O LEFT Selects Photo, Calendar or Settings menu. EXIT Goes back to the previous page. RIGHT Selects Photo, Calendar or Settings menu. When using the Calendar menu O Enters sub-pages of Photo, Calendar or Settings menu. Button Function UP Moves up to the next month.
When using the Settings menu 2.2 Button The following table describes the buttons and their functions that are available on the supplied remote control. UP DOWN Function Moves up to the previous sub-menu in Using the remote control Settings . Moves down to the next sub-menu in Settings . 1 7 Selects Photo , Calendar or Settings menu. 2 O 8 • Enters sub-menus in Settings. • Enters/confirms the selection. 3 9 EXIT • Quits sub-menus in Settings . • Goes back to the previous page.
No. Description 1 ON/OFF • Turns on the screen backlight. • Turns off the screen backlight to enter Standby mode. 2 UP Moves up. 3 LEFT/PREVIOUS Moves left or selects the previous item. 4 DOWN Moves down. 5 ZOOM Zooms in the photo by a factor of 2x, 4x, 8x and 16x. 6 SETUP You can press this button to access the Settings menu. 7 EXIT Goes back to the previous page. 8 = (OK/PLAY/PAUSE) 9 RIGHT/NEXT Moves right or selects the next item.
3. Using the menus 3.1 Using the Main Menu When powered on, photos will play in slideshow mode automatically. • If a memory card has been inserted, photos in the card will play in slideshow mode automatically. • If no memory card is inserted, photos in the built-in memory will play in slideshow mode automatically. To exit slideshow mode and return to the Main Menu, press the EXIT button on the back of the photo frame or the EXIT button on the remote.
3.2 Using the Photo menu NOTE The photo frame only supports JPEG (*.jpg) image file format. 1. In the Main Menu, press the LEFT or RIGHT button to select the Photo menu. 2. Press the UP or DOWN button to select a device. 3. Press the button to enter Photo Viewer, which displays your photos in thumbnail view. In Photo Viewer, both photos and folders may display, depending on the content stored in your device. = 14 • To browse or select a photo, use the UP, DOWN, LEFT and RIGHT buttons.
3.2.1 Copying one or all photos NOTE • To copy photos from your memory card or USB to the internal memory, please insert your memory card or USB flash drive first. • Use the supplied remote control for this operation. 1. In Photo Viewer, press the MENU button on the remote control. Copy One , Copy All , Delete One and Delete All options will appear on the screen. 4. Press the LEFT or RIGHT button to select the destination (USB , Memory Card or Internal Memory), and then press the button to confirm.
3.3 Using the Calendar menu 3.4 1. In the Main Menu, press the LEFT or RIGHT button to select the Calendar menu. 2. Press the button to enter the Calendar menu. The slideshow automatically starts. = Using the Settings menu 1. In the Main Menu, press the LEFT or RIGHT button to select the Settings menu. 2. Press the button to enter the Settings menu. • To move among sub-menus under Settings , press the UP or DOWN button. • To apply the settings you have selected, press the button.
You can control all function settings of the photo frame from the Settings menu. Refer to the table below for more information. Sub-menu Option Description/Function Slideshow 5 seconds Selects the speed of slideshow. frequency 10 seconds 30 seconds 1 minute 1 hour 1 day Transition No effect Selects the transition effect to be applied in effect Random slideshow. Fade out Fade in Left to Right Horizontal open Pan zoom Date & Time Year Allows you to set up the date and time.
Sub-menu On/Off schedule Option Auto On/Off Auto on hour Auto on minute Auto off hour Auto off minute Display Logo on/off Photo view options Brightness Contrast On/Off Original Fit to screen Description/Function Enables/disables the Auto power on/power off options. Powers on the photo frame automatically according to the time length you set. Powers off the photo frame automatically according to the time length you set. Sets the level of brightness. Sets the level of contrast.
3.4.1 Enabling auto on/off The photo frame comes with the Programmable On/Off Time feature, making it possible to power on and off automatically according to the time you set. 1. In the Main Menu, press the LEFT or RIGHT button to select the Settings menu. 2. Press the button to enter the Settings menu. 3. Press the DOWN button to select On/Off schedule, and then press the button. 4. Press the LEFT or RIGHT button to select On for the Auto On/Off option. 5. Continue to set the Auto On/Off time.
Consumer Products and Accessories purchased in the United States, Canada, UK, Russia, Singapore, South Africa, New Zealand, Australia or India. What Does this Warranty Cover? Subject to the exclusions and limitations contained below, Binatone Electronics International LTD.
IMPLIED. IN NO EVENT SHALL MOTOROLA OR BINATONE ELECTRONICS INTERNATIONAL LTD.
the product resulting from misuse; (b) your failure to follow or operation outside the usage parameters stated in the user instructions that came with the Products or Accessories; (c) contact with liquid, water, rain, extreme humidity or heavy perspiration, sand, dirt or the like, extreme heat, or food; (d) use of the Products or Accessories for commercial purposes or subjecting the Product or Accessory to abnormal usage or conditions; or (e) other acts or omissions which are not the fault or neglect of Mot
warranty agreement between you and BINATONE ELECTRONICS INTERNATIONAL LTD. regarding the Products or Accessories purchased by you, and supersede any prior agreement or representations, including representations made in any literature publications or promotional materials issued by BINATONE ELECTRONICS INTERNATIONAL LTD. or representations made by any agent employee or staff of BINATONE ELECTRONICS INTERNATIONAL LTD., that may have been made in connection with the said purchase.
5. Technical Specifications Screen size 8" diagonal TFT LCD Aspect ratio 4:3 Panel resolution 800 (H) x 600 (V) pixels Internal memory size 512MB Brightness 250 cd/m2 Contrast ratio 500:1 Viewing angle in landscape (Top/Bottom/Left/Right) 50º / 70º / 70º / 70º Supported memory card types SD, SDHC, MMC USB Host Supported USB Port Output <0.2A Power adapter • AC input: 100-240V; 50/60 Hz; 0.6A • DC output: 5V, 1A Supported image file format JPEG (*.
Manufactured, distributed or sold by Binatone Electronics International LTD., official licensee for this product. MOTOROLA and the Stylized M Logo, and other Motorola trademarks and trade dress are owned by Motorola, Inc. and are used under license from Motorola, Inc. MOTOROLA and the Stylized M Logo are registered in the US Patent & Trademark Office. All other product or service names are the property of their respective owners. © Motorola, Inc. 2010. All rights reserved. Version 1.