User’s Guide MBP701, MBP702, MBP703, MBP704 MFV701, MFV702, MFV703, MFV704 Digital Photo Frame with Video-in-Picture The features described in this user's guide are subject to modifications without prior notice.
Welcome... to your new Motorola Digital Photo Frame with Video-In-Picture! Thank you for purchasing the Motorola product - the Digital Photo Frame with Video-In-Picture is more than just a Photo Frame. It's a multimedia trip down memory lane, and with the addition of the Wireless Camera and Live Video Feed, it's also a way of protecting what matters most. Please retain your original dated sales receipt for your records.
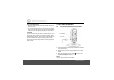
Overview of your Digital photo frame Rear panel 4 Front panel 1 5 6 2 1 1 Link Indicator On when the digital photo frame is powered on and linked to a camera unit. Flashes when the digital photo frame is out of range of the selected camera unit. Off when the digital photo frame is powered off.
Overview of your Camera unit 2 3 10 1 2 3 4 9 8 1 5 6 7 Infrared Lights 4 IR LEDs for night vision (Note: the picture will be in black and white.) WARNING IR emitted from this product. Do not stare directly into the IR LEDs. Camera Power Indicator On steadily when the camera unit is switched on and linked to the digital photo frame. Flashes quickly when the camera unit is in registration mode. Flashes slowly when the camera unit is out of range or not registered to the digital photo frame.
Important guidelines for installing our Digital photo frame • To use your camera unit and digital photo frame together, you must be able to establish a radio link between them, and the range will be affected by environmental conditions. • Any large metal object, like a refrigerator, a mirror, a filing cabinet, a metallic door or reinforced concrete, between the camera unit and digital photo frame may block the radio signal.
1. SAFETY INSTRUCTIONS ................................... 7 2. GETTING STARTED............................................ 8 2.1 2.2 2.3 2.4 2.5 2.6 Connecting Camera unit to power...................... 8 Connecting Digital Photo Frame to power.......... 9 Inserting a memory card..................................... 9 Removing a memory card ................................ 10 Connecting a USB device ................................ 10 Replacing the remote control battery ............... 10 3.
1. SAFETY INSTRUCTIONS WARNING: STRANGULATION HAZARD - Keep the adapter cord out of the baby's reach. NEVER place the camera unit or its cord within the cot. Secure the cord some distance away from the baby's reach. Never use extension cords with AC Adapters. Only use the AC Adapters provided. CAMERA SET UP & USE: • Determine a location for the CAMERA that will provide the best view of the area you want to view.
Care and maintenance • Wipe the frame and the LCD screen gently with a soft, clean, dry cloth. • To remove fingerprints on the LCD screen, wipe gently with a soft, lint-free cloth. Do not use cleaning solutions unless they are designed specifically for LCD screens. CAUTION In order to reduce the risk of fire or electrical shock, do not expose the device to water or excessive humidity. Never disassemble the device. Opening the casing is dangerous and will invalidate the warranty.
2.2 Connecting Digital Photo Frame to power NOTE Only use the provided power adapter. 2.3 Inserting a memory card On the side of the Digital Photo Frame, you can also insert a memory card or a USB flash drive containing the content you want to show on this unit. Your Digital Photo Frame supports SD, SDHC and MMC memory cards with a memory capacity of 2GB or up to 16GB. PO POWER PLUG W 1.
2.4 Removing a memory card Simply pull the card out of the slot gently. NOTE Do not insert a micro or mini memory card without an adapter. 2.5 Connecting a USB device To insert the USB drive flash drive, push the drive firmly into the USB slot as indicated below. NOTE The USB port on the display unit cannot be used to connect to a computer.
1. Push and hold the locking tab to the right. 3. Insert the new battery into the battery holder. The battery must be placed with the positive pole facing upwards in the illustrated position. 3 1 2. Pull out the battery holder. 4. Slide the battery holder back into the remote control. 2 GETTING STARTED 4 WARNING • Protect the battery from overheating or excessive moisture. • Failure to replace the battery in the correct manner may result in damage to the battery.
3. USING YOUR DIGITAL PHOTO FRAME No. Function 1 UP: Moves up/goes back to the previous page. Please read these instructions carefully, and be aware that the video function featured with the digital photo frame is only intended as an aid if used as a baby monitor. It is not a substitute for responsible, correct parental supervision. 2 DOWN: Moves down/goes to next page. 3 RIGHT: Moves right/increases the volume. 4 LEFT: Moves left/decreases the volume.
When using the Home Menu When playing a slideshow Button Function Button UP Selects USB or Memory Card. UP Goes back to the previous photo. DOWN Selects USB or Memory Card. DOWN Goes to the next photo. LEFT Selects Calendar, Picture, VideoFeed, Music or Tools menu. RIGHT Increases the background music volume. RIGHT Selects Calendar, Picture, VideoFeed, Music or Tools menu. LEFT Decreases the background music volume.
When Video Feed is on When using the Tools menu Button Function Button RIGHT Increases the audio volume. UP Moves up the menu or submenu list. LEFT Decreases the audio volume DOWN Moves down the menu or submenu list. P V Switches to the next registered camera. RIGHT Moves right through the submenu option choices. LEFT Moves left through the submenu option choices. P Enters submenu or enter/confirm/change the settings. Press and hold to return to HOME screen.
3.2 Using the remote control The following table describes the buttons and their functions that are available on the supplied remote control. USING YOUR DIGITAL PHOTO FRAME No. Description 1 ON/OFF • Press to turn the digital photo frame on or off. 2 UP U • Move up. • Select previous picture when viewing pictures. 3 LEFT/PREVIOUS Move left or decrease the volume. 4 DOWN D • Move down. • Select next picture when viewing pictures.
9 RIGHT/NEXT Move right or increase the Volume. 10 VideoFeed V Enter or exit video feed mode. Note: The video size is 3.8" diagonally and does not take up the whole viewing area. 11 ROTATE Press repeatedly to rotate the selected photo counterclockwise in increments of 90 degrees in browse mode. 12 MENU Return to the HOME screen. 13 SnapShot Capture a picture while in video feed mode and store directly in the memory card or USB drive.
3.5 Switching monitoring camera unit The system allows registering up to four camera units. You can switch the monitoring camera unit by one-touch key or by menu settings: By one-touch key: Press the P button at the back of the digital photo frame or the button on the remote control when the digital photo frame is in video monitoring mode. The digital photo frame will switch to the next registered camera unit and show the video from it after a few seconds.
4. USING THE MENUS In the Home Menu, you can: 4.1 • Press the LEFT or RIGHT button to select the Calender, Picture, VideoFeed, Music or Tools menu. • Press the UP or DOWN button to select either the USB or Memory Card. Using the Home Menu When powered on, photos will play in slideshow mode automatically if available on a connected memory card or USB drive. • If a memory card or USB drive has been inserted, photos in the device will play in slideshow mode automatically.
4. If the Thumbnail option has been selected, it will display your photos in thumbnail view (both photos and folders may display, depending on the content stored in the device). 4.3 Using the Music Player menu NOTE The Digital Photo Frame only supports MP3 (*.mp3) audio file format. 1. In the Home Menu, press the LEFT or RIGHT button to select the Music menu. 2. Press the UP or DOWN button to select the USB or SD memory. 3. Press the P button to enter Music Player.
During music playback mode, • Press UP to go to the previous song. • Press DOWN to go to the next song. • Press P to play/pause. • Press RIGHT to increase the playback volume. • Press LEFT to decrease the playback volume. 4.4 Using the Calendar menu 1. In the Home Menu, press the LEFT or RIGHT button to select the Calendar menu. 2. Press the P button to enter the Calendar mode.
4.6 Using the Tools menu Aspect 1. In the Home Menu, press the LEFT or RIGHT button to select the Tools menu. Fit to Screen Optimises photos to fit the whole screen. Crop to Fill Crop the photos to fit the whole screen. Full Screen Stretch the photo to fit the whole screen. 5 Sec. Selects the speed of the slideshow. 2. Press the P button to enter the Tools menu. • To move up or down the Tools menu list, press the UP or DOWN button. • To apply the settings you have selected, press the P button.
Slideshow Effect Random Snake Partition Selects the transition effect to be applied in the slideshow. Calendar Setup Sub-menu Options Description/Function Display mode Monthly Calendar Sets the calendar display mode. Erase Clock Blinds Random lines Grid Cross Spiral Rect On Off - Allows you to set up the date, month and year. Time Format 24-hour 12-hour Sets 24-hour or 12-hour time mode. Clock Time - Sets the clock time. Alarm Status On Enables/disables the Alarm options.
Music Setup Sub-menu Play Mode Show Spectrum System Setup Sub-menu Languages Backlight USING THE MENUS Options Description/Function Brightness Repeat current Repeat Random Once On Off Sets the music playback mode. Contrast Options Description/Function English Francais Espanol Deutsch Italiano Portugues Nederlands Svenska 1, 2, ......, 5 Selects the OSD (OnScreen display) language. Saturation Auto On Enables/disables the graphic display of the volume level.
Reset Default Setting Wallpaper Yes Resets the Photo Frame to its default settings. No Cancels the task. Wallpaper 1 Selects the pre-loaded Wallpaper 2 wallpaper. Wallpaper 3 De-Registration Registration Monitor Setup Sub-menu Select Camera Options Description/Function Camera 1 Selects the desired camera unit to display. Camera 2 All Cameras NOTES Only camera units registered will be shown in the list. Camera 1 Selects the camera unit you want to deregister.
5. DISPOSAL OF THE DEVICE (ENVIRONMENT) At the end of the product lifecycle, you should not dispose of this product with normal household waste. Take this product to a collection point for the recycling of electrical and electronic equipment. The symbol on the product, user's guide and/or box indicates this. Some of the product materials can be reused if you take them to a recycling point.
7. TROUBLESHOOTING Link light on the digital photo frame does not come on • Check whether the digital photo frame is powered on. Link light on the digital photo frame flashes • The digital photo frame and the camera unit may be out of range of each other. Reduce the distance between the units, but not closer than 2 metres. • The camera unit may be switched off. Press the key to switch on the camera unit The digital photo frame beeps • Lost connection with the camera unit.
Some images are not displayed • The image file is not supported by this device. Cannot read SD/MMC/SDHC card • Check the SD/MMC/SDHC card is inserted properly. • Check that the memory card capacity is 2GB - 16GB. Cannot read USB flash drive • Check the USB flash drive is inserted properly. • Check that the USB flash drive capacity is 2GB - 16GB. 8. GENERAL INFORMATION If your product is not working properly... 1. Read this User's Guide. 2. Visit our website: www.motorola.com 3.
What will BINATONE do? BINATONE or its authorised distributor at its option and within a commercially reasonable time, will at no charge repair or replace any Products or Accessories that does not conform to this Warranty. We may use functionally equivalent reconditioned/ refurbished/ pre-owned or new Products, Accessories or parts.
Exclusions Normal Wear and Tear. Periodic maintenance, repair and replacement of parts due to normal wear and tear are excluded from coverage. Batteries. Only batteries whose fully charged capacity falls below 80% of their rated capacity and batteries that leak are covered by this Warranty. Abuse & Misuse. Defects or damage that result from: (a) improper operation, storage, misuse or abuse, accident or neglect, such as physical damage (cracks, scratches, etc.
To obtain service, you must include: (a) the Product or Accessory; (b) the original proof of purchase (receipt) which includes the date, place and seller of the Product; (c) if a warranty card was included in your box, a completed warranty card showing the serial number of the Product; (d) a written description of the problem; and, most importantly; (e) your address and telephone number. 9.
BINATONE TELECOM PLC ________________________________________ 1 Apsley Way London NW2 7HF,United Kingdom. Tel: +44(0) 20 8955 2700 Fax: +44(0) 20 8344 8877 e-mail: binatoneuk@binatonetelecom.co.uk . EC Declaration of Conformity We the manufacturer / Importer : Binatone Telecom Plc 1 Apsley Way London NW2 7HF, United Kingdom.
Manufactured, distributed or sold by Binatone Electronics International LTD., official licensee for this product. MOTOROLA and the Stylized M Logo are trademarks or registered trademarks of Motorola Trademark Holdings, LLC. and are used under license. All other trademarks are the property of their respective owners. © 2012 Motorola Mobility, Inc. All rights reserved. Version 2.