MOTO business edition User’s Guide 9h
HELLOMOTO Technology promised to make things easier... but then it gave you more to do—phone calls, e-mails, music, photos, videos, the Internet, and more. It’s time to take back control. It’s time to meet the MOTO Q™ 9h. Getting Started—To set up your preferences and e-mail, just press Start > Getting Started. My Device, My Way—Use your photos for your wallpaper, use your songs for your ring tones, use new programs that you load onto your device... you get the idea.
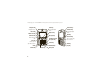
Introducing your new MOTO Q™ 9h wireless device! Here’s a quick anatomy lesson. Navigation Key Navigate menus. Center Key Select highlighted items. Left Soft Key Web Browser Key Call/Answer Key Make & answer calls. Home Key Hold to open a quick list of options. Calendar Key 2 Right Soft Key Side Select Key Select highlighted items. Messaging Key Back Keys Speakerphone/Voice Recognition Key Power/End Key Turn on & off, hang up, exit menus.
Camera Lens 2.0 MEGAPIXELS 8X DIGITAL ZOOM Camera Flash Storage Card Slot Insert microSD memory card Storage Card Slot Battery Door Release Micro USB Port Charge and connect phone accessories Speakers To avoid damaging your device, carry it in an approved holster or case rather than a pocket, purse, or bag.
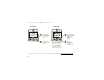
From the home screen, press Start to open the main menu. Home Screen Menu Screen Start Home Service 12:00 PM 12/31/09 0 0 No Appointments 12/31/2009 - 1/1/2010 Start 0 0 1 Contacts 2 Press and release the Power Key O to turn on your phone. Press Start (the left soft key) to open the main menu. More 3 Press the Navigation Key up, down, left, or right (S) to highlight a menu feature. 4 Press the Center Key s to select the highlighted feature.
Motorola, Inc. Consumer Advocacy Office 1307 East Algonquin Road Schaumburg, IL 60196 www.hellomoto.com Note: Do not ship your phone to the above address.
contents start menu . . . . . . . . . . . . . . . . 8 volume . . . . . . . . . . . . . . . . 24 emergency calls . . . . . . . . . 35 Use and Care . . . . . . . . . . . . . . 9 task manager . . . . . . . . . . . 24 international calls. . . . . . . . . 36 get started . . . . . . . . . . . . . . . 10 lock & unlock device . . . . . . 25 speed dial . . . . . . . . . . . . . . 36 about this guide . . . . . . . . . 10 personalize . . . . . . . . . . . . . . . 27 voicemail . . . . . . . . . . . . . . .
tools . . . . . . . . . . . . . . . . . . . . 57 WHO Information . . . . . . . . . . 96 contacts. . . . . . . . . . . . . . . . 57 Registration . . . . . . . . . . . . . . 96 calendar. . . . . . . . . . . . . . . . 59 Export Law . . . . . . . . . . . . . . . 97 alarm . . . . . . . . . . . . . . . . . . 60 Recycling Information . . . . . . 97 calculator . . . . . . . . . . . . . . . 60 Perchlorate Label . . . . . . . . . . 98 connections . . . . . . . . . . . . . . 61 Bluetooth® wireless . . . . .
start menu main menu To open the menu from the home screen, press Start (the left soft key).
Use and Care Use and Care To care for your Motorola phone, please keep it away from: liquids of any kind dust and dirt Don’t expose your phone to water, rain, extreme humidity, sweat, or other moisture. If it does get wet, don’t try to accelerate drying with the use of an oven or dryer, as this may damage the phone. Don’t expose your phone to dust, dirt, sand, food, or other inappropriate materials. extreme heat or cold cleaning solutions Avoid temperatures below 0°C/32°F or above 45°C/113°F.
get started items, and press the center key s to select them. CAUTION: Before using the phone for the first time, read the Important Safety and Legal Information included in the grayedged pages at the back of this guide. about this guide Press the left and right soft keys to open menus and select options.
2 Press the navigation key S to scroll to # Call History. Press the center key s to select Call History. 3 Press the navigation key to scroll to a received call. Press the center key to select the call. Tip: You can press the side scroll keys to scroll up and down, and press the side select key to select items (see page 2 for side key locations). SIM card Caution: Don’t bend or scratch your SIM card. Keep it away from static electricity, water, and dirt.
3 4 1 Open the memory slot cover by gently lifting the cover away from the device as shown. The cover remains attached to the device. 2 Insert the memory card into its slot, with the card’s metal contacts facing the front of the device. memory card 3 Put the memory slot cover back in place and push it to close it. The cover clicks into place. Note: A memory card is not included with your device. It is sold separately.
DON’Ts • • Don’t disassemble, crush, puncture, shred, dryer or microwave oven. or otherwise attempt to change the form of • your battery. • phone’s circuits, leading to corrosion. If the phone and/or battery get wet, have them DOs • surface, can potentially cause damage. even if they appear to be working properly. Don’t allow the battery to touch metal objects. If metal objects, such as jewelry, stay in prolonged contact with the battery contact points, the battery could become very hot.
safety protection), Motorola provides holograms on its Important: Motorola’s warranty does not cover batteries. Consumers should confirm that any battery damage to the phone caused by non-Motorola they purchase has a “Motorola Original” hologram. batteries and/or chargers. Motorola recommends you always use Warning: Use of a non-Motorola battery or charger Motorola-branded batteries and chargers.
recycling organizations for more information on how to dispose of batteries. charge the battery New batteries are not Warning: Never dispose of batteries in a fire because fully charged. Plug the they may explode. battery charger into your device and an install the battery 1 electrical outlet. Your 2 device might take several seconds to start charging the battery. When finished, your display shows a full battery icon ^.
conserve battery life To set how long your device waits before the backlight turns off, press Start > Settings > Power Management > Backlight time out on battery. When the backlight is off, the display is visible but dim. Your device has a light sensor that tells it when you’re in a dark place. You can tell your device to use the backlight only when it’s dark, press Start > Settings > Power Management > Smart Backlight > Enable.
answer a call store a phone number When your device rings and/or vibrates, press N to Find it: Start > Contacts, then press New answer. To hang up, press O. 1 • • Choose whether the contact will be stored on If you are busy when a call comes in, press your device (Outlook contact) or your SIM card. Ignore to send the call directly to voicemail. Contacts on the SIM card can only include a To put a call on hold, press N. To return to the call, press N again. name and number.
call a stored number Find it: Start > Contacts 1 Scroll to the number. 2 Press N. Your device calls the contact’s default number. Tip: If you stored more than one number for a contact, select the contact to open the other numbers. To dial a number, scroll to it and press N. your phone number To view your phone number, press Start > Settings > Phone > Call Options.
tips & tricks From the home screen (shown on page 20), you can To... Do this... play music or To keep using your games and games on an music on a flight, turn off your airplane network and Bluetooth® use shortcuts: To... Do this... lock keypad Press X, then f. open recent Press N. To return a call, use the quick list appears, then select calls the navigation key to scroll to the Wireless Manager > All. services. Press and hold X until call, then press N.
basics See page 2 for a basic device diagram. Soft key labels show the current soft key functions. For soft key locations, see page 2. display Press the navigation key S up, down, left, or right to The home screen appears when you turn on the device. To dial a number from the home screen, press number keys and N. Note: Your home screen may look different than this one.
Status indicators can appear at the top of the home 2 screen: 1. GPS Voicemail Indicator – Shows when you have new voicemail. 2. Voicemail 3. Message 4. Bluetooth 3 Message Indicator – Shows when you receive a new C e-mail or : text message. 4 Home Service Bluetooth power is on. 12:00 PM 5 12/31/09 0 0 No Appointments 12/31/2009 - 1/1/2010 Start 0 Bluetooth® Indicator – Shows E when Call Forward Indicator – Shows D when call forwarding is on.
7 Profile Indicator – Shows when your ring style is the device automatically selects the appropriate entry set to Silent (Q) or Vibrate (<). No indicator mode. An indicator at the top right of the display appears when the ring style profile is Normal, Outdoor, shows the entry mode you are currently using. or Automatic. Note: A % appears when the speakerphone is on Press b to switch entry modes. For indicator descriptions, see the following section. (see page 39).
Press b in a text • entry view to select an entry mode: entry modes i Enters the large character on each key (such as Q). To delete one character, press D. Hold D to keep deleting. • To start a new line, press j. • To enter the number or character above the letter on each key, press the Alt key b. Press b twice to lock It.
To turn off text prediction, change its language, or • Want to turn off a sound? Press Start > Settings clear its memory of the words you’ve used, go to the > Sounds. Highlight the desired item and select home screen and press b k > Setup. the sound you want to associate with that item. volume Tip: You can silence the ringer volume instantly when an incoming call comes in—just use the When you are side scroll keys to turn the ringer off.
Note: If you want to completely remove a program characters, including uppercase and lowercase from your device, from the home screen, press Start letters, numerals, and punctuation). > Settings > Remove Programs. Tip: Choose a password you will remember. Without your password, you can reset your lock & unlock device device, but it will result in the loss of your personalized settings and all content stored in To prevent accidental keypresses, you can lock your device memory.
Note: You can make emergency calls on a locked device (see page 57). A locked device still rings or vibrates for incoming calls or messages, and you do not need to unlock it to answer.
personalize profiles Note: The Automatic profile is the same as Normal, except Each profile uses a different set of sounds, ring styles, stored in your Calendar. that it automatically switches to Vibrate during any event earpiece volume settings, or vibrations for incoming calls and other events. For example, the Outdoor profile volume is much louder than the Normal profile.
1 Scroll and highlight the sound you want to 1 change, then press the navigation key S right or your time zone. left to change it. 2 Note: Update your time zone when you travel, to Press Done to save the sound setting. make sure your device’s calendar events appear at the right time. Note: If you download a sound file for a ring tone, it does not automatically save in the Sounds location. To move your sound file, press Start > File Manager > My Documents.
Find it: Start > Settings > Home Screen Microsoft ActiveSync on your PC as described on page 76. options Home Screen Select a layout for the home screen. Layout 1 Connect the device to your PC. 2 On your PC, copy the image file you want. The file format needs to be .gif, .jpg, or .bmp. Color Scheme Select a color scheme for the display. Background Select a picture for your wallpaper Image image, or Default for default wallpaper.
picture file is stored and copy it to the My Pictures and installed immediately. Compatible commercial and folder. free applications are available on the Internet. For more information, visit the downloads catalog on the backlight Motorola Support Web site at: Your device automatically adjusts the display service provider’s Web site. brightness when you move between bright and dark environments. www.motorola.
more personalizing features ring volume features language Set menu language: Press Start > Settings > Regional Settings Note: You need to turn your device off and on again for the changes to take effect. Press Start > Settings > Profiles Highlight the desired profile, then press Menu > Edit Under Ring Volume, press the navigation key S left or right to adjust the volume for that profile.
features features sounds master reset To change the default sounds for your ring tone, To return your device to original settings: Press Start reminders, new messages, alarm clock, or keypad > System Tools > Master Reset controls: Press Start > Settings > Sounds The default master reset code is 000000 (6 zeroes). Master reset does not reset the unlock code, Note: Changes made to the alert settings will have security code, and lifetime timer. no effect when using the Silent profile.
calls To make and answer calls, see page 16. recent calls are listed first. The oldest calls are deleted as new calls are added. turn off a call alert Find it: Start > Call History You can use the side scroll keys to turn off the ringer Highlight a call, then: before answering the call. answer options To use any key to answer an incoming call, press Start • To call the number, press N. • To open call details (like time and date), press the center key s.
redial options E-mail Send an e-mail message to this 1 contact. View Timers View the call times for this call and all 2 calls. Delete/ Delete Delete this call from the Call History. List Press N from the home screen to open the calls list. Highlight the entry you want to call, then press N. If you hear a busy signal and Call Failed, Number Busy appears, press N to redial the Save to Save this number to a contact. number.
caller ID Note: Check with your service provider, as emergency numbers vary by country. Your device may not work in Calling line identification (caller ID) shows the all locations, and sometimes an emergency call cannot phone number for an incoming call on your be placed due to network, environmental, or home screen. interference issues.
your location. Remain on the device for as long as the emergency response center instructs you. GPS might not work for emergency calls if your local emergency response center does not process GPS • Move away from radios, entertainment equipment, and other electronic devices that might interfere with or block GPS satellite signals. location information. For details, contact your local authorities.
To access speed dial entries, press and hold the 5 single-digit speed dial number for one second. If the number to use. speed dial is two digits, press the first digit, then Note: Speed dial 1 is reserved for calling your press and hold the second digit. The device dials the voicemail. phone number, opens a new e-mail message, or goes to the Web page. phone numbers In the Keypad Assignment, select the speed dial 6 Press Done.
Note: To delete a shortcut, press Start > Speed Dial, scroll contact for your voicemail number (see page 17) and to the shortcut, then press > Menu > Delete. Your service use the contact to call your voicemail. provider might add a Voicemail shortcut you cannot delete. three-way calling voicemail While connected to a call: Note: Your service provider may include additional 1 N. information about using this feature. Your network stores the voicemail messages 2 3 Press and hold 1.
• to switch between the calls, or press Menu Note: The handsfree speaker won’t work when your > Conference to combine them. device is connected to a car kit or headset. To send the second call to your voicemail, To activate a connected external press Ignore. speakerphone during a call, press h or press Menu > Speakerphone On. handsfree calls Note: The use of wireless phones while driving may cause distraction. Discontinue a call if you can’t concentrate on driving.
service provider. For billing information, contact your service provider. features open call timers Press Start > Call History, then press Menu > View more calling features call forwarding Set up or cancel call forwarding: Press Start > Settings > Phone > Call Forwarding Timers reset call timers Note: If you choose No Reply, you can set how many To reset all call timers to zero (0), except for the seconds your device waits before it forwards a call.
features TTY calls Set up your device for use with an optional TTY device: Press Start > Settings > Phone Accessibility > TTY Note: A teletypewriter (TTY) is a communication device used by people who are hard of hearing or have a speech impairment. TTY does not work from one mobile device to another. call a phone number in a message E-mail or text messages can contain phone numbers that have an underline, like a Web site hyperlink. To dial one of these numbers, scroll to it and press N.
e-mail & messages To set up e-mail on your MOTO Q™ 9h, refer to If a list of messages does not appear, press Menu your Quick Start Guide. If you have problems > Folders > Inbox. To return to the folder list, press setting up e-mail or synchronizing, please visit Menu > Folders. www.motorola.
Download the attachment, then select the file and follow the prompts to open it. When the document opens, you can move around the page using the navigation key S. • Excel spreadsheets: Select cells and enter numbers or text. Press Menu for options like message options To delete, save, reply, or forward the messages, use these quick steps from the Inbox with a message selected or when viewing a message: • messages in a row, scroll to the top message save, cut, copy, paste, find, delete, and more.
messages and press Menu > Send/Receive. The device For text messages, enter a phone number or connects to your Internet e-mail server and sends and contact name. As you enter a contact name, receives your messages. To stop this process, press suggestions appear in a box below the To field. Menu > Stop Send/Receive. Tip: You can quickly enter phone numbers or e-mail addresses from your contacts. In To, send a message press j and select a recipient from the list.
To set the priority for an e-mail message, press Menu > Message Options. To cancel a message, press Menu > Cancel Message. 4 Press Send. global address look up From your device, you can search the global address list (GAL) stored on your company's Exchange Server.
4 a call. messaging quick reference Note: Although the entire GAL cannot be stored Note: Some features might not work if you set on your device, once the contact is found, you can up your e-mail account manually (without the add the single contact to your contact list. e-mail setup wizard). Scroll through the list of entries that appears. When you locate your contact, press N to make Tip: You can also choose to send a message, SMS or e-mail to a contact found using GAL.
features features create and send e-mail create and add an e-mail signature Press Start > Messaging > e-mail account, then Press Start > Messaging > e-mail account, then press press New Menu > Tools > Options > Signatures Note: You need to have your e-mail set up to send Scroll to the account for which you are creating the an e-mail (refer to your Quick Start Guide). signature. Select Use signature with this account.
features features view attachment reply, reply all or forward messages While viewing the message, use the From your Inbox or an open message, press center key s to select the attachment. Menu > Reply, Reply All, or Forward Note: You can view attachments only for file types Tip: If you are replying to an e-mail in the e-mail that are supported by the device. account, you will send less data if you do not edit read old messages the original message.
features features download message objects download complete e-mail messages If an e-mail message includes an Press Start > Messaging > e-mail account. Scroll attachment, when you open the message, to the message and press Menu > Download the name of the attachment will appear highlighted. Message. To download the attachment, select the highlighted attachment name. The attachment is downloaded the next time you synchronize or connect to your e-mail server.
features features mark a folder for synchronization view status of sent e-mail When you synchronize your e-mail account Press Start > Messaging > e-mail account, then with your PC, the same Inbox folders that are in press Menu > Folders > Outbox Outlook on your PC are created on your device. Messages in the Outbox have not been sent. To send Press Start > Messaging > e-mail account, then press a message, scroll to it and press Menu > Send/Receive.
features call a phone number in e-mail Highlight a phone number in a message and press N. move e-mail to personal folder After you read the e-mail, press Menu > Move > folder. delete a mail account instant messaging To use instant messaging (IM): Find it: Start > Windows Live > Sign in to Windows Live. Follow the prompts to accept the Windows Live terms and conditions and sign into an account. For more details, visit get.live.com/wl/all.
entertainment take & send a photo 2 Your device saves the picture and shows it in the Press e to open the camera viewfinder: Pictures & Videos Press e or the center key s to take a photo. viewfinder. 3 Close the viewfinder or open the camera options menu. To close the viewfinder, press O. You can open IMAGE AREA your stored picture by pressing Start > Pictures & Videos. 877 Thumbnails 1.
• To send the photo with e-mail, select Send > E-mail. self portrait 1 Press e to activate the camera. 2 Press Menu > Mode > Timer. 3 Press e to start the 5 second delay. Use as Home Screen. 4 Aim the camera lens at yourself. • To edit the picture, select Edit. 5 When you hear the camera shutter sound, your • To view image properties, like the filename, • To send the photo with Bluetooth® wireless, select Send via Bluetooth.
record & play video clip option Camera Video Select default locations to store pictures, filename prefixes, and image record a video clip compression. Find it: e, then Menu > Video Determine audio settings and time Pictures & Videos limits for video files. VIDEO AREA 00:05 Stop Remaining recording time 43:20 Pause Current recording length Tip: In the video viewfinder, press Menu to adjust video settings such as brightness, quality, and white balance.
2 Press e or the center key s to begin recording a video. The viewfinder shows what the video is recording. 3 video options In the video viewfinder press Menu > Options to open the video options menu: Press Stop to end recording the video altogether, or press Pause to pause recording and Resume to option continue recording. Camera Select default save locations, video Note: Videos are automatically stored in your filename prefixes, and image device. To view them, press Start > Pictures & Videos.
The video clip plays in the Windows Media Player. Windows Media video playback options In the video playback window, press Menu > Options to open the Video Playback Menu. This menu can include: option Playback Determines how the time counter appears, whether to pause playback 00:00 70% Now Playing while using another program, and whether to resume playback after a call. Menu Tip: To play video in full screen mode, press Menu > Full Video in full screen mode.
tools contacts To store and call contacts, see page 17. features set ringer ID for a contact Note: You cannot store a ringer ID for features search for contact Enter the first few letters of the contact's name. Your device searches through the contact list and shows the name. SIM Contacts. To easily identify who is calling you by the ring tone, you can assign a custom ring tone to each contact.
features features set picture ID for contact set category view Note: You cannot store a picture ID for Press Start > Contacts, then press Menu > Filter SIM Contacts.
calendar features view calendar event features add new calendar event Press Start > Calendar to open the calendar for today. • Note: To schedule an all-day event, select the All day event check box under End time. All-day events do not occupy blocks of time in the calendar; instead, they appear in banners at the top of the calendar. To open days before or after today, press the navigation key S left or right.
features send calendar event to another device alarm Find it: Start > Clock & Alarm > Alarm 1 or Alarm 2 Use a Bluetooth® connection to send a calendar event to another phone, computer, or device: From the calendar item, press Menu > Send via Bluetooth. Select the device to which you want to send the item. For more about Bluetooth connections, see page 72. respond to a meeting request You can receive and respond to meeting requests on your device in a similar manner as you do in Outlook on your PC.
connections Bluetooth® wireless Your device supports Bluetooth wireless pairing (also called linking or bonding). You can pair your device with a Bluetooth headset or car kit, or pair your device with a computer to exchange and synchronize files. Note: The use of wireless devices and their accessories may be prohibited or restricted in certain areas. Always obey the laws and regulations on the use of these products.
and ready in pairing or bonding mode (see the Tip: For specific information about the Bluetooth Bluetooth device user’s guide). You can pair your device you are using with your device, refer to the device with multiple other devices, but only use it with instructions that came with it. one headset at a time. Your device lists the Bluetooth devices it finds within send objects to another device You can use Bluetooth pairing to send e-mail, range.
use your device as a PC remote 6 Device or PC Remote and select Next. You can use Bluetooth wireless and your device as a remote control for your computer. For In the next window, choose Human Interface 7 In the next window, make sure that example, want to watch a video on your computer and “Show all devices” is chosen in the pull-down use your device as a remote control? Use PC Remote menu. Your computer should find your to control when the video plays, stops, or pauses. “SmartPhone.
advanced Bluetooth features features features send object to device make device visible to other Bluetooth device Send an object to another device: Allow a Bluetooth device to discover your Press Start > Bluetooth > BT Send Object device: edit device properties / change device Press Start > Bluetooth > Bluetooth Manager > Settings, and name check Allow other Bluetooth devices to see this phone Edit the properties of a recognized device: connect to recognized device Press Start > Bluetooth > Blu
synchronize select View Status. Synchronization will resume when there is network coverage. You can synchronize the information on your device in two ways, over the air (OTA) or using a cable and your computer. sync over the air sync with a computer You can use Microsoft® ActiveSync version 4.5 or above, or Windows® Mobile Device Center to synchronize information between your device and To sync your device over the air (OTA) you need to desktop computer.
installing the software, verify that your computer and administrator. For general questions about your operating system meet the minimum requirements device, see page 75. stated on the Microsoft Windows® Mobile Web site (http://www.microsoft.com/windowsmobile). This Web site also lets you download the latest software for ActiveSync.
Note: For more detailed information, see “Connecting 3 On your device, verify that Bluetooth wireless is a mobile device to a PC” in ActiveSync Help on your turned on (press Start > Bluetooth > Bluetooth Manager PC, the Microsoft Web Site for ActiveSync or the > Settings > Status > Bluetooth On). Motorola support Web site at www.motorola.com/consumer/support. 4 Press Start > Settings > Connections > USB Device Type. 5 Press Start > ActiveSync. 6 Select Menu > Connect via Bluetooth.
modem-link wireless. To do this on your device, press Start You can use your device as a modem to dial in Status to Bluetooth On. See Bluetooth wireless on page to a network. To do this, you need a 61 for more information. Bluetooth® wireless or USB cable connection. > Bluetooth > Bluetooth Manager > Settings then toggle 2 Note: When you activate your device as a applet from the task bar.
Now you can use your device as a modem to connect 2 In the Getting Started Disc application, go to the Additional Tools screen and select the Dial-Up to a service provider or network. Networking Software. modem-link with a cable 3 Note: Do not connect your data cable to your device Follow the prompts as directed to install the drivers onto your computer. and computer until these steps tell you to.
On your computer: 11 Select OK on all of the setup screens. After you set up your computer and device, you can 12 Select Start > Settings > Control Panel establish a new network connection on your computer: Note: This procedure might not work on all computers. Please refer to your computer operating help system for more information. 6 Select Start > Settings > Control Panel > New Connection > New Connection Wizard. 13 Select Next.
• Connection Name: Leave this blank and select • Next On the General tab, click on Configure button under the modem name. Remove the checkmarks on Enable HW flow control, • Number to Dial: *99# and select Next • Connection Availability: Anyone's Use and select modem compression. Select OK. On the Next General tab, verify that phone number is *99# • • Remove the checkmarks for account name Enable modem error control, and Enable • secured password from the drop-down menu Select Next.
• • Click on Dial. A black screen should appear. On your device, to return to ActiveSync mode for USB The dial-up connection is now established. connections, press Start > Settings > Connections Select Done. Note: You might need to deactivate your computer proxy server settings to let modem-link access the Internet.
web browser Note: Not all Web file formats are supported. You can use the Internet Explorer browser to search and • the address and press OK. view the Web. • Find it: Start > Internet Explorer To go to a Web page, press Action > Go to. Enter To go to a link in a Web page, use the navigation key S to highlight the link and Your browser homepage appears. then press the center key s. • Page Name To change connection options, press Menu > Tools > Settings > Connections.
Web security features manage certificates Enable or disable Internet access certificates stored on your device: Press Start > Settings > Security > Certificates Certificates are used to verify the identity and security of Web sites when you download files or share information.
service & repair Tip: Motorola Software Update is an easy way to Microsoft® Windows® Mobile and ActiveSync update your device. Make sure you have the latest Support:http://www.microsoft.com/windowsmobile/help available software updates at /smartphone/ www.motorola.com/support/Q9. If you have questions or need assistance, we're here to help. Motorola Support: Go to www.motorola.com/consumer/support, where you can select from a number of customer care options.
Specific Absorption Rate Data SAR Data This model wireless phone meets the government’s requirements for exposure to radio waves. Your wireless phone is a radio transmitter and receiver. It is designed and manufactured not to exceed limits for exposure to radio frequency (RF) energy set by the Federal Communications Commission (FCC) of the U.S. Government and by the Canadian regulatory authorities.
Additional information on Specific Absorption Rates (SAR) can be found on the Cellular Telecommunications & Internet Association (CTIA) Web site: http://www.phonefacts.net or the Canadian Wireless Telecommunications Association (CWTA) Web site: http://www.cwta.ca 1. In the United States and Canada, the SAR limit for mobile phones used by the public is 1.6 watts/kg (W/kg) averaged over one gram of tissue.
European Union Directives Conformance Statement Hereby, Motorola declares that this product is in compliance with: • The essential requirements and other relevant provisions of Directive 1999/5/EC • All other relevant EU Directives EU Conformance 0168 Product Approval Number The above gives an example of a typical Product Approval Number. You can view your product’s Declaration of Conformity (DoC) to Directive 1999/5/EC (to R&TTE Directive) at www.motorola.com/rtte.
Microsoft End User License Agreement You have acquired a device (“DEVICE”) that includes software licensed by Motorola, Inc. (“Motorola”) from Microsoft Licensing Inc. or its affiliates (“Microsoft”), for use in connection with wireless network services provided under separate agreement between you and a wireless telecommunications provider (“Mobile Operator”).
1.4. Microsoft Windows® 2003.
Content”) so that their intellectual property, including copyright, in such content is not misappropriated. Owners of such Secure Content (“Secure Content Owners”) may, from time to time, request Microsoft, Microsoft Corporation or their subsidiaries to provide security related updates to the Microsoft DRM components of the SOFTWARE (“Security Updates”) that may affect your ability to copy, display and/or play Secure Content through Microsoft software or third party applications that utilize Microsoft DRM.
an endorsement of the third party site by Motorola, Microsoft, Microsoft Corporation or their affiliates. 14. Additional Software/Services. The SOFTWARE may permit Motorola, Microsoft, Microsoft Corporation or their affiliates to provide or make available to you SOFTWARE updates, supplements, add-on components, or Internet-based services components of the SOFTWARE after the date you obtain your initial copy of the SOFTWARE (“Supplemental Components”). 14.1.
SOFTWARE, including the U.S. Export Administration Regulations, as well as end-user, end-use and destination restrictions issued by U.S. and other governments. For additional information, see http://www.microsoft.com/exporting/. 18. PRODUCT SUPPORT. Product support for the SOFTWARE is NOT provided by Microsoft, its parent corporation, Microsoft Corporation, or their affiliates or subsidiaries. 19. NO LIABILITY FOR CERTAIN DAMAGES.
84 Microsoft License
Important Safety and Legal Information 85
Safety and General Information This section contains important information on the safe and efficient operation of your mobile device. Read this information before using your mobile device. Safety Information Exposure to Radio Frequency (RF) Energy Your mobile device contains a transmitter and receiver. When it is ON, it receives and transmits RF energy. When you communicate with your mobile device, the system handling your call controls the power level at which your mobile device transmits.
Follow Instructions to Avoid Interference Problems your mobile device with your implantable medical device, consult your healthcare provider. Turn off your mobile device in any location where posted notices instruct you to do so. In an aircraft, turn off your mobile device whenever instructed to do so by airline staff. If your mobile device offers an airplane mode or similar feature, consult airline staff about using it in flight.
Symbol Key Batteries & Chargers Your battery, charger, or mobile device may contain symbols, defined as follows: Caution: Improper treatment or use of batteries may present a danger of fire, explosion, leakage, or other hazard. For more information, see the “battery use & safety” section in the user’s guide. Symbol 032374o 032376o 032375o Definition Important safety information follows. Do not dispose of your battery or mobile device in a fire.
Seizures/Blackouts Some people may be susceptible to epileptic seizures or blackouts when exposed to flashing lights, such as when playing video games. These may occur even if a person has never had a previous seizure or blackout. If you have experienced seizures or blackouts, or if you have a family history of such occurrences, please consult with your physician before playing video games or enabling a flashing-lights feature (if available) on your mobile device.
Industry Canada Notice to Users Operation is subject to the following two conditions: (1) This device may not cause interference and (2) This device must accept Industry Canada Notice any interference, including interference that may cause undesired operation of the device. See RSS-GEN 7.1.5. FCC Notice to Users The following statement applies to all products that have received FCC approval. Applicable products bear the FCC logo, and/or an FCC ID in the format FCC-ID:xxxxxx on the product label.
• Consult the dealer or an experienced radio/TV technician for help. Motorola Limited Warranty for the United States and Canada Warranty What Does this Warranty Cover? Subject to the exclusions contained below, Motorola, Inc.
Products Covered Length of Coverage Monaural Headsets. Ear buds and boom headsets that transmit mono sound through a wired connection. Limited lifetime warranty for the lifetime of ownership by the first consumer purchaser of the product. Consumer and Professional Two-Way Radio Accessories. Ninety (90) days from the date of purchase by the first consumer purchaser of the product. Products and Accessories that are Repaired or Replaced.
What Will Motorola Do? Software Products Covered Length of Coverage Software. Applies only to physical defects in the media that embodies the copy of the software (e.g. CD-ROM, or floppy disk). Ninety (90) days from the date of purchase. Exclusions Software Embodied in Physical Media.
For Accessories and Software, please call the telephone number designated above for the product with which they are used. You will receive instructions on how to ship the Products, Accessories or Software, at your expense, to a Motorola Authorized Repair Center.
Hearing Aid Compatibility with Mobile Phones Some Motorola phones are measured for compatibility with hearing aids. If the box for your particular model has “Rated for Hearing Aids” printed on it, the following explanation applies. When some mobile phones are used near some hearing devices (hearing aids and cochlear implants), users may detect a buzzing, humming, or whining noise.
Information from the World Health Organization Present scientific information does not indicate the need for any special precautions for the use of mobile phones. If you are concerned, you may want to limit your own or your children’s RF WHO Information Product Registration Online Product Registration: direct.motorola.com/hellomoto/ Motosupport/source/registration.asp Product registration is an important step toward enjoying your new Motorola product.
Export Law Assurances This product is controlled under the export regulations of the United States of America and Canada. The Governments of the United States of America and Canada may restrict the exportation Export Law or re-exportation of this product to certain destinations. For further information contact the U.S. Department of Commerce or the Canadian Department of Foreign Affairs and International Trade.
California Perchlorate Label Some mobile phones use an internal, permanent backup battery on the printed circuit board that may contain very small amounts of perchlorate. In such cases, California law requires the following label: Perchlorate Label “Perchlorate Material – special handling may apply. See www.dtsc.ca.gov/hazardouswaste/ perchlorate.” There is no special handling required by consumers. Privacy and Data Security Motorola understands that privacy and data security are important to everyone.
driving directions. Users who prefer not to permit such tracking and monitoring should avoid using such applications. If you have further questions regarding how use of your mobile device may impact your privacy or data security, please contact Motorola at privacy@motorola.com, or contact your service provider. Smart Practices While Driving Drive Safe, Call Smart SM Check the laws and regulations on the use of mobile devices and their accessories in the areas where you drive. Always obey them.
• Dial sensibly and assess the traffic; if possible, place calls when your car is not moving or before pulling into traffic. If you must make a call while moving, dial only a few numbers, check the road and your mirrors, then continue. • Do not engage in stressful or emotional conversations that may be distracting. Make people you are talking with aware you are driving and suspend conversations that can divert your attention away from the road. • Use your mobile device to call for help.
index A battery indicator 22 caller ID 35, 58 accessibility 31 battery life, extend 12, 30, 61 camera 52, 54 accessory connector port 2, 3 Bluetooth connection 58, 60 camera key 2, 3 ActiveSync 65 Bluetooth indicator 21 cancel message 45 alarm 60 Bluetooth remote 63 center key 2, 3 alert Bluetooth wireless 61 certificate management 74 bonding (See Bluetooth wireless) codes 25 set 27 turn off 24, 33, 73 answer a call 17, 33 attachments 48 auto-lock phone 25 conference calls 38 C contac
dialed calls 33 G linking (See Bluetooth wireless) display 20, 30 global access look up 45 lock download e-mail messages 49 GPS 21, 35 H E handsfree speaker 39 e-mail 42, 46, 47 phone 25 Low Battery message 22 download message objects 49 headset jack 2, 3 lowercase 23 M attachment 48 hearing aids 95 make a call 16, 41 signature 47 home screen 20, 28 master clear 32 hyperlink, in a message 41 master reset 32 emergency number 35 media player 32 end a call 17 end key 2, 3, 17 I men
sending 46 optional feature 11 recent calls 33 text message 46 over the air (OTA) 65 redial 34 owner information 32 remote control 63 Microsoft license agreement 79 remove program 25 missed call 34 Missed Calls message 34 P reply 48 modem 68 pairing (See Bluetooth wireless) return a call 34 multimedia message 42, 47, 48 paste message text 44 ring style indicator 22 PC remote 63 ring style, setting 27 N perchlorate label 98 ringer ID 35, 57 navigation key 2, 3 personalize 31 ringer
side select key 2, 3 three way calling 38 W signal strength indicator 22 time, setting 28 wallpaper 28 signature 47 timers 34, 40 warranty 91 SIM card 11 TTY calls 41 web soft keys 2, 3, 20 turn on/off 16 sounds 32 speed dial 36 U Start menu 10 unlock store your number 18 phone 25 symbol entry mode 23 unlock code 25 sync (cable) 66 uppercase 23 synchronize 65 video clip 54 task manager 24 voice key 2, 3 telephone number.
www.motorola.