PROFESSIONAL DIGITAL TWO-WAY RADIO SYSTEM MOTOTRBO™ DP 3600/DP 3601 MPT1327 FOR PORTABLE RADIOS USER GUIDE Authorized Communication Solution Provider H.E.R.T.Z Elektronik GmbH Strausberger Straße 8h (Pappelhain) 15378 Rüdersdorf bei Berlin (OT Herzfelde) Telefon: 033434 766-0 Fax: 033434 766-76 E-Mail: info@hertz-elektronik.de Internet: www.hertz-elektronik.
APAC_DispPort.book Page i Friday, June 10, 2011 1:52 PM Contents Important Safety Information . . . . . . . . . . . . . . . . . iii Product Safety and RF Exposure Compliance . . .iii Software Version . . . . . . . . . . . . . . . . . . . . . . . . . . . iii Option Board Part Number . . . . . . . . . . . . . . . . . . . iii Computer Software Copyrights . . . . . . . . . . . . . . . iv Getting Started . . . . . . . . . . . . . . . . . . . . . . . . . . . . . . 1 How to Use This User Guide . . . . . . . . .
Contents APAC_DispPort.book Page ii Friday, June 10, 2011 1:52 PM Dedicated Calls . . . . . . . . . . . . . . . . . . . . . . . . . . Manual Dialing . . . . . . . . . . . . . . . . . . . . . . . . . . Last Number Redial . . . . . . . . . . . . . . . . . . . . . . Keypad Edit . . . . . . . . . . . . . . . . . . . . . . . . . . . . . Contact List . . . . . . . . . . . . . . . . . . . . . . . . . . . . . Modifying the Contact List . . . . . . . . . . . . . . . . . . . To Add an Entry . . . . . . . . . . . .
APAC_DispPort.book Page iii Friday, June 10, 2011 1:52 PM Software Version Product Safety and RF Exposure Compliance All the features described in the following sections are supported by the radio's software version R01.08.20 or later. ! Caution Before using this product, read the operating instructions for safe usage contained in the Product Safety and RF Exposure booklet enclosed with your radio. Check with your dealer or system administrator for more details of all the features supported.
APAC_DispPort.book Page iv Friday, June 10, 2011 1:52 PM Computer Software Copyrights Computer Software Copyrights The Motorola products described in this manual may include copyrighted Motorola computer programs stored in semiconductor memories or other media. Laws in the United States and other countries preserve for Motorola certain exclusive rights for copyrighted computer programs including, but not limited to, the exclusive right to copy or reproduce in any form the copyrighted computer program.
APAC_DispPort.book Page 1 Friday, June 10, 2011 1:52 PM Getting Started How to Use This User Guide This User Guide covers only the functional operation of the MPT1327 Generic Option Board (GOB) installed in MOTOTRBO Portables. For the complete operation of the MOTOTRBO Portables, refer to the specific User Guides for each radio.
APAC_DispPort.book Page 2 Friday, June 10, 2011 1:52 PM Additional Performance Enhancement The following are some of the latest creations designed to enhnace the security, quality and efficiency of your radio. Preparing Your Radio for Use Tone Private Line (TPL) TPL prevents any channel or radio out of MPT system to disturb the transmission in MPT system. TPL code are embedded in the traffic channels to prevent noise when the radio is receiving TPL voice or data signals.
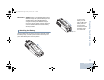
APAC_DispPort.book Page 3 Friday, June 10, 2011 1:52 PM To remove the battery, turn the radio off. Move the battery latch into unlock position and hold, and slide the battery down and off the rails. Attaching the Battery Battery Latch Align the battery with the rails on the back of the radio. Press the battery firmly, and slide upward until the latch snaps into place. Slide battery latch into lock position.
APAC_DispPort.book Page 4 Friday, June 10, 2011 1:52 PM Attaching the Antenna Preparing Your Radio for Use With the radio turned off, set the antenna in its receptacle and turn clockwise. Attaching the Belt Clip Align the grooves on the clip with those on the battery and press downward until you hear a click. To remove the clip, press the belt clip tab away from the battery using a key. Then slide the clip upward and away from the radio. To remove the antenna, turn the antenna counterclockwise.
APAC_DispPort.book Page 5 Friday, June 10, 2011 1:52 PM Attaching the Universal Connector Cover (Dust Cover) Cover (Dust Cover) Insert the hooked end of the cover into the slots above the universal connector. Press downward on the cover to seat the lower tab properly into the RF connector. Turn the thumbscrew clockwise to secure the connector cover to the radio. Replace the dust cover when the universal connector is not in use.
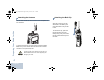
APAC_DispPort.book Page 6 Friday, June 10, 2011 1:52 PM To turn off the radio, rotate this knob counterclockwise until you hear a click. You see a brief Powering Down on the radio’s display. Adjusting the Volume Identifying Radio Controls To increase the volume, turn the On/Off/Volume Control Knob clockwise. To decrease the volume, turn this knob counterclockwise. NOTE: Your radio can be programmed to have a minimum volume offset where the volume level cannot be turned down fully.
APAC_DispPort.book Page 7 Friday, June 10, 2011 1:52 PM Radio Controls 5 Push-to-Talk (PTT) Button 17 6 Side Button 2* 2 16 15 3 4 14 5 13 6 12 7 11 1 Channel Selector Knob 2 On/Off/Volume Control Knob 8 Front Button P1* 9 Microphone 10 Speaker 11 Front Button P2* 12 Keypad 13 Menu Navigation Keys 8 9 7 Side Button 3* 10 14 Universal Connector for Accessories Identifying Radio Controls 1 4 Side Button 1* 15 Display 16 Emergency Button* 17 Antenna * These buttons are programmable.
APAC_DispPort.book Page 8 Friday, June 10, 2011 1:52 PM Programmable Buttons The Customer Programming Software (CPS) can program the programmable buttons as shortcuts to radio functions or preset channels/groups depending on the duration of a button press: • Short press – Pressing and releasing rapidly (between 0.05 and 0.75 second). Identifying Radio Controls • Long press – Pressing and holding for the programmed duration (between 1.00 second and 3.75 seconds).
APAC_DispPort.book Page 9 Friday, June 10, 2011 1:52 PM Accessing the Programmed Functions • A short or long press of the relevant programmable buttons. OR • Use the Menu Navigation Buttons as follows: 1 To access the menu, press S. Press the appropriate Menu Scroll button (Por Q) to access the menu functions. 2 To select a function or enter a sub-menu, press N. 3 To go back one menu level, or to return to the previous screen, press R.
APAC_DispPort.book Page 10 Friday, June 10, 2011 1:52 PM Using the Keypad You can use the 3 x 4 alphanumeric keypad to access your radio’s features. You can use the keypad to enter subscriber aliases or IDs, and text messages. Many characters require that you press a key multiple times. The table below shows the number of times a key needs to be pressed to generate the required character. This table is only applicable for a radio that does not support Simplified Chinese.
APAC_DispPort.book Page 11 Friday, June 10, 2011 1:52 PM Number of Times Key is Pressed Key 1 2 3 4 5 6 7 8 9 10 11 12 13 14 15 1 2 3 4 5 6 7 8 9 0 * # . 1 ? ! , @ - & : “ ( ) ‘ % $ A B C 2 D E F 3 G H I 4 J K L 5 M N O 6 P Q R S T U V 8 W X Y Z 9 + - 0 X * / = > < # * or del # or space 7 Identifying Radio Controls This table is only applicable for a radio that supports Simplified Chinese.
APAC_DispPort.book Page 12 Friday, June 10, 2011 1:52 PM Identifying Status Indicators Identifying Status Indicators Your radio indicates its operational status through the following: Display Icons. . . . . . . . . . . . . . . . . . . . . . . . . . . . . . . . page 12 LED Indicators. . . . . . . . . . . . . . . . . . . . . . . . . . . . . . . page 14 Audio Tones . . . . . . . . . . . . . . . . . . . . . . . . . . . . . . . . page 14 Indicator Tones . . . . . . . . . . . . . . . . . . . . . . . . . . . .
APAC_DispPort.book Page 13 Friday, June 10, 2011 1:52 PM Power Level Radio is set at Low power. Radio is set at High power. Registered Indicates that Control Channel is acquired. Repeater/Talkaround Indicates that background hunt is running. Scan Indicates that scanning for a control channel is in progress. Battery Level Indicates the remaining charge in the battery. Blinks when the battery is low. Option Board The Option Board is enabled. Option Board Non-Function The Option Board is disabled.
APAC_DispPort.book Page 14 Friday, June 10, 2011 1:52 PM LED Indicators The LED indicator shows the operational status of your radio. LED Indicator Audio Tones Alert tones provide you with audible indications of the radio’s status or the radio’s response to data received. Continuous Tone A monotone sound. Sounds continuously until termination. Identifying Status Indicators Repetitive Tone A single tone that repeats itself until it is terminated by the user.
APAC_DispPort.book Page 15 Friday, June 10, 2011 1:52 PM MPT Personalities and Radio Zones The personalities described below are programmed into your radio by your dealer and are accessible either via the personality button or via the menu. An MPT personality contains data such as frequencies, display text, alert tones, permitted calls etc. which determines the mode of operation of your radio. Your radio may be programmed with up to 4 different MPT personalities.
APAC_DispPort.book Page 16 Friday, June 10, 2011 1:52 PM Personality Selection Fixed and Dynamic Groups MPT Personalities and Radio Zones These groups form part of the Talkgroup Personality, such that when this personality is selected your talkgroup list shows only these groups. A fixed group is a group of users, the address (number) of which is preprogrammed into your radio by your dealer. The Personality menu provides access to all MPT personalities and radio defined zones.
APAC_DispPort.book Page 17 Friday, June 10, 2011 1:52 PM Zone Selection Selecting a Personality in Non-MPT Mode 1 Press S to enter Menu Mode. 2 Press Por Q until Zone. 3 Press N to select Zone. A zone is a group of channels. Your radio supports up to 250 zones, with a maximum of 16 channels and Capacity Plus personalities per zone. Use the following procedure to switch from an MPT personality to a zone in non-MPT mode. 4 Display shows current zone e.g. Zone 1.
APAC_DispPort.book Page 18 Friday, June 10, 2011 1:52 PM Radio Calls Once you understand how your MOTOTRBO Portable is configured, you are ready to use your radio. Radio Calls Use this navigation guide to familiarize yourself with the basic Call features: Making a Call . . . . . . . . . . . . . . . . . . . . . . . . . . . . . . . page 18 Ending a Call. . . . . . . . . . . . . . . . . . . . . . . . . . . . . . . . page 22 Cancelling a Call . . . . . . . . . . . . . . . . . . . . . . . . . . . . .
APAC_DispPort.book Page 19 Friday, June 10, 2011 1:52 PM Last Number Redial Dedicated calls can be made from either a preprogrammed button or using the speed-dial feature from the keypad. The last number dialed by the radio is stored in the memory of the radio. Press the Dedicated Call button to make a call to the most commonly used preprogrammed number. The display shows Calling.
APAC_DispPort.book Page 20 Friday, June 10, 2011 1:52 PM If the radio is displaying a Contact List number, a Keypad Dialed number, Status number or Missed Call number, the last digit may be deleted by: The contact list can be entered directly by one click of the Channel Selector Knob when the radio is in IDLE STATE. Use the Channel Selector Knob or the menu navigation buttons to scroll through the list. Then select the required name or number as indicated in step 5 below.
APAC_DispPort.book Page 21 Friday, June 10, 2011 1:52 PM Modifying the Contact List • Add an entry • Delete an entry • Edit an existing entry 2 Press Por Q until Delete Contact. 3 Press N to select Delete Contact. The display shows Alias 1. 4 Press Por Q until you see the entry you want to delete. The display shows Alias 2. To Add an Entry 1 Press S to enter Menu Mode. 5 Press N to select the entry. The display shows Delete?. 2 Press Por Q until Add Contact. 6 Press N to delete selected entry.
APAC_DispPort.book Page 22 Friday, June 10, 2011 1:52 PM 7 Press N to store edited/new alias. The display shows Ending a Call 0123456789. 8 Edit the number or delete and enter a new number. Use P to delete the last digit and R to delete entire entry. 9 Press N to store edited entry. The display returns to Alias 3. To Search for an Entry When in Contact List or Delete Contact menu, search for an alias (name) by entering characters from the keypad. Procedure: 1 Enter up to 3 characters.
APAC_DispPort.book Page 23 Friday, June 10, 2011 1:52 PM Receiving a Call on an OACSU System 1 A repetitive tone sounds. The display shows Alerted. 2 A momentary tone sounds. The display shows Call Type. Receiving a Call on a FOACSU System When the radio is called: 1 The ring tone sounds. The display shows Alerted. 2 Press the PTT button to accept call (unless in talkgroup personality, when radio unmutes automatically for fixed and dynamic group calls). 3 A repetitive tone sounds.
APAC_DispPort.book Page 24 Friday, June 10, 2011 1:52 PM 4 First call in list, the display shows Alpha Alias or the radio number. 5 Press Por Q to scroll list. NOTE: In the Missed Calls list some alpha alias/numbers may contain a suffix S that indicates a status message associated with the call. Examples of Missed Calls List The display shows Reception S, where S is a status message associated with the call. 1 Press S, the display shows message e.g. On Break.
APAC_DispPort.book Page 25 Friday, June 10, 2011 1:52 PM Call Diversion 1 Press ZGD from your radio. 2 Press ZGG from another radio. To initiate call diversion when the radio is in IDLE STATE: 1 Press ZGDZ to divert all calls OR Press ZGGZ 2 Press ZGDDZ to divert speech calls only OR Press ZGGDZ 3 Press ZGDEZ to divert status calls only OR ZGGEZ 4 Enter ID of radio to which you are diverting to. 5 Press [ to complete call diversion.
APAC_DispPort.book Page 26 Friday, June 10, 2011 1:52 PM Special Calls Use this guide to familiarize yourself with the special call features: Short Data Messages (SDM) . . . . . . . . . . . . . . . . . . . page 26 Status Calls . . . . . . . . . . . . . . . . . . . . . . . . . . . . . . . . . page 29 Emergency Calls . . . . . . . . . . . . . . . . . . . . . . . . . . . . . page 30 Priority Calls . . . . . . . . . . . . . . . . . . . . . . . . . . . . . . . . page 31 Broadcast Calls . . . . . . . . . . . . .
APAC_DispPort.book Page 27 Friday, June 10, 2011 1:52 PM Procedure: To view the calls in the list via the menu: 2 Press Por Q until Data Calls. 3 Press N to select Data Calls. 4 First call in list shows Alpha Alias or Number. 5 Press Por Q to scroll list. The display shows Alpha Alias or Number. 6 Press N or Q to read selected message. The display shows Call 8116. 7 Press Q or R to return to the Data Calls list at the end of the message.
APAC_DispPort.book Page 28 Friday, June 10, 2011 1:52 PM Making an SDM Call SDM Calls may be initiated in two different ways: • via the keypad using a Call modifier • via the Contact List NOTE: The maximum data message size is limited to 20 characters which includes address information and data selection characters. Data entered via the data button or call modifier methods may be alphanumeric characters entered from the keypad.
APAC_DispPort.book Page 29 Friday, June 10, 2011 1:52 PM Status Calls 3 Press N to select Status. 4 Press Por Q until display shows Status Message e.g. On Break. Making a Status Call Status Calls may be initiated in two different ways: 5 Press S until display shows Status Number e.g. Status 04. • via the keypad using a Call modifier 6 Press N to select. The display shows Status 04. • via the Menu 7 The display shows for 10 seconds Select Contact.
APAC_DispPort.book Page 30 Friday, June 10, 2011 1:52 PM Receiving a Status Call You radio receives a Status Call when: 1 A momentary tone sounds. 2 The display alternates every 2 seconds between: Status 04 OR On Break AND Alias/Number where Status Messages “04”/”On Break” are examples. Special Calls NOTE: Status number (04) is only displayed if associated message is not programmed into your radio. Alias/ Number is the name or number of the calling radio.
APAC_DispPort.book Page 31 Friday, June 10, 2011 1:52 PM A repetitive tone OR ring tone sounds and the display shows Emergency. Priority Calls A priority call allows you to gain priority over other users of the system when requesting a call. Procedure: To initiate a priority call: Broadcast Calls A broadcast call allows you to make calls to groups of radios. Note that on a broadcast call only the calling radio can talk and there is no indication that any radios in the group have received the call.
APAC_DispPort.book Page 32 Friday, June 10, 2011 1:52 PM Call Progress Use this guide to familiarize yourself with the call progress and call types: Sending a Call. . . . . . . . . . . . . . . . . . . . . . . . . . . . . . . page 32 Receiving a Call . . . . . . . . . . . . . . . . . . . . . . . . . . . . . page 33 Cancelling a Call . . . . . . . . . . . . . . . . . . . . . . . . . . . . . page 33 Ending a Call. . . . . . . . . . . . . . . . . . . . . . . . . . . . . . . .
APAC_DispPort.book Page 33 Friday, June 10, 2011 1:52 PM Receiving a Call Cancelling a Call Description Display Description Alerted A call is being received on OACSU Cancelling Call successfully canceled by user Alerted A call is being received on FOACSU.
MOTOROLA, MOTO, MOTOROLA SOLUTIONS and the Stylized M logo are trademarks or registered trademarks of Motorola Trademark Holdings, LLC and are used under license. All other trademarks are the property of their respective owners. © 2011 Motorola Solutions, Inc. All rights reserved. June 2011. www.motorola.